← samimirash.com
007 FIRST LIGHT
Spoiler-free 100% completion: campaign, collectibles, challenges, gadgets, wardrobe, TacSim, and completion records · 30 areas · 460 tracked items
This page shows everything, including exact locations.
It exists so you can search for one specific collectible and find it.
If you are playing blind, use the
interactive spoiler-free version instead, it hides
locations until you ask for them, one item at a time.
Open the spoiler-free interactive guide
Completion Planner
You are here when: The profile screen, Chapter Select menu, Journal, and gadget loadout screen before a replay.
Checkpoint replay prevents permanent content loss, but the single-autosave model and delayed registration justify a separate safety profile.
Single-Autosave Safety
Run plan
HintUse a separate profile before major cleanup passes.
WhereThe campaign uses one autosave per profile, while additional profile slots preserve independent runs.
Full detailBefore a major campaign transition or the last item of a collectible family, leave the active profile untouched and copy the local PC save directory or begin the safety run in another profile slot. Checkpoint replay handles ordinary misses, but a backup protects against delayed collection registration.
Collectible Gadget Loadout
Run plan
HintLater tools reveal or open routes that early exploration cannot finish.
WhereFor collectible cleanup, carry the yellow-scan watch function, Dart Phone, and Laser Strap.
Full detailThe watch scan arrives automatically in the gadget workshop and highlights nearby interactables. The Dart Phone opens distraction and pickpocket routes, while the later Laser Strap breaks specified locks, cabinets, vents, and glass. If checkpoint replay supplies the wrong tools, replay from the preceding gadget-lab section and keep that loadout into the target area.
Challenge Registration
Run plan
HintOpen the Journal before and after each focused attempt.
WhereChallenge progress requires an online connection and normally saves after its condition or checkpoint boundary registers.
Full detailStay connected, pin one or two compatible Journal entries, satisfy them, and wait for their completion marks before leaving. You may then exit or select another checkpoint; a full area replay is usually unnecessary. If a valid attempt fails to register, restart from the checkpoint before the challenge window rather than reloading inside it.
Against the Odds
You are here when: The frozen deployment camp with machinery, stacked containers, and elevated ziplines.
Finish the visible route once, then use checkpoint replay for collectibles and mutually exclusive Journal approaches.
Area Completion
Story completion
HintFollow the current objective markers and explore at your own pace.
WhereComplete every checkpoint currently listed for this area in Chapter Select.
Full detailReach the area-complete transition on any difficulty. Its checkpoints remain replayable, so collection and Journal cleanup can be handled later without restarting the campaign.
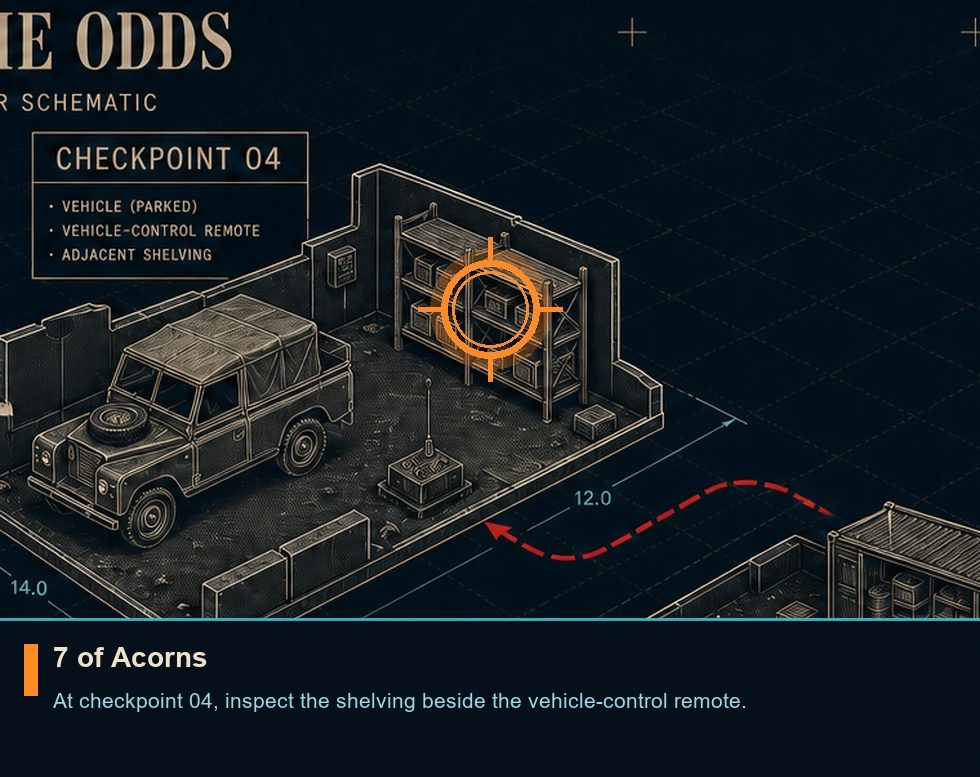
7 of Acorns
Playing card
HintUse the watch scan during quieter exploration and inspect side rooms before following the main route.
WhereAt checkpoint 04, inspect the shelving beside the vehicle-control remote.
Full detailLoad checkpoint 04. At the parked vehicle, face the control remote and collect the card from the adjacent shelving. The pickup saves immediately.
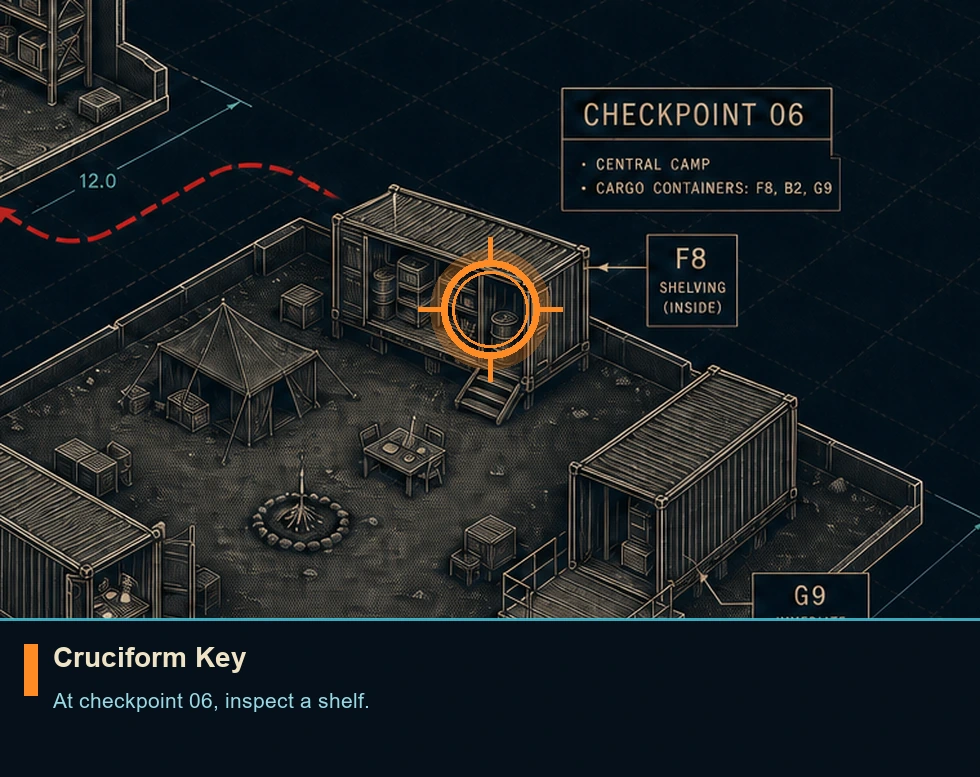
Cruciform Key
Legacy item
HintUse the watch scan during quieter exploration and inspect side rooms before following the main route.
WhereAt checkpoint 06, inspect a shelf.
Full detailLoad checkpoint 06. Drop into the central camp, enter container F8, and inspect the shelving inside. The key saves immediately when collected.
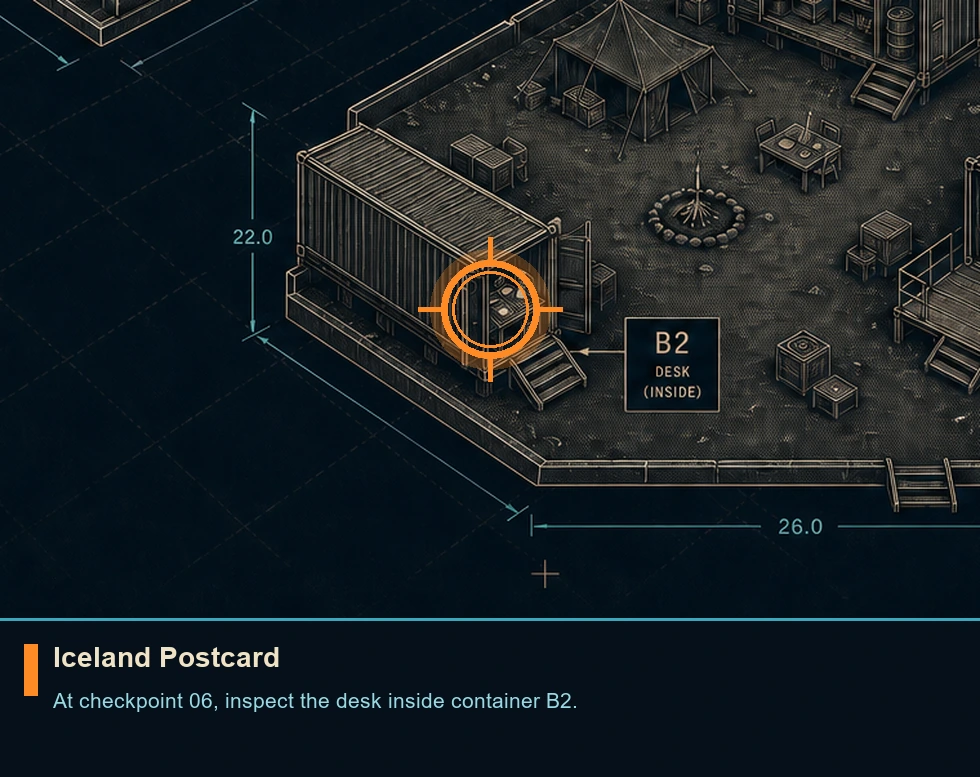
Iceland Postcard
Postcard
HintUse the watch scan during quieter exploration and inspect side rooms before following the main route.
WhereAt checkpoint 06, inspect the desk inside container B2.
Full detailLoad checkpoint 06. From container F8, turn right and enter B2. Subdue or distract the guard at the desk, then collect the postcard from that desk. The pickup saves immediately.
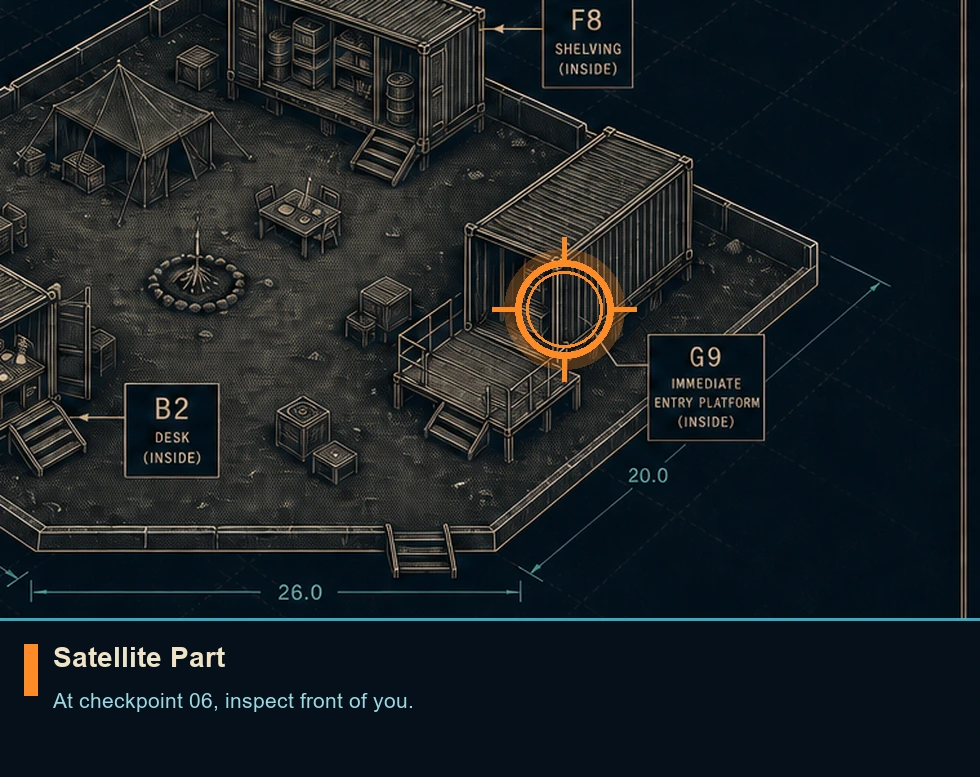
Satellite Part
Memento
HintUse the watch scan during quieter exploration and inspect side rooms before following the main route.
WhereAt checkpoint 06, inspect front of you.
Full detailLoad checkpoint 06. As soon as you access container G9 (marked route) this will be in front of you. The pickup saves immediately; once its new-item notice appears, checkpoint completion is not required.
Completionist: Against The Odds
Mission challenge
HintPin this Journal entry and give it a focused attempt instead of combining incompatible routes.
WhereOpen this area's Journal challenge list and track the umbrella entry.
Full detailClear every challenge in this area. Finish every Journal inspect the area. Confirm the Journal mark appears before changing to another checkpoint.
Pacifist: Against The Odds
Mission challenge
HintPin this Journal entry and give it a focused attempt instead of combining incompatible routes.
WhereOpen this area's Journal challenge list and track the umbrella entry.
Full detailFinish every component Journal check displayed beneath this umbrella entry. Plan your route carefully and keep clear of unnecessary takedowns. Confirm the Journal mark appears before changing to another checkpoint.
Ghost: Against The Odds
Mission challenge
HintPin this Journal entry and give it a focused attempt instead of combining incompatible routes.
WhereOpen this area's Journal challenge list and track the umbrella entry.
Full detailFinish every component Journal check displayed beneath this umbrella entry. Remain crouched, use cover, and watch enemy patrols. Confirm the Journal mark appears before changing to another checkpoint.
Assault: Against The Odds
Mission challenge
HintPin this Journal entry and give it a focused attempt instead of combining incompatible routes.
WhereOpen this area's Journal challenge list and track the umbrella entry.
Full detailComplete every component listed beneath this umbrella record. Use fast, controlled engagements and prevent isolated groups from triggering an alarm; verify the umbrella record after its final component fills.
No Help Needed
Mission challenge
HintPin this Journal entry and give it a focused attempt instead of combining incompatible routes.
WhereStart from checkpoint 3; open the Journal and track this entry.
Full detailGo through the central camp without with any distractions. Remain low and keep clear of with distraction gadgets or environmental distractions. Confirm the Journal mark appears before changing to another checkpoint.
Full Of Surprises
Mission challenge
HintPin this Journal entry and give it a focused attempt instead of combining incompatible routes.
WhereStart from checkpoint 3; open the Journal and track this entry.
Full detailCreate both vehicle distractions: trigger the BT65 control console, then tamper with the nearby ATV's brakes. Do this on a different attempt from No Help Needed and verify the record before restarting.
00 To Become
Mission challenge
HintPin this Journal entry and give it a focused attempt instead of combining incompatible routes.
WhereStart from checkpoint 3; open the Journal and track this entry.
Full detailSilently incapacitate seven soldiers in the central camp without being seen. Separate patrols, perform one takedown at a time, and check the Journal counter before leaving.
High Ground
Mission challenge
HintPin this Journal entry and give it a focused attempt instead of combining incompatible routes.
WhereStart from checkpoint 3; open the Journal and track this entry.
Full detailPerform three aerial takedowns on soldiers in the central camp. Stay on the cliff paths and zipline platforms to approach from above, then verify that all three counted.
Scenic Route
Mission challenge
HintPin this Journal entry and give it a focused attempt instead of combining incompatible routes.
WhereStart from checkpoint 3; open the Journal and track this entry.
Full detailRide the central camp's zipline. Climb through building F8 to its upper launch point, take the line overlooking G9, and wait for the Journal record to register.
In His Majesty’s Secret Service
You are here when: The secure office-and-briefing interior reached after the frozen camp.
Finish the visible route once, then use checkpoint replay for collectibles and mutually exclusive Journal approaches.
Area Completion
Story completion
HintFollow the current objective markers and explore at your own pace.
WhereComplete every checkpoint currently listed for this area in Chapter Select.
Full detailReach the area-complete transition on any difficulty. Its checkpoints remain replayable, so collection and Journal cleanup can be handled later without restarting the campaign.
The Needle’s Eye
You are here when: The sunlit coastal training ground with marked firing and movement stations.
Finish the visible route once, then use checkpoint replay for collectibles and mutually exclusive Journal approaches.
Area Completion
Story completion
HintFollow the current objective markers and explore at your own pace.
WhereComplete every checkpoint currently listed for this area in Chapter Select.
Full detailReach the area-complete transition on any difficulty. Its checkpoints remain replayable, so collection and Journal cleanup can be handled later without restarting the campaign.
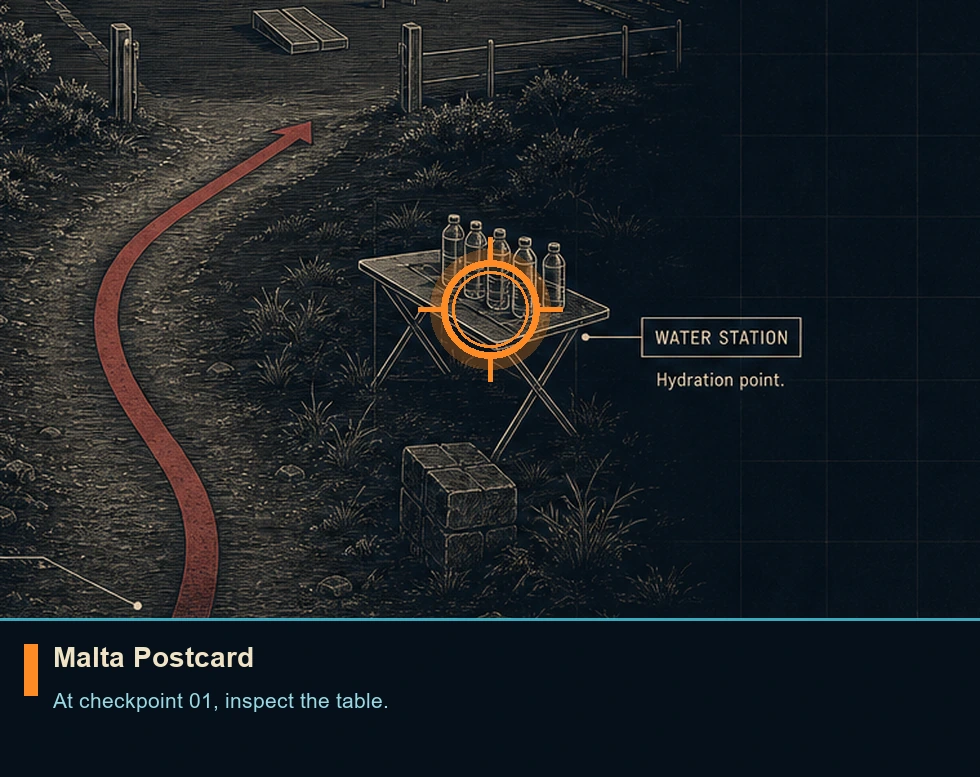
Malta Postcard
Postcard
HintUse the watch scan during quieter exploration and inspect side rooms before following the main route.
WhereAt checkpoint 01, inspect the table.
Full detailLoad checkpoint 01. When movement resumes, walk toward the training ground and inspect the small folding table with water bottles on the right. The pickup saves immediately.
The Heart of the Matter
You are here when: The gadget workshop filled with test bays, workbenches, and a vehicle chamber.
Finish the visible route once, then use checkpoint replay for collectibles and mutually exclusive Journal approaches.
Area Completion
Story completion
HintFollow the current objective markers and explore at your own pace.
WhereComplete every checkpoint currently listed for this area in Chapter Select.
Full detailReach the area-complete transition on any difficulty. Its checkpoints remain replayable, so collection and Journal cleanup can be handled later without restarting the campaign.
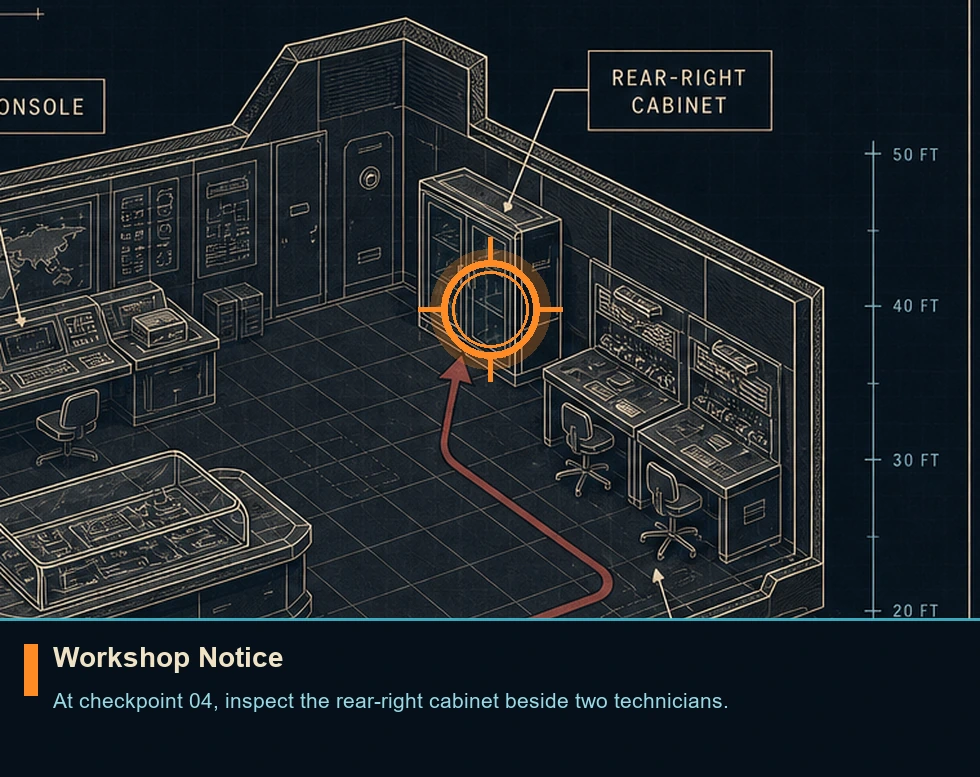
Workshop Notice
Intel file
HintUse the watch scan during quieter exploration and inspect side rooms before following the main route.
WhereAt checkpoint 04, inspect the rear-right cabinet beside two technicians.
Full detailLoad checkpoint 04. Enter the gadget lab and continue to its rear-right corner. The notice rests on the cabinet beside the two technicians. The pickup saves immediately.
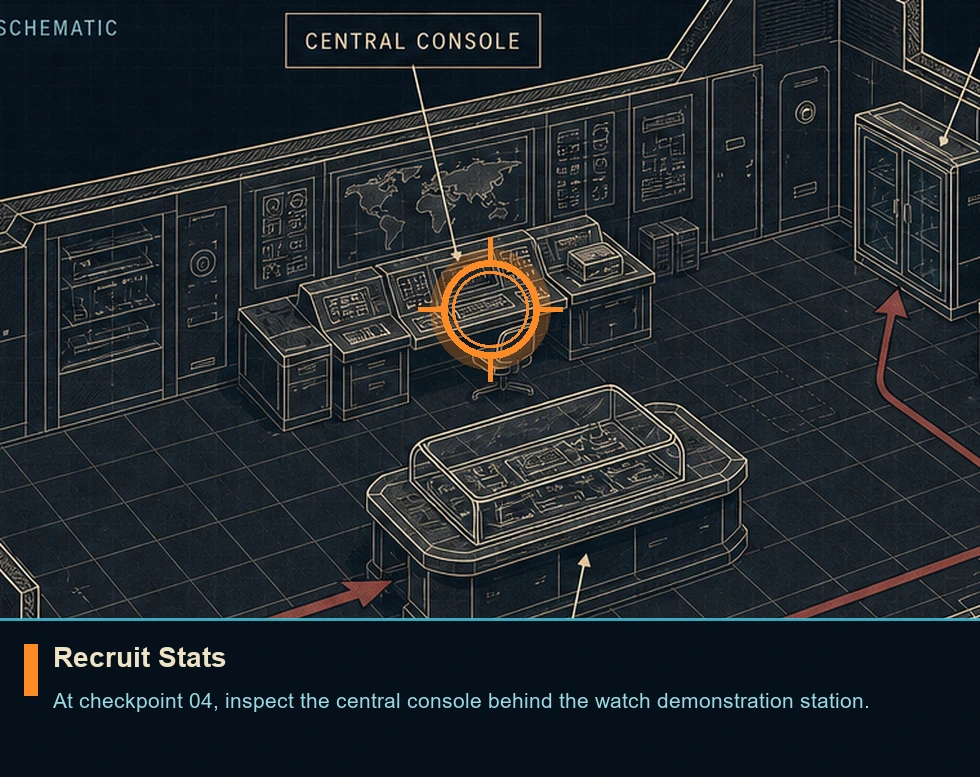
Recruit Stats
Intel file
HintUse the watch scan during quieter exploration and inspect side rooms before following the main route.
WhereAt checkpoint 04, inspect the central console behind the watch demonstration station.
Full detailLoad checkpoint 04. Complete the watch-scanner demonstration, then turn back to the console behind that station. Interact with its screen to register the file; it cannot be used before the demonstration. The pickup saves immediately.
A New Home
You are here when: The townhouse interior followed by an outdoor training compound with platforms and a flag route.
Finish the visible route once, then use checkpoint replay for collectibles and mutually exclusive Journal approaches.
Area Completion
Story completion
HintFollow the current objective markers and explore at your own pace.
WhereComplete every checkpoint currently listed for this area in Chapter Select.
Full detailReach the area-complete transition on any difficulty. Its checkpoints remain replayable, so collection and Journal cleanup can be handled later without restarting the campaign.
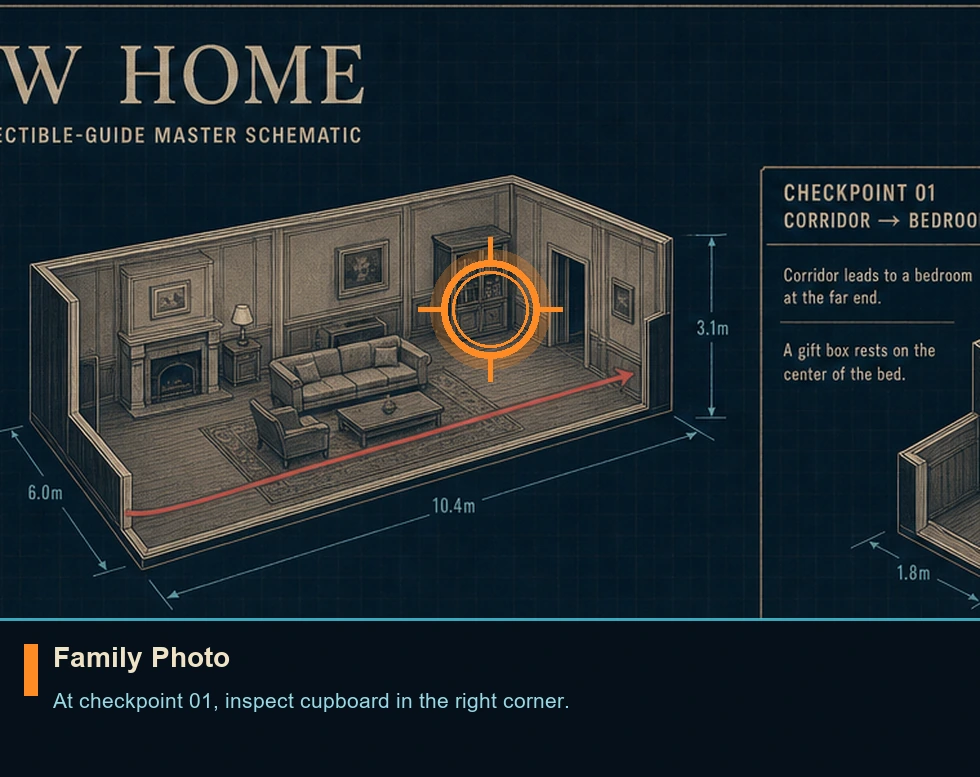
Family Photo
Intel file
HintUse the watch scan during quieter exploration and inspect side rooms before following the main route.
WhereAt checkpoint 01, inspect cupboard in the right corner.
Full detailLoad checkpoint 01. Walk into the living room and inspect the cabinet in the far-right corner. The photograph is on top and saves immediately.
Dress Box
Intel file
HintUse the watch scan during quieter exploration and inspect side rooms before following the main route.
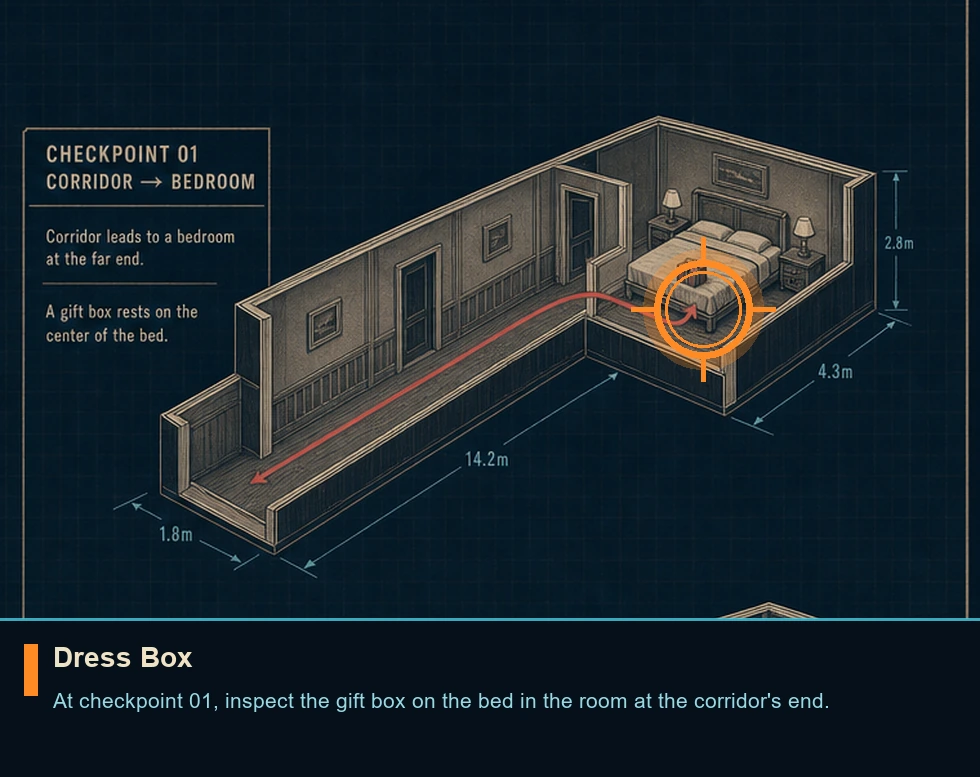
WhereAt checkpoint 01, inspect the gift box on the bed in the room at the corridor's end.
Full detailLoad checkpoint 01. Follow the corridor to its final bedroom and interact with the gift box placed on the bed. The pickup saves immediately.
Under of Acorns
Playing card
HintUse the watch scan during quieter exploration and inspect side rooms before following the main route.
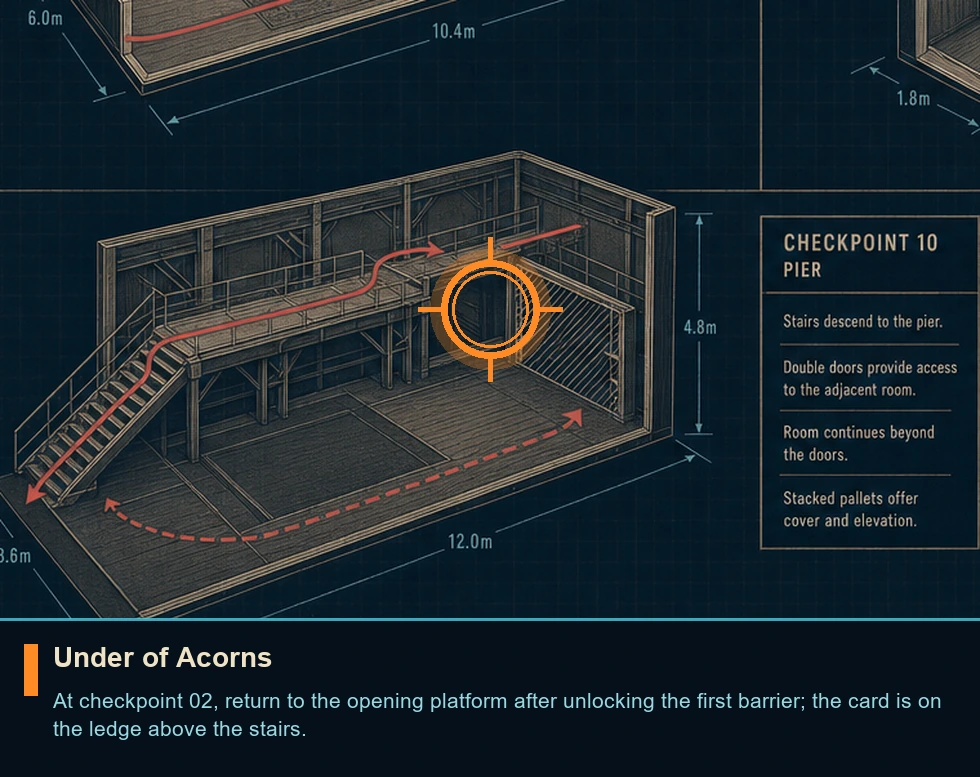
WhereAt checkpoint 02, return to the opening platform after unlocking the first barrier; the card is on the ledge above the stairs.
Full detailLoad checkpoint 02. Advance until the first hackable barrier is open, then backtrack to the initial training platform. Climb the stairs and take the card from the ledge directly ahead; that platform is inaccessible before the barrier opens. The pickup saves immediately.
7 of Roses
Playing card
HintUse the watch scan during quieter exploration and inspect side rooms before following the main route.
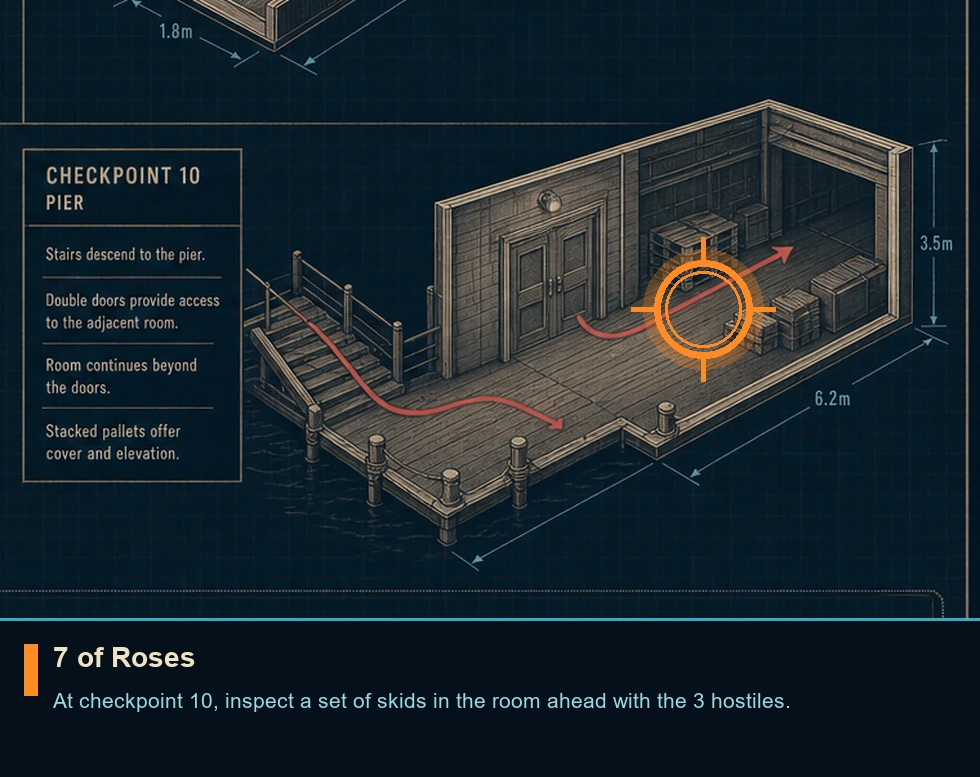
WhereAt checkpoint 10, inspect a set of skids in the room ahead with the 3 hostiles.
Full detailLoad checkpoint 10. Descend to the pier and open the double doors beside the stairs, either by forcing them or taking the nearby guard's key. In the room beyond, clear or bypass the three guards and inspect the stacked pallets. The card saves immediately when collected.
Completionist: A New Home
Mission challenge
HintPin this Journal entry and give it a focused attempt instead of combining incompatible routes.
WhereOpen this area's Journal challenge list and track the umbrella entry.
Full detailClear every challenge in this area. Finish every Journal inspect the area. Confirm the Journal mark appears before changing to another checkpoint.
Pacifist: A New Home
Mission challenge
HintPin this Journal entry and give it a focused attempt instead of combining incompatible routes.
WhereOpen this area's Journal challenge list and track the umbrella entry.
Full detailFinish every component Journal check displayed beneath this umbrella entry. Finish both pacifist challenges. Confirm the Journal mark appears before changing to another checkpoint.
Ghost: A New Home
Mission challenge
HintPin this Journal entry and give it a focused attempt instead of combining incompatible routes.
WhereOpen this area's Journal challenge list and track the umbrella entry.
Full detailFinish every component Journal check displayed beneath this umbrella entry. Finish both stealth challenges without detection. Confirm the Journal mark appears before changing to another checkpoint.
Assault: A New Home
Mission challenge
HintPin this Journal entry and give it a focused attempt instead of combining incompatible routes.
WhereOpen this area's Journal challenge list and track the umbrella entry.
Full detailFinish every component Journal check displayed beneath this umbrella entry. Finish both combat-focused challenges. Confirm the Journal mark appears before changing to another checkpoint.
Mr Mnemonic
Mission challenge
HintPin this Journal entry and give it a focused attempt instead of combining incompatible routes.
WhereStart from checkpoint 1; open the Journal and track this entry.
Full detailCorrectly answer the instructor's memory game. Correct answer: Umbrella and Crown. Confirm the Journal mark appears before changing to another checkpoint.
Something To Prove
Mission challenge
HintPin this Journal entry and give it a focused attempt instead of combining incompatible routes.
WhereStart from checkpoint 2; open the Journal and track this entry.
Full detailComplete the area without incapacitating any soldier. Stay in cover, bypass every patrol, and confirm the Journal mark before changing checkpoints.
Cressida's Way
Mission challenge
HintPin this Journal entry and give it a focused attempt instead of combining incompatible routes.
WhereStart from checkpoint 2; open the Journal and track this entry.
Full detailComplete the area from beginning to end without detection. Stay low, move between covered positions only when patrols turn away, and inspect the Journal at the endpoint.
Monroe's Way
Mission challenge
HintPin this Journal entry and give it a focused attempt instead of combining incompatible routes.
WhereStart from checkpoint 2; open the Journal and track this entry.
Full detailSubdue every enemy in the simulation run. Clear the level methodically, eliminating every opponent. Confirm the Journal mark appears before changing to another checkpoint.
Spinning A Yarn
Mission challenge
HintPin this Journal entry and give it a focused attempt instead of combining incompatible routes.
WhereStart from checkpoint 3; open the Journal and track this entry.
Full detailSelect the lie response at every polygraph prompt. Do not mix in a truthful answer, and verify the Journal record after the questioning sequence finishes.
White Flag
Mission challenge
HintPin this Journal entry and give it a focused attempt instead of combining incompatible routes.
WhereStart from checkpoint 4; open the Journal and track this entry.
Full detailReach the flag without incapacitating any soldier. Use cover and timing throughout the route, then verify the Journal mark before restarting or changing checkpoints.
Always Do The Unexpected
Mission challenge
HintPin this Journal entry and give it a focused attempt instead of combining incompatible routes.
WhereStart from checkpoint 4; open the Journal and track this entry.
Full detailReach the flag without causing an alert. Take the raised catwalk path, time the railing vault between patrol views, and climb the final ladder while unseen; check the Journal afterward.
Party Crasher
Mission challenge
HintPin this Journal entry and give it a focused attempt instead of combining incompatible routes.
WhereStart from checkpoint 4; open the Journal and track this entry.
Full detailSubdue every enemy before reaching the flag. Take out hostiles in small groups to keep clear of alerting everyone. Confirm the Journal mark appears before changing to another checkpoint.
A Night Out
You are here when: The crowded nightclub containing a bar, dance floor, backstage scaffolding, and upper lounge.
Finish the visible route once, then use checkpoint replay for collectibles and mutually exclusive Journal approaches.
Area Completion
Story completion
HintFollow the current objective markers and explore at your own pace.
WhereComplete every checkpoint currently listed for this area in Chapter Select.
Full detailReach the area-complete transition on any difficulty. Its checkpoints remain replayable, so collection and Journal cleanup can be handled later without restarting the campaign.
Cocktail Napkin
Memento
HintUse the watch scan during quieter exploration and inspect side rooms before following the main route.
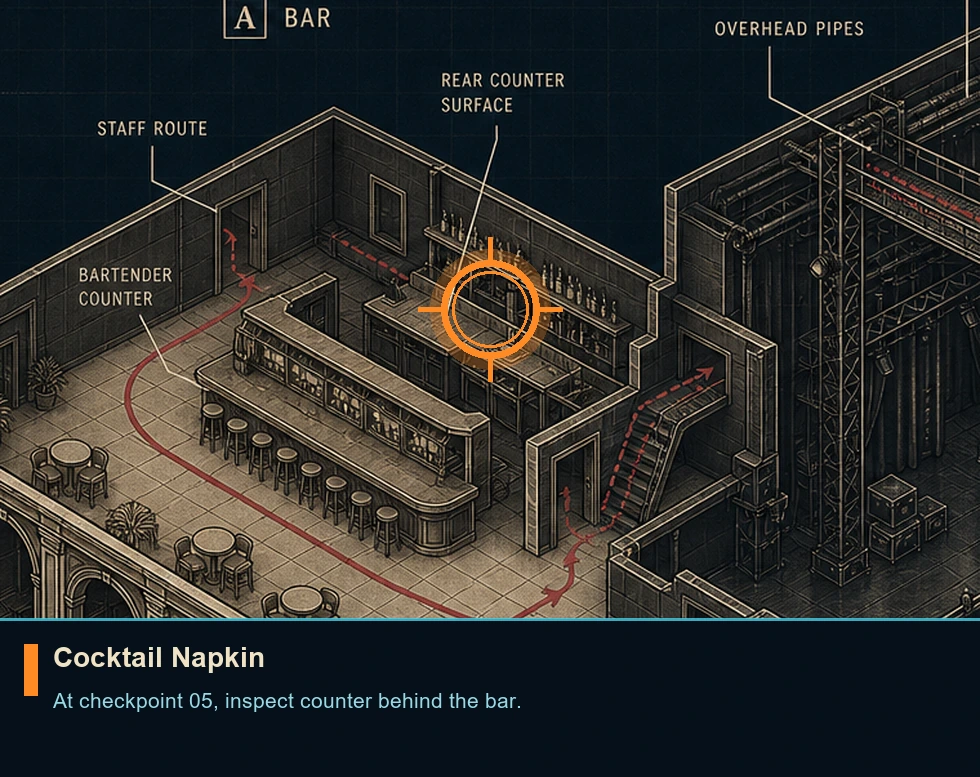
WhereAt checkpoint 05, inspect counter behind the bar.
Full detailLoad checkpoint 05. The napkin is on the counter behind the bar along the staff route. Enter by successfully bluffing your way past the restriction, or distract the bartender with the Dart Phone and slip behind the counter. The pickup saves immediately.
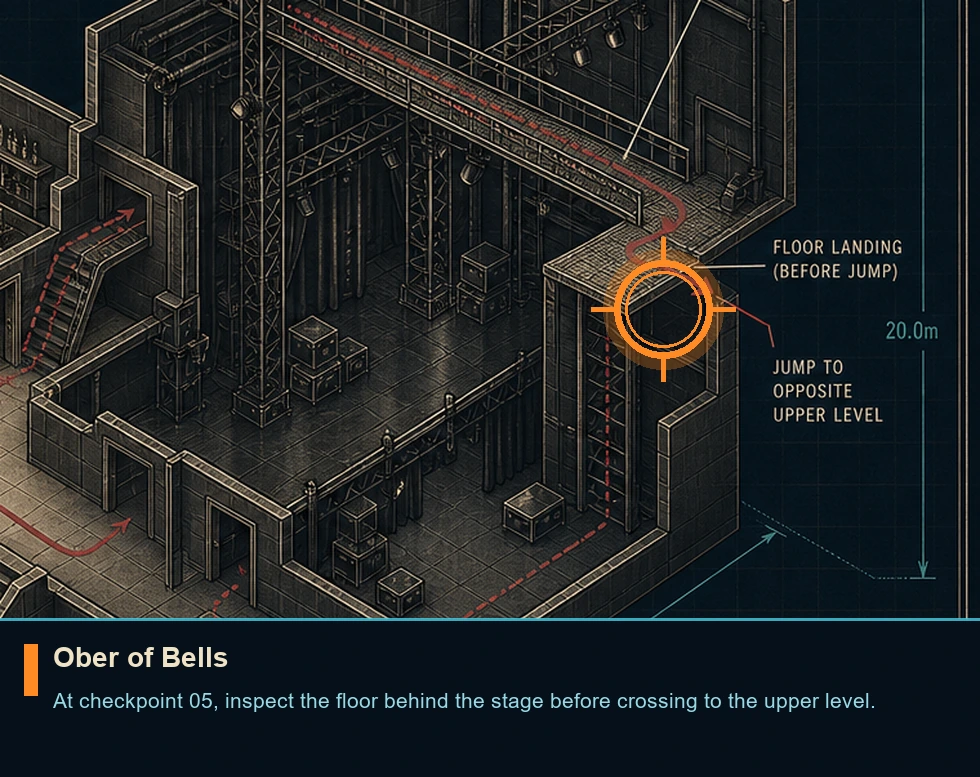
Ober of Bells
Playing card
HintUse the watch scan during quieter exploration and inspect side rooms before following the main route.
WhereAt checkpoint 05, inspect the floor behind the stage before crossing to the upper level.
Full detailLoad checkpoint 05. Go behind the stage, climb the backstage scaffolding, and cross the overhead pipes. Take the card from the floor immediately before the jump to the opposite upper level. The pickup saves immediately.
A Matter of Considerable Delicacy
You are here when: The gadget-testing rooms, elevator, and open-plan operations floor.
Finish the visible route once, then use checkpoint replay for collectibles and mutually exclusive Journal approaches.
Area Completion
Story completion
HintFollow the current objective markers and explore at your own pace.
WhereComplete every checkpoint currently listed for this area in Chapter Select.
Full detailReach the area-complete transition on any difficulty. Its checkpoints remain replayable, so collection and Journal cleanup can be handled later without restarting the campaign.
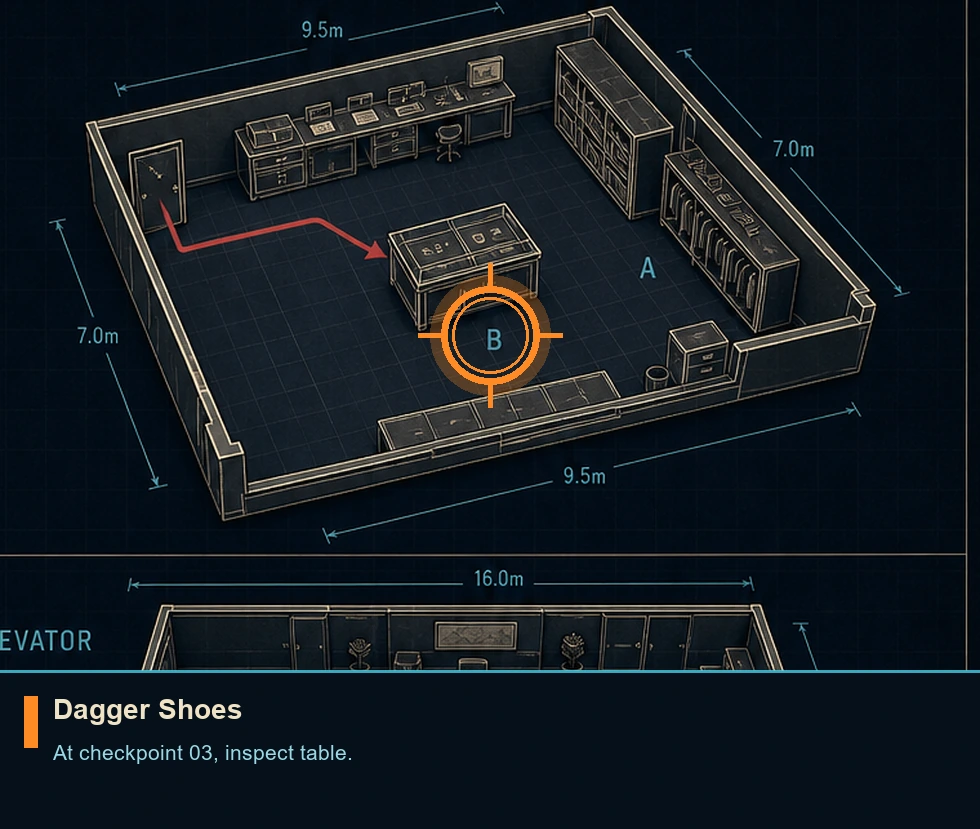
Dagger Shoes
Legacy item
HintUse the watch scan during quieter exploration and inspect side rooms before following the main route.
WhereAt checkpoint 03, inspect table.
Full detailLoad checkpoint 03. In the gadget lab, enter the wearables bay on the right. After its required interaction, collect the shoes from the display table. The pickup saves immediately.
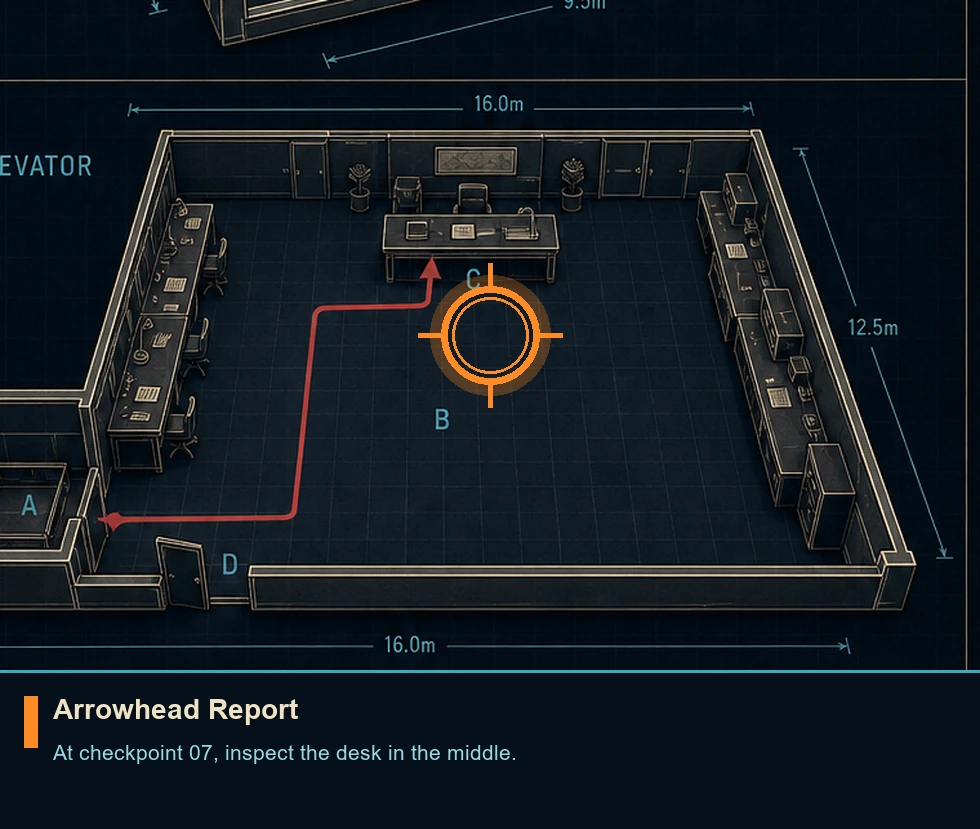
Arrowhead Report
Intel file
HintUse the watch scan during quieter exploration and inspect side rooms before following the main route.
WhereAt checkpoint 07, inspect the desk in the middle.
Full detailLoad checkpoint 07. Ride the elevator to Operations, turn around upon exiting, and walk away from the route marker. The report lies on the central desk at the far end of the level. The pickup saves immediately.
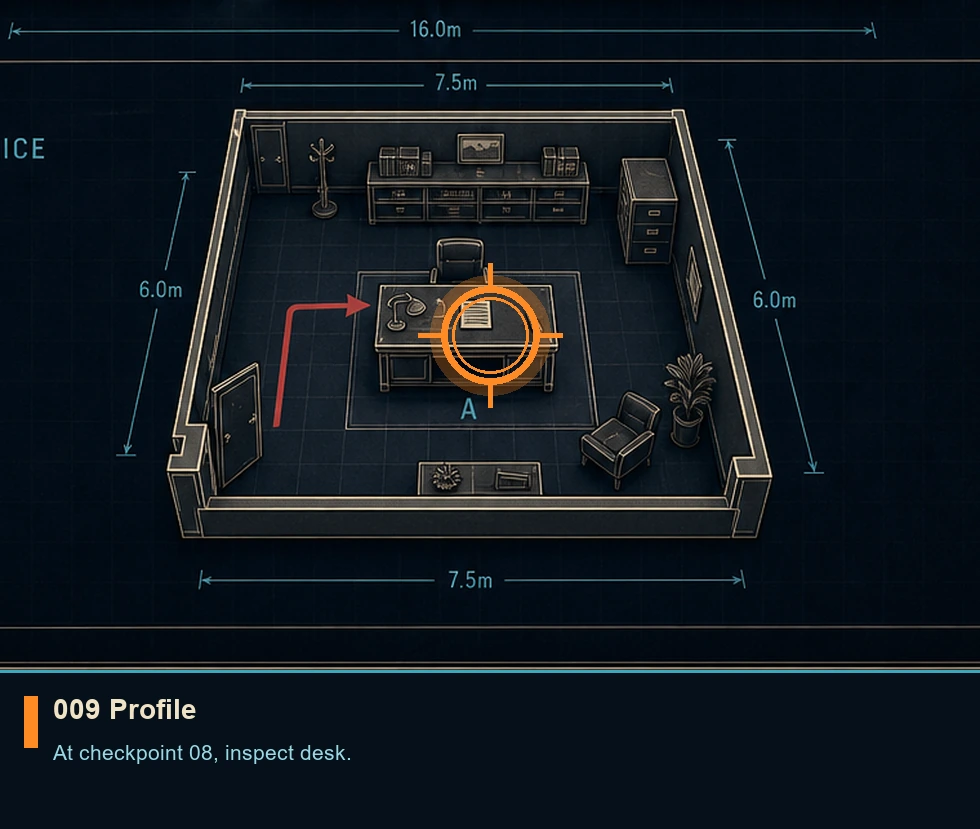
009 Profile
Intel file
HintUse the watch scan during quieter exploration and inspect side rooms before following the main route.
WhereAt checkpoint 08, inspect desk.
Full detailLoad checkpoint 08. Enter the marked office and take the profile from its main desk. The pickup saves immediately.
All the Time in the World
You are here when: The grand mountain hotel with reception, tournament hall, guest floors, laundry, and cellar.
Finish the visible route once, then use checkpoint replay for collectibles and mutually exclusive Journal approaches.
Area Completion
Story completion
HintFollow the current objective markers and explore at your own pace.
WhereComplete every checkpoint currently listed for this area in Chapter Select.
Full detailReach the area-complete transition on any difficulty. Its checkpoints remain replayable, so collection and Journal cleanup can be handled later without restarting the campaign.
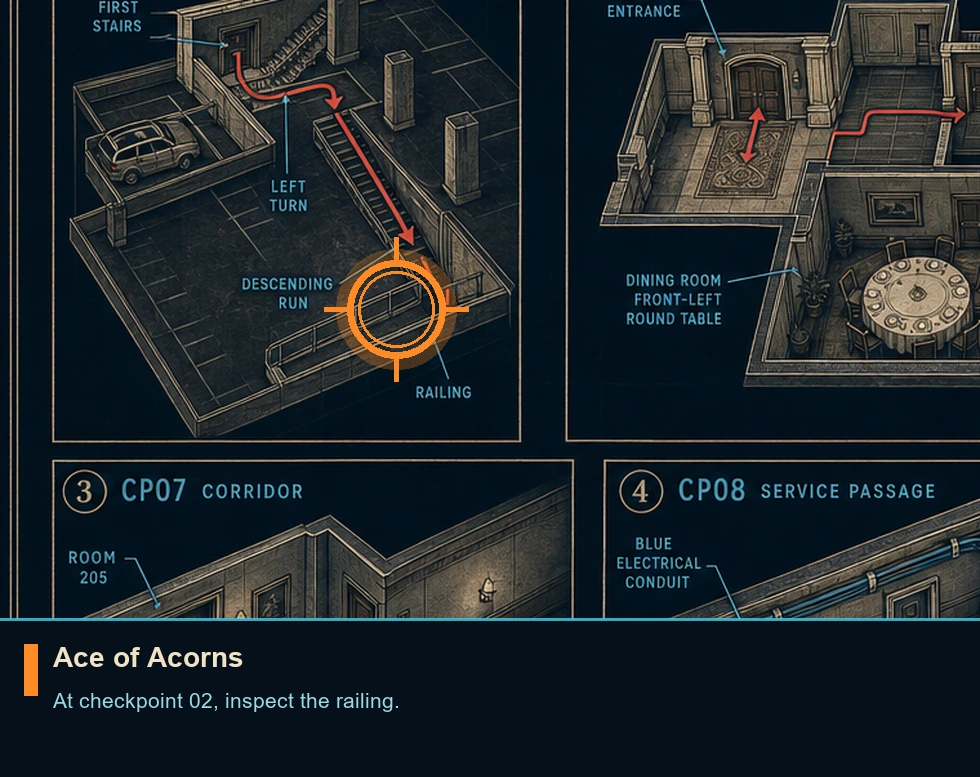
Ace of Acorns
Playing card
HintUse the watch scan during quieter exploration and inspect side rooms before following the main route.
WhereAt checkpoint 02, inspect the railing.
Full detailLoad checkpoint 02. After parking, climb the first stairs, turn left, and descend the next flight. The card is resting on the railing. The pickup saves immediately.
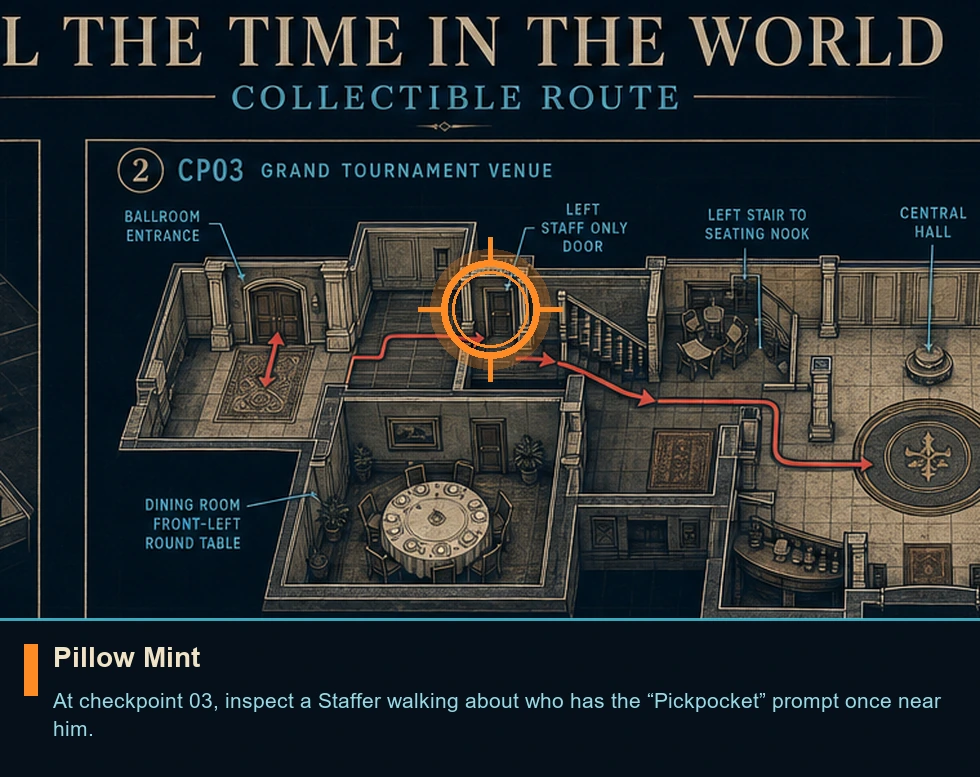
Pillow Mint
Memento
HintUse the watch scan during quieter exploration and inspect side rooms before following the main route.
WhereAt checkpoint 03, inspect a Staffer walking about who has the “Pickpocket” prompt once near him.
Full detailLoad checkpoint 03. From the ballroom entrance, take the left-hand Staff Only doorway just before the descending stairs. Distract the roaming employee with a phone dart or the cleaner above the stairs, steal their key, enter the staff room, and take the mint from the wooden cabinet beside the blocked doorway. The pickup saves immediately.
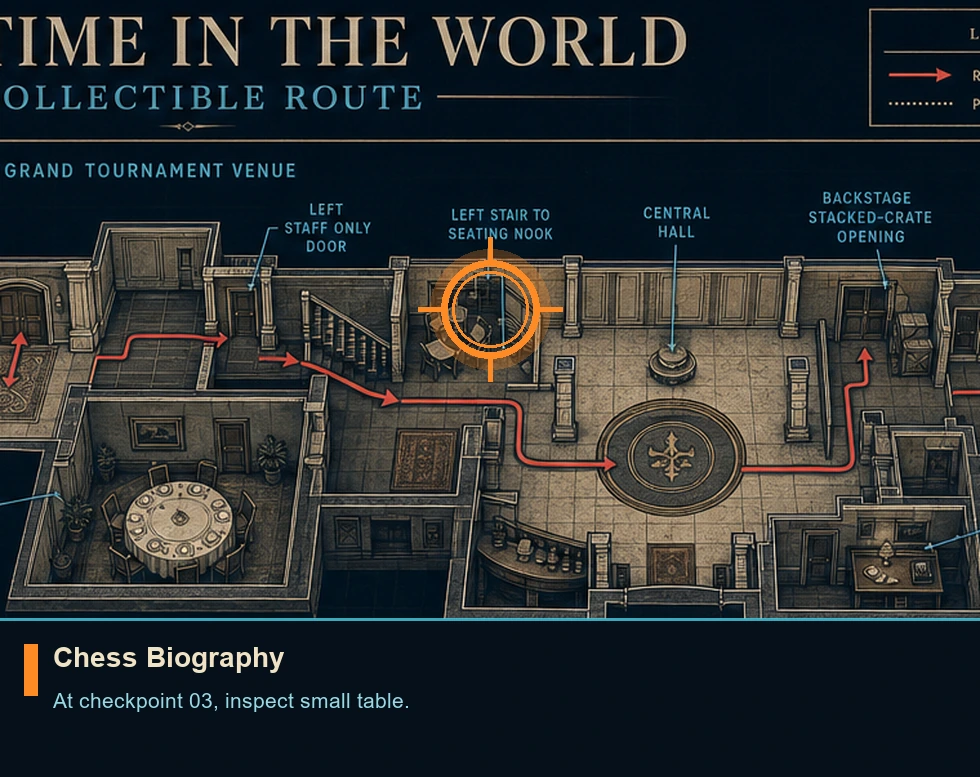
Chess Biography
Legacy item
HintUse the watch scan during quieter exploration and inspect side rooms before following the main route.
WhereAt checkpoint 03, inspect small table.
Full detailLoad checkpoint 03. Descend the left stairway, turn right at its foot, and continue to the seating nook at the far end. The book rests on the small table beside two guests discussing a sports car. The pickup saves immediately.
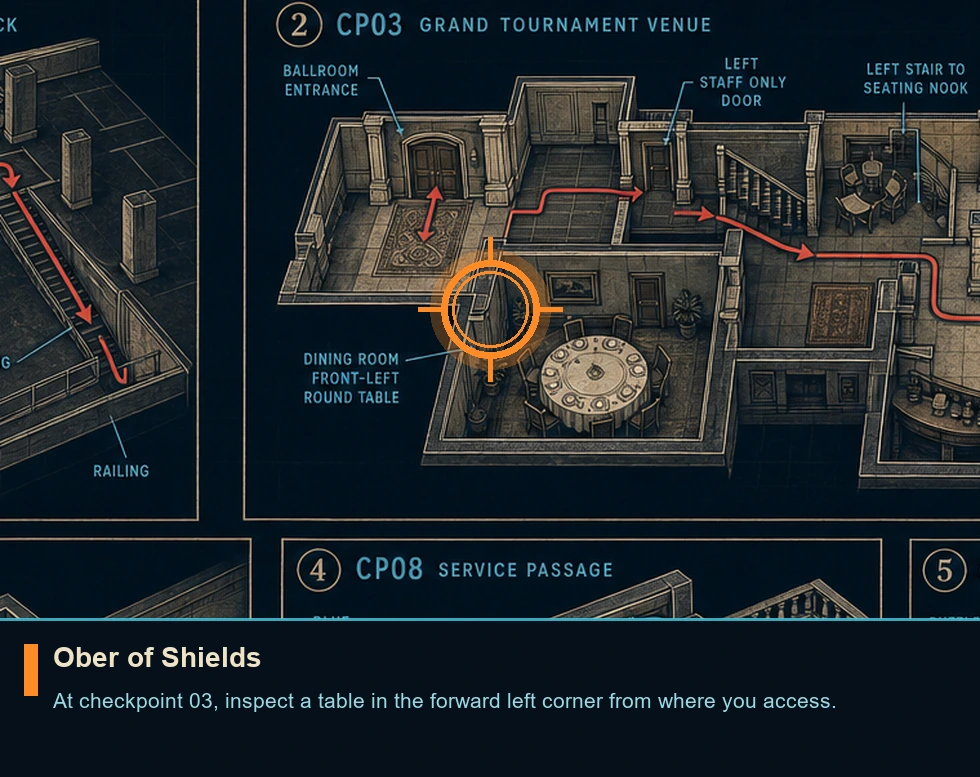
Ober of Shields
Playing card
HintUse the watch scan during quieter exploration and inspect side rooms before following the main route.
WhereAt checkpoint 03, inspect a table in the forward left corner from where you access.
Full detailLoad checkpoint 03. From the book's seating nook, return to the central tournament hall and keep left into the dining room filled with round, white-covered tables. The card is on the front-left table. The pickup saves immediately.
Championship Badge
Memento
HintUse the watch scan during quieter exploration and inspect side rooms before following the main route.
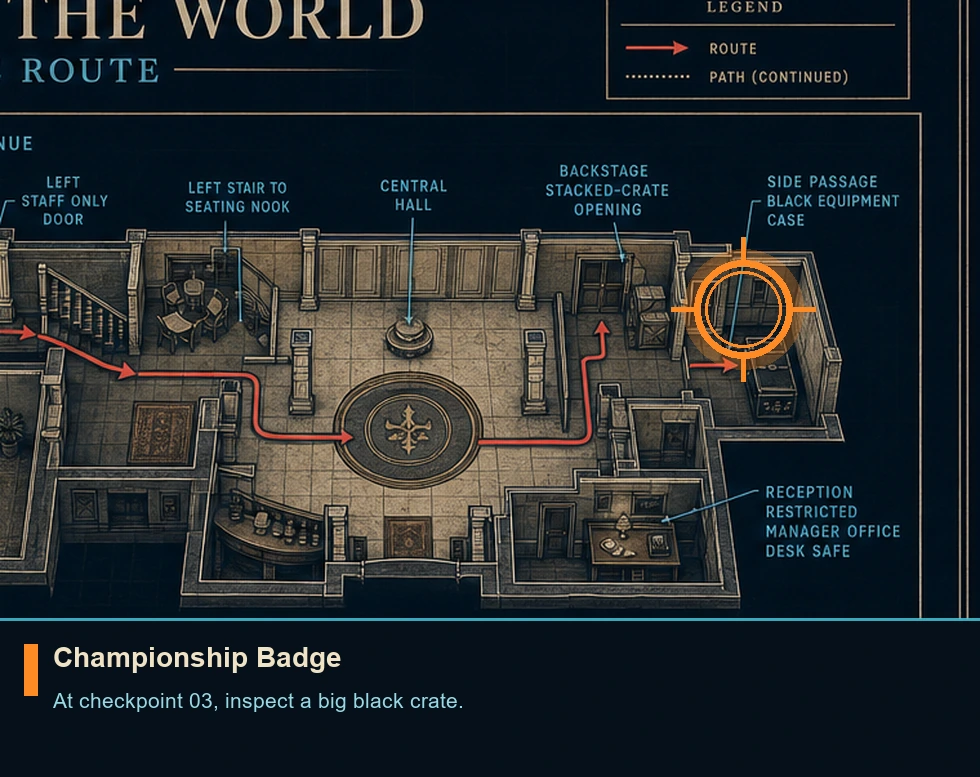
WhereAt checkpoint 03, inspect a big black crate.
Full detailLoad checkpoint 03. Return to the central tournament hall, slip through the stacked-crate opening on the left, and enter the backstage space. Turn immediately into the side passage; the badge is on a large black equipment case. The pickup saves immediately.
6 of Roses
Playing card
HintUse the watch scan during quieter exploration and inspect side rooms before following the main route.
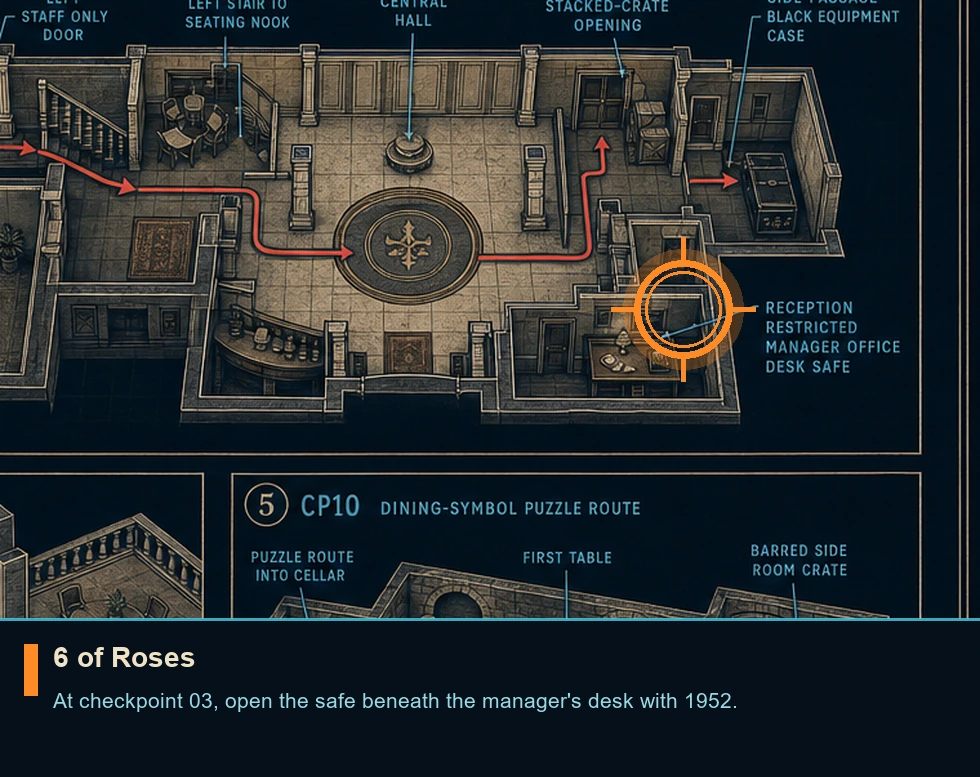
WhereAt checkpoint 03, open the safe beneath the manager's desk with 1952.
Full detailLoad checkpoint 03. From reception, enter the restricted staff side and reach the manager's office in the rear-right corner. Open the safe below the desk with 1952, the center wine bottle supplies the year, and collect the card. The pickup saves immediately.
Slovakia Postcard
Postcard
HintUse the watch scan during quieter exploration and inspect side rooms before following the main route.
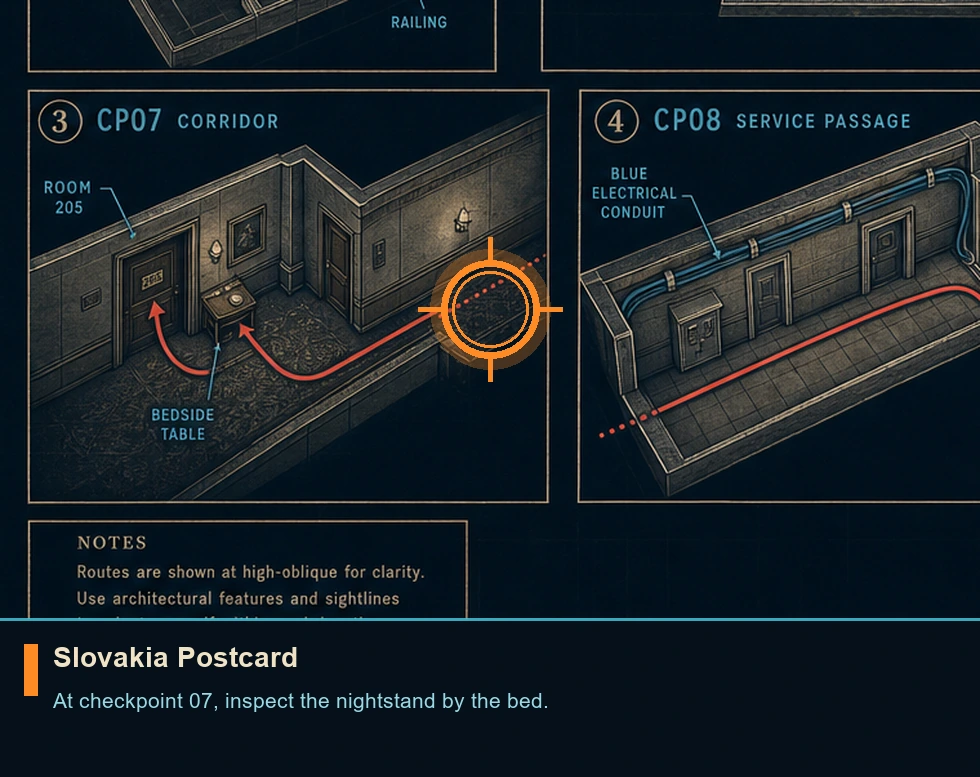
WhereAt checkpoint 07, inspect the nightstand by the bed.
Full detailLoad checkpoint 07. Obtain the Room 205 card either from the earlier staff room or by distracting the corridor attendant with the cleaner or a phone dart and pickpocketing them. Unlock Room 205 and take the postcard from the bedside table. The pickup saves immediately.
6 of Acorns
Playing card
HintUse the watch scan during quieter exploration and inspect side rooms before following the main route.
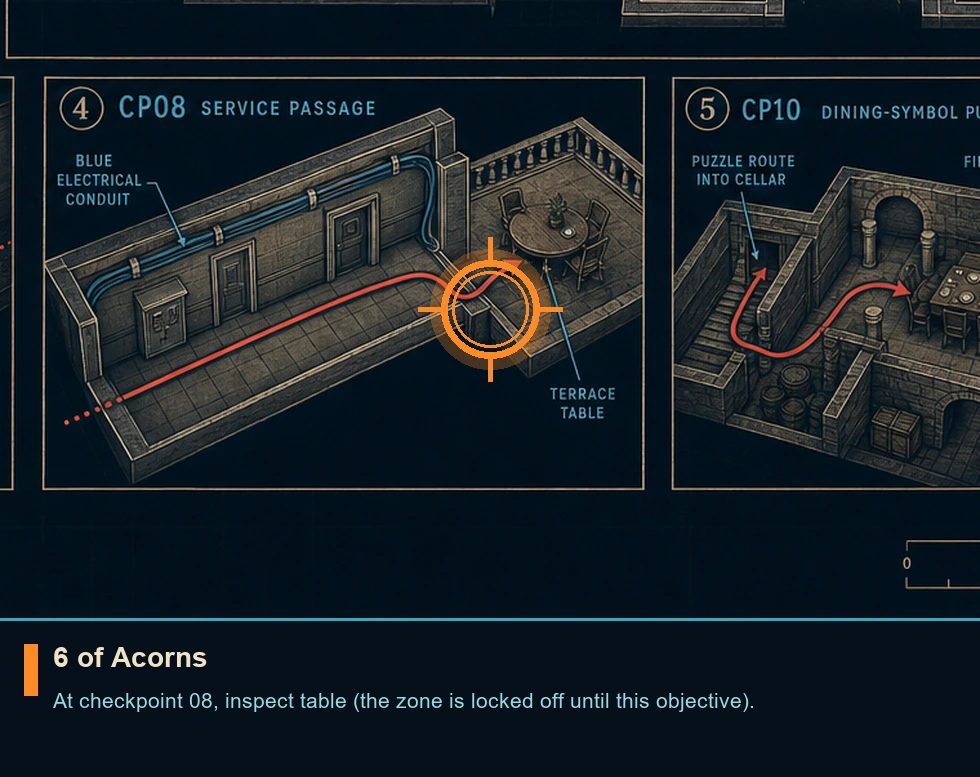
WhereAt checkpoint 08, inspect table (the zone is locked off until this objective).
Full detailLoad checkpoint 08. Trace the blue electrical line through the service passage, use the doorway at its far end, and turn left onto the terrace. The card is on a table there; this terrace is inaccessible at earlier checkpoints. The pickup saves immediately.
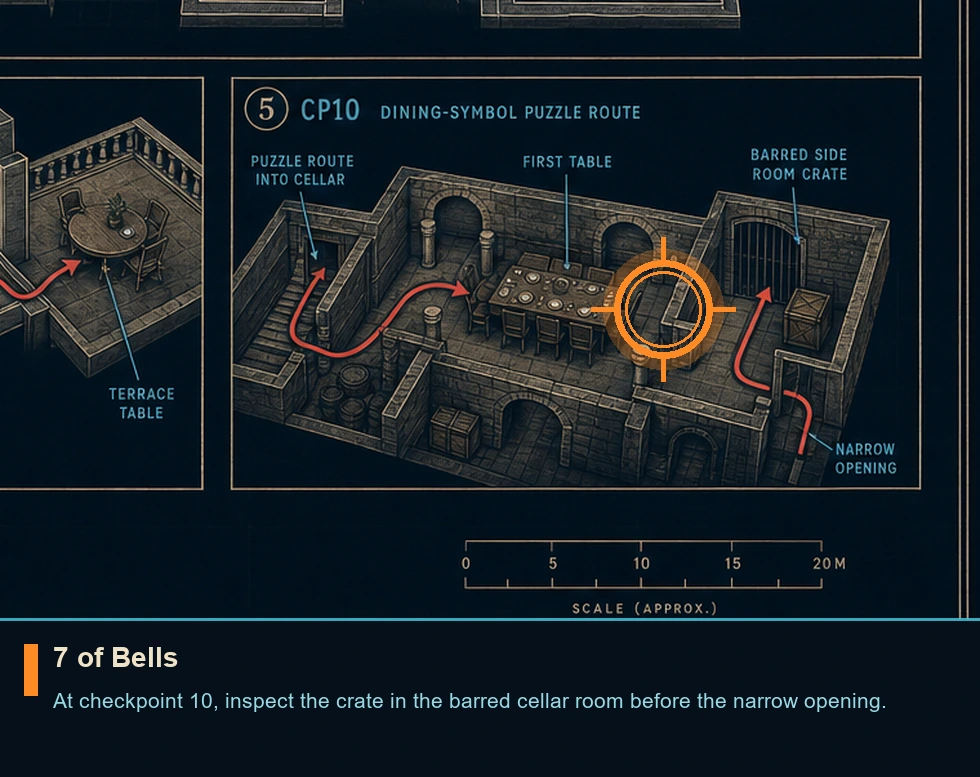
7 of Bells
Playing card
HintUse the watch scan during quieter exploration and inspect side rooms before following the main route.
WhereAt checkpoint 10, inspect the crate in the barred cellar room before the narrow opening.
Full detailLoad checkpoint 10. Set the dining-room symbols to Lion, Snake, Goat, then descend into the cellar. Vault the first table, turn left into the barred side room, and take the card from the crate before squeezing onward. The pickup saves immediately.
Completionist
Mission challenge
HintPin this Journal entry and give it a focused attempt instead of combining incompatible routes.
WhereOpen this area's Journal challenge list and track the umbrella entry.
Full detailClear every challenge in this area to unlock the Chauffeur uniform for TacSim. Finish every Journal inspect the simulation run. Confirm the Journal mark appears before changing to another checkpoint.
Pacifist
Mission challenge
HintPin this Journal entry and give it a focused attempt instead of combining incompatible routes.
WhereOpen this area's Journal challenge list and track the umbrella entry.
Full detailFinish every component Journal check displayed beneath this umbrella entry. Finish both Pacifist challenges. Confirm the Journal mark appears before changing to another checkpoint.
Ghost
Mission challenge
HintPin this Journal entry and give it a focused attempt instead of combining incompatible routes.
WhereOpen this area's Journal challenge list and track the umbrella entry.
Full detailFinish every component Journal check displayed beneath this umbrella entry. Finish both Ghost challenges. Confirm the Journal mark appears before changing to another checkpoint.
Assault
Mission challenge
HintPin this Journal entry and give it a focused attempt instead of combining incompatible routes.
WhereOpen this area's Journal challenge list and track the umbrella entry.
Full detailFinish every component Journal check displayed beneath this umbrella entry. Finish both Assault challenges. Confirm the Journal mark appears before changing to another checkpoint.
Press Only
Mission challenge
HintPin this Journal entry and give it a focused attempt instead of combining incompatible routes.
WhereStart from checkpoint 1; open the Journal and track this entry.
Full detailAccess the chess tournament as a representative of the press. Obtain the press disguise. Confirm the Journal mark appears before changing to another checkpoint.
Self Check-In
Mission challenge
HintPin this Journal entry and give it a focused attempt instead of combining incompatible routes.
WhereStart from checkpoint 1; open the Journal and track this entry.
Full detailAccess the chess tournament with an alternative entrance. Locate a secondary way into the hotel. Confirm the Journal mark appears before changing to another checkpoint.
Lone Wolf
Mission challenge
HintPin this Journal entry and give it a focused attempt instead of combining incompatible routes.
WhereStart from checkpoint 1; open the Journal and track this entry.
Full detailReach the hotel entrance without allowing any fellow recruit to detect you. Remain outside their sight lines throughout the approach, then wait for the Journal completion mark before changing checkpoints.
Bellboy Hat
Mission challenge
HintPin this Journal entry and give it a focused attempt instead of combining incompatible routes.
WhereStart from checkpoint 1; open the Journal and track this entry.
Full detailFind and equip the Bellboy Hat near the hotel's public entrance. Inspect the service side of the lobby and surrounding staff surfaces, then verify the wardrobe pickup in the Journal.
Wine Connoisseur
Mission challenge
HintPin this Journal entry and give it a focused attempt instead of combining incompatible routes.
WhereStart from checkpoint 2; open the Journal and track this entry.
Full detailUnlock the hotel manager's safe. Locate the safe code before opening it. Confirm the Journal mark appears before changing to another checkpoint.
Peace Studies
Mission challenge
HintPin this Journal entry and give it a focused attempt instead of combining incompatible routes.
WhereStart from checkpoint 3; open the Journal and track this entry.
Full detailCross the study room without harming any security personnel. Remain completely non-lethal. Confirm the Journal mark appears before changing to another checkpoint.
Silent Study
Mission challenge
HintPin this Journal entry and give it a focused attempt instead of combining incompatible routes.
WhereStart from checkpoint 3; open the Journal and track this entry.
Full detailCross the study room while remaining unseen. Use stealth and distractions. Confirm the Journal mark appears before changing to another checkpoint.
Indiscrete
Mission challenge
HintPin this Journal entry and give it a focused attempt instead of combining incompatible routes.
WhereStart from checkpoint 3; open the Journal and track this entry.
Full detailIncapacitate five private guards while inside the library. Keep the fight within that room, monitor the counter after each takedown, and do not leave until five register.
The Manager
Mission challenge
HintPin this Journal entry and give it a focused attempt instead of combining incompatible routes.
WhereStart from checkpoint 4; open the Journal and track this entry.
Full detailAccess the hotel manager's office. Locate a route or key into the office. Confirm the Journal mark appears before changing to another checkpoint.
Housekeeping
Mission challenge
HintPin this Journal entry and give it a focused attempt instead of combining incompatible routes.
WhereStart from checkpoint 4; open the Journal and track this entry.
Full detailHave a staff member unlock Room 205 for you. Create a distraction that sends the corridor attendant to the door, then confirm the Journal mark after it opens.
Elementary
Mission challenge
HintPin this Journal entry and give it a focused attempt instead of combining incompatible routes.
WhereStart from checkpoint 4; open the Journal and track this entry.
Full detailInspect every required clue inside Room 206. Sweep each interactable surface before advancing and check the Journal to ensure the investigation record is complete.
Do Disturb
Mission challenge
HintPin this Journal entry and give it a focused attempt instead of combining incompatible routes.
WhereStart from checkpoint 4; open the Journal and track this entry.
Full detailEnter Room 207 by any valid route. Obtain access or force an alternate opening, cross the threshold, and wait for the Journal entry to register.
Old School Hacking
Mission challenge
HintPin this Journal entry and give it a focused attempt instead of combining incompatible routes.
WhereStart from checkpoint 5; open the Journal and track this entry.
Full detailLearn the laundry entrance combination from environmental clues rather than guessing. Inspect the nearby written hints, derive the digits, and enter them at the keypad.
Laundry Day
Mission challenge
HintPin this Journal entry and give it a focused attempt instead of combining incompatible routes.
WhereStart from checkpoint 5; open the Journal and track this entry.
Full detailAcquire and wear a laundry-worker uniform. Isolate a suitable staff member, take the disguise without raising an alarm, and verify the Journal update while it remains equipped.
Uninterrupted Service
Mission challenge
HintPin this Journal entry and give it a focused attempt instead of combining incompatible routes.
WhereStart from checkpoint 5; open the Journal and track this entry.
Full detailCross the laundry without harming any workers. Keep clear of harming or incapacitating staff. Confirm the Journal mark appears before changing to another checkpoint.
Squeaky Clean
Mission challenge
HintPin this Journal entry and give it a focused attempt instead of combining incompatible routes.
WhereStart from checkpoint 5; open the Journal and track this entry.
Full detailCross the laundry while remaining unseen. Remain completely undetected. Confirm the Journal mark appears before changing to another checkpoint.
Getting Dirty
Mission challenge
HintPin this Journal entry and give it a focused attempt instead of combining incompatible routes.
WhereStart from checkpoint 5; open the Journal and track this entry.
Full detailIncapacitate five workers within the laundry. Keep every qualifying takedown inside its boundary and watch the Journal counter until it reaches five.
Chimera
Mission challenge
HintPin this Journal entry and give it a focused attempt instead of combining incompatible routes.
WhereStart from checkpoint 6; open the Journal and track this entry.
Full detailComplete the dining-room symbol puzzle without submitting a wrong arrangement. Set Lion, Snake, Goat before the first activation, then confirm the Journal record.
A Beautiful Waste
Mission challenge
HintPin this Journal entry and give it a focused attempt instead of combining incompatible routes.
WhereStart from checkpoint 6; open the Journal and track this entry.
Full detailBreak 5 premium wine bottles within the cellar fight. Fire at or smash the premium bottles during combat. Confirm the Journal mark appears before changing to another checkpoint.
Floor It!
Mission challenge
HintPin this Journal entry and give it a focused attempt instead of combining incompatible routes.
WhereStart from checkpoint 7; open the Journal and track this entry.
Full detailBring the vehicle to maximum speed during the pursuit. Hold acceleration through the longest clear straightaway and wait for the speed condition to register.
Firebrand
Mission challenge
HintPin this Journal entry and give it a focused attempt instead of combining incompatible routes.
WhereStart from checkpoint 7; open the Journal and track this entry.
Full detailBreak 5 explosive barrels. Fire at explosive barrels as you drive. Confirm the Journal mark appears before changing to another checkpoint.
No Brakes
Mission challenge
HintPin this Journal entry and give it a focused attempt instead of combining incompatible routes.
WhereStart from checkpoint 8; open the Journal and track this entry.
Full detailRemove the aircraft's vehicle restraint. Aim directly at the locking assembly as soon as it becomes targetable, break it promptly, and verify the Journal entry.
Travelling Light
Mission challenge
HintPin this Journal entry and give it a focused attempt instead of combining incompatible routes.
WhereStart from checkpoint 8; open the Journal and track this entry.
Full detailHurl three hostiles from the aircraft. Grab hostiles and hurl them out of the aircraft. Confirm the Journal mark appears before changing to another checkpoint.
Out of the Ashes
You are here when: The familiar operations floor and adjoining office corridors.
Finish the visible route once, then use checkpoint replay for collectibles and mutually exclusive Journal approaches.
Area Completion
Story completion
HintFollow the current objective markers and explore at your own pace.
WhereComplete every checkpoint currently listed for this area in Chapter Select.
Full detailReach the area-complete transition on any difficulty. Its checkpoints remain replayable, so collection and Journal cleanup can be handled later without restarting the campaign.
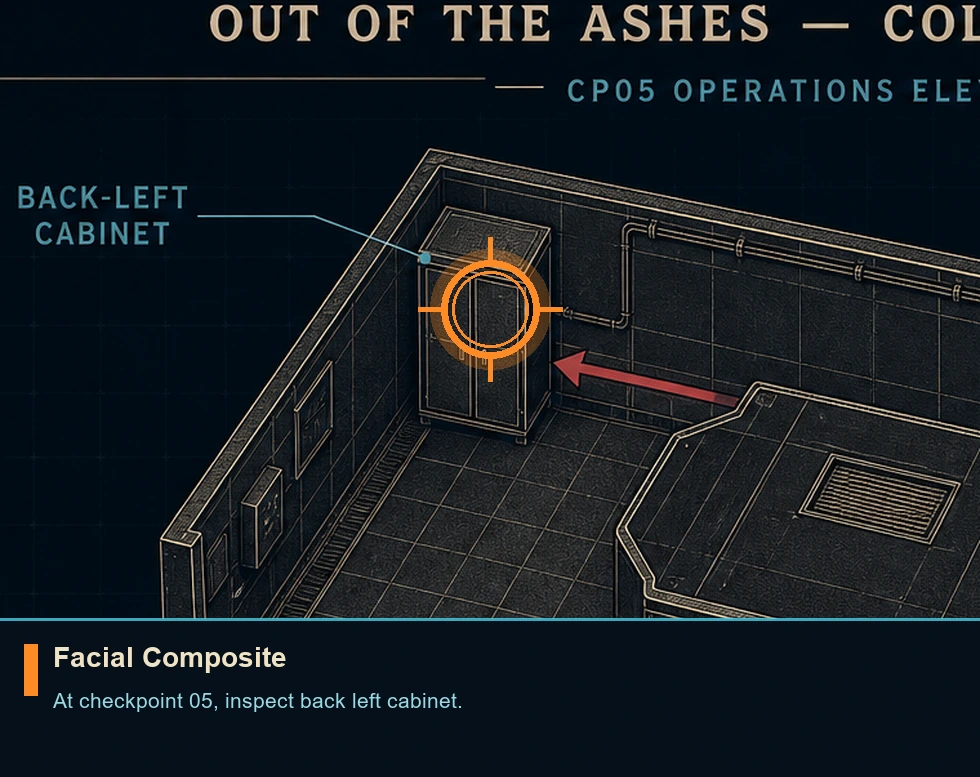
Facial Composite
Intel file
HintUse the watch scan during quieter exploration and inspect side rooms before following the main route.
WhereAt checkpoint 05, inspect back left cabinet.
Full detailLoad checkpoint 05. After taking the elevator up to Operations, proceed behind the elevator to locate the item on the back left cabinet. The pickup saves immediately; once its new-item notice appears, checkpoint completion is not required.
The Past Never Dies
You are here when: The coastal shipwreck settlement containing a market, fight pit, rooftops, and docked vessels.
Finish the visible route once, then use checkpoint replay for collectibles and mutually exclusive Journal approaches.
Area Completion
Story completion
HintFollow the current objective markers and explore at your own pace.
WhereComplete every checkpoint currently listed for this area in Chapter Select.
Full detailReach the area-complete transition on any difficulty. Its checkpoints remain replayable, so collection and Journal cleanup can be handled later without restarting the campaign.
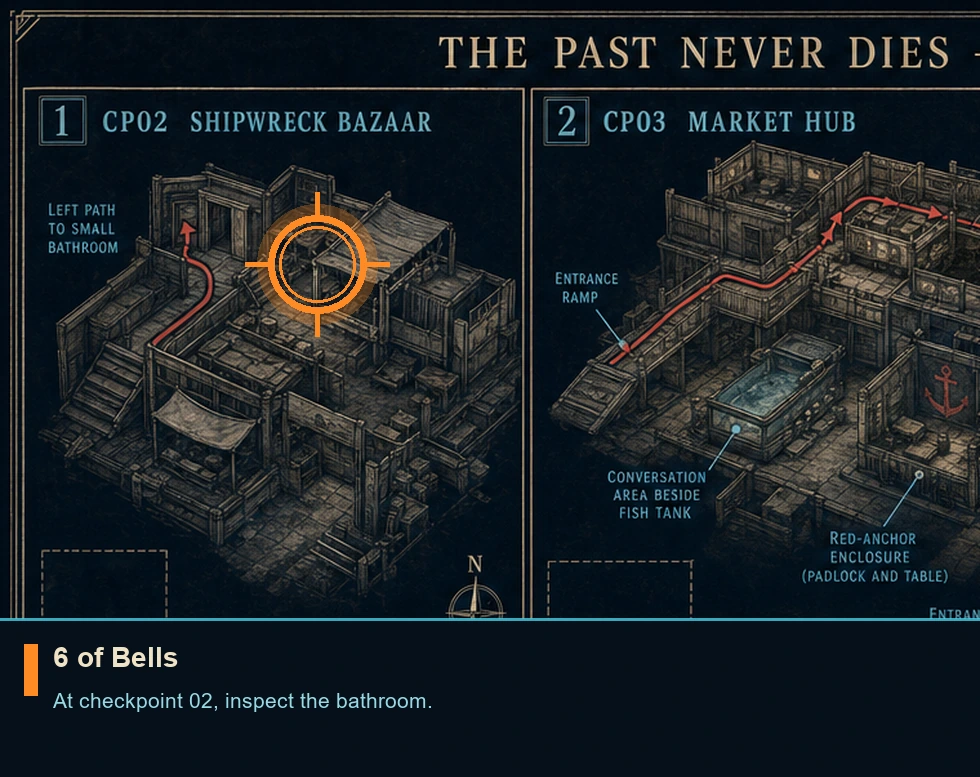
6 of Bells
Playing card
HintUse the watch scan during quieter exploration and inspect side rooms before following the main route.
WhereAt checkpoint 02, inspect the bathroom.
Full detailLoad checkpoint 02. After you exit the vehicle you continue walking into a shipwreck with a bazaar inside. Take the left path to locate this in the bathroom. The pickup saves immediately; once its new-item notice appears, checkpoint completion is not required.
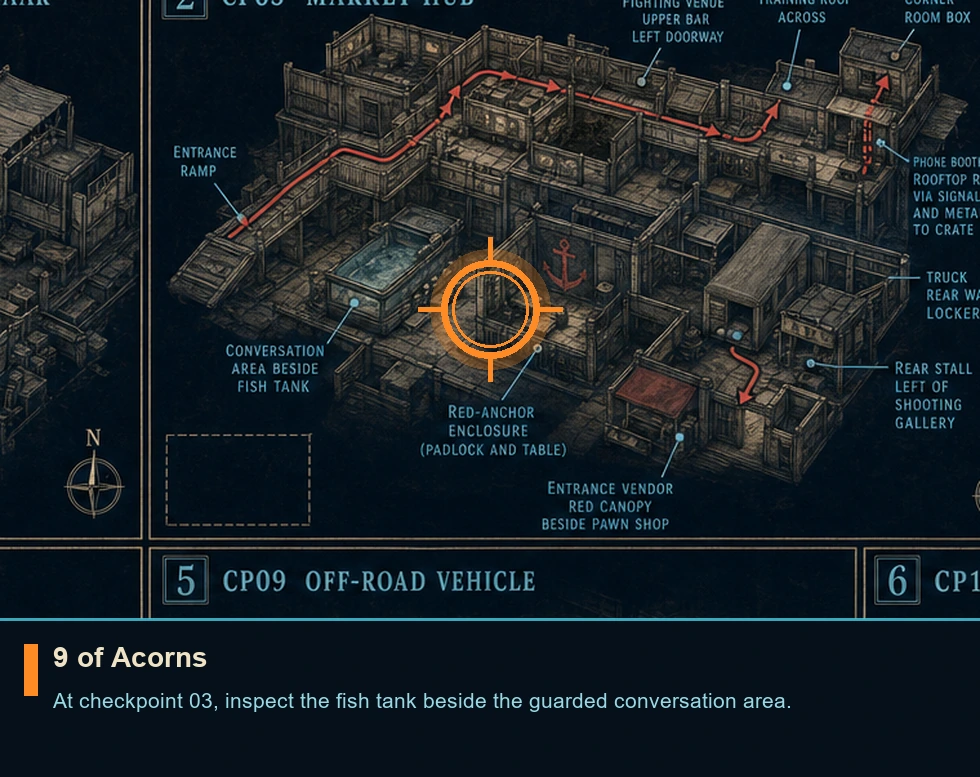
9 of Acorns
Playing card
HintUse the watch scan during quieter exploration and inspect side rooms before following the main route.
WhereAt checkpoint 03, inspect the fish tank beside the guarded conversation area.
Full detailLoad checkpoint 03 with the Laser Strap equipped from the earlier gadget lab. Descend into the market, keep right to the guarded conversation area, and cut open the fish tank with the laser. Collect the card inside. If replay gives you another tool, restart from the gadget-lab checkpoint and carry the laser forward.
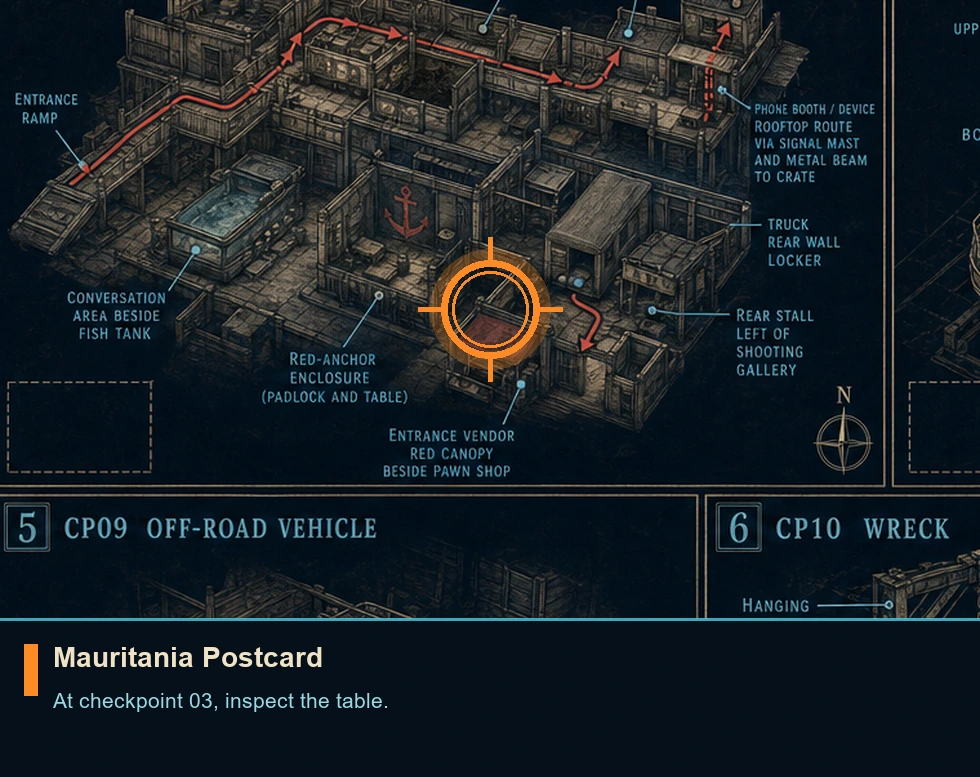
Mauritania Postcard
Postcard
HintUse the watch scan during quieter exploration and inspect side rooms before following the main route.
WhereAt checkpoint 03, inspect the table.
Full detailLoad checkpoint 03. From the market entrance, go left toward the large red anchor. Cut the padlock on the nearby enclosure with the Laser Strap and take the postcard from the table inside. The pickup saves immediately.
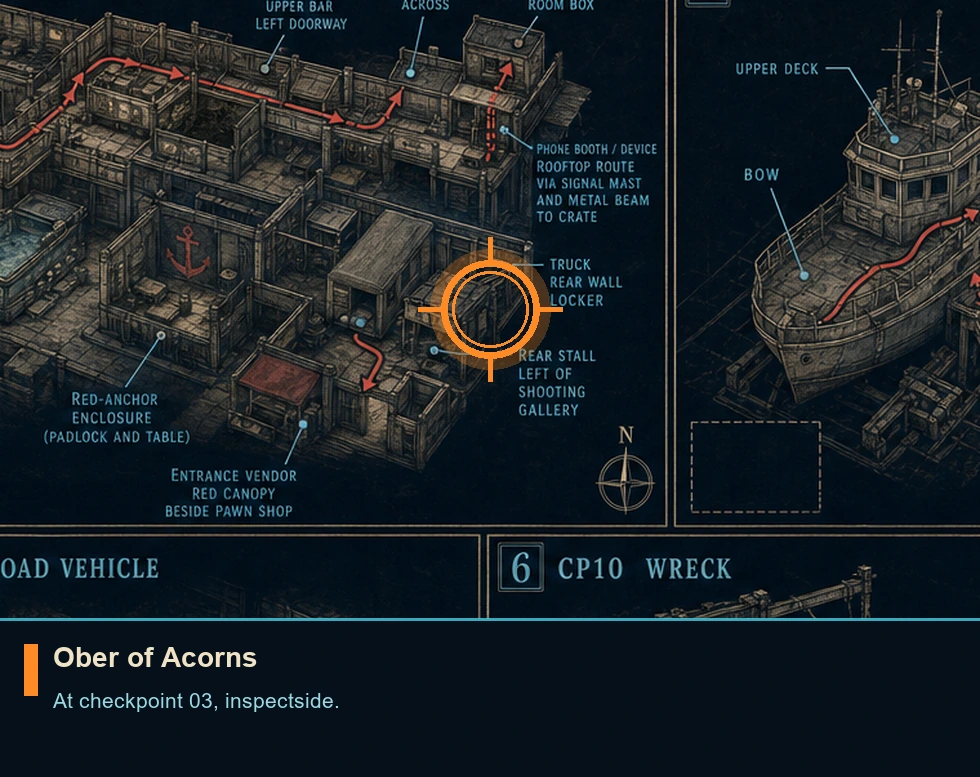
Ober of Acorns
Playing card
HintUse the watch scan during quieter exploration and inspect side rooms before following the main route.
WhereAt checkpoint 03, inspectside.
Full detailLoad checkpoint 03. Leave the previous pickup room, turn left, and approach the truck ahead. At the truck's rear, aim the Laser Strap at the wall-mounted locker to open it and collect the card. The pickup saves immediately.
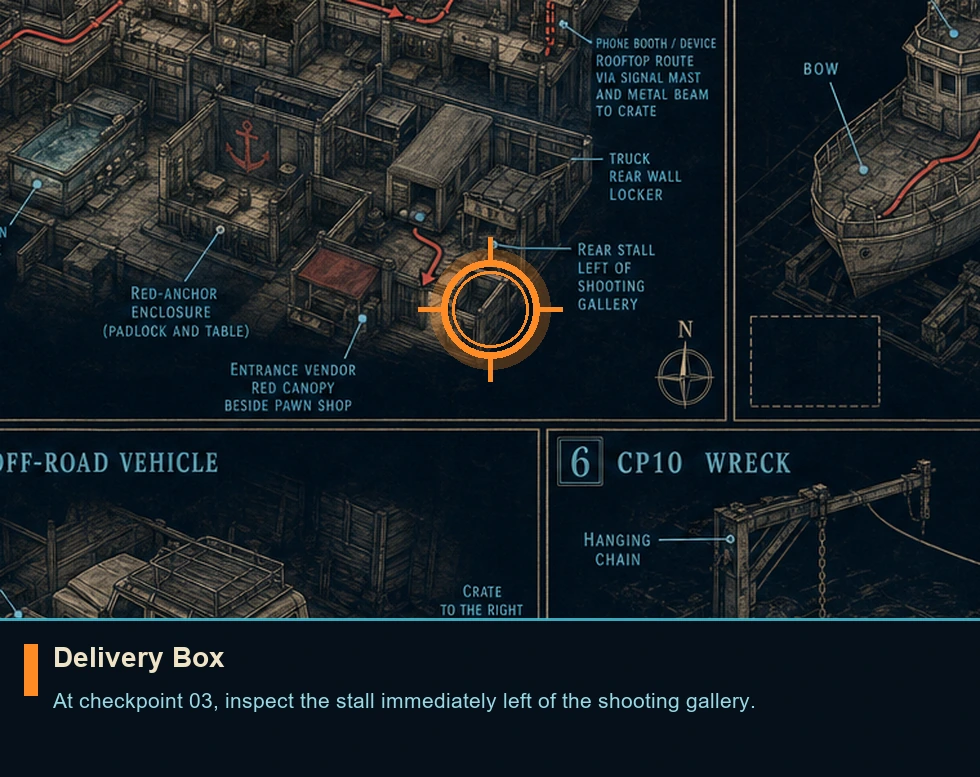
Delivery Box
Intel file
HintUse the watch scan during quieter exploration and inspect side rooms before following the main route.
WhereAt checkpoint 03, inspect the stall immediately left of the shooting gallery.
Full detailLoad checkpoint 03. Use the passage beside the truck to enter the rear market lane. The delivery box rests on the stall directly left of the shooting gallery. The pickup saves immediately.
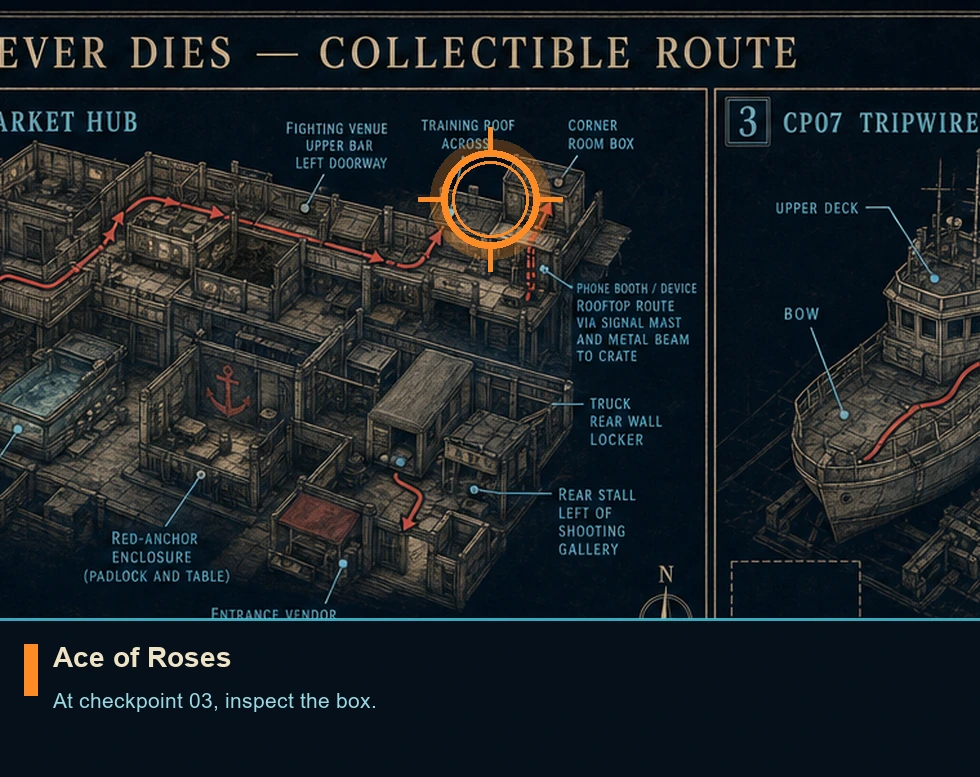
Ace of Roses
Playing card
HintUse the watch scan during quieter exploration and inspect side rooms before following the main route.
WhereAt checkpoint 03, inspect the box.
Full detailLoad checkpoint 03. Cross the market from its entrance ramp and follow the tunnel into the fighting venue. On its upper level, use the doorway left of the bar to reach the training roof. The card is on a box in the small corner room. The pickup saves immediately.
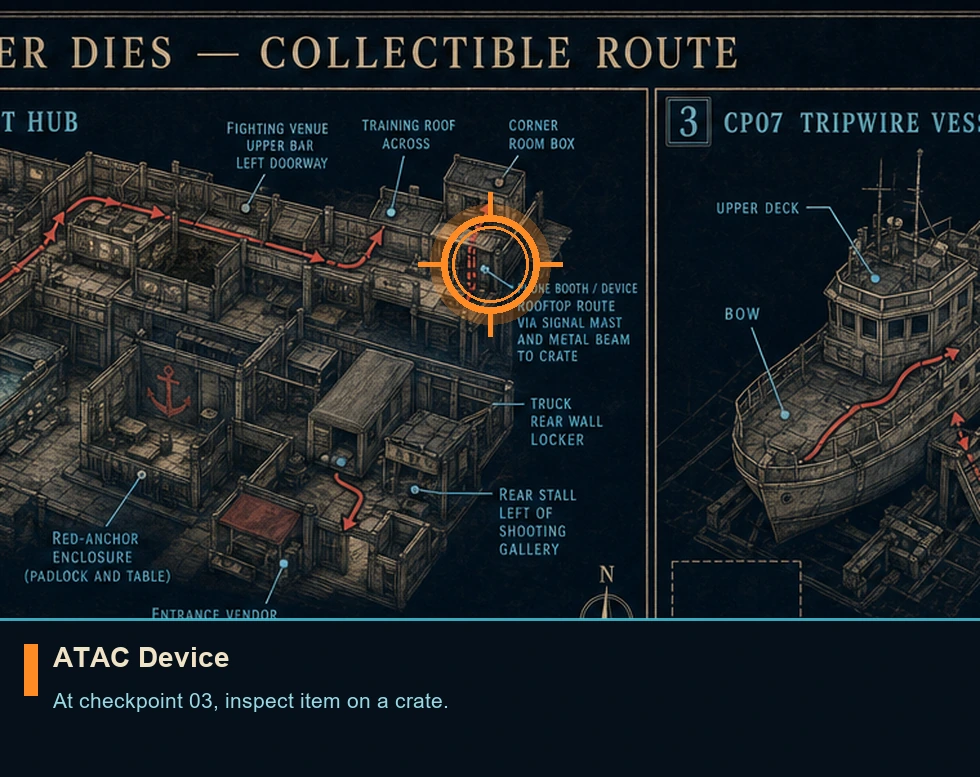
ATAC Device
Legacy item
HintUse the watch scan during quieter exploration and inspect side rooms before following the main route.
WhereAt checkpoint 03, inspect item on a crate.
Full detailLoad checkpoint 03. Listen at the phone conversation in the rear-market booth opposite the shooting gallery, then pin the resulting device objective. Follow its markers out of the market and onto the rooftops. Beneath the signal mast, descend to the long metal beam and cross it to the crate holding the device. The pickup saves immediately.
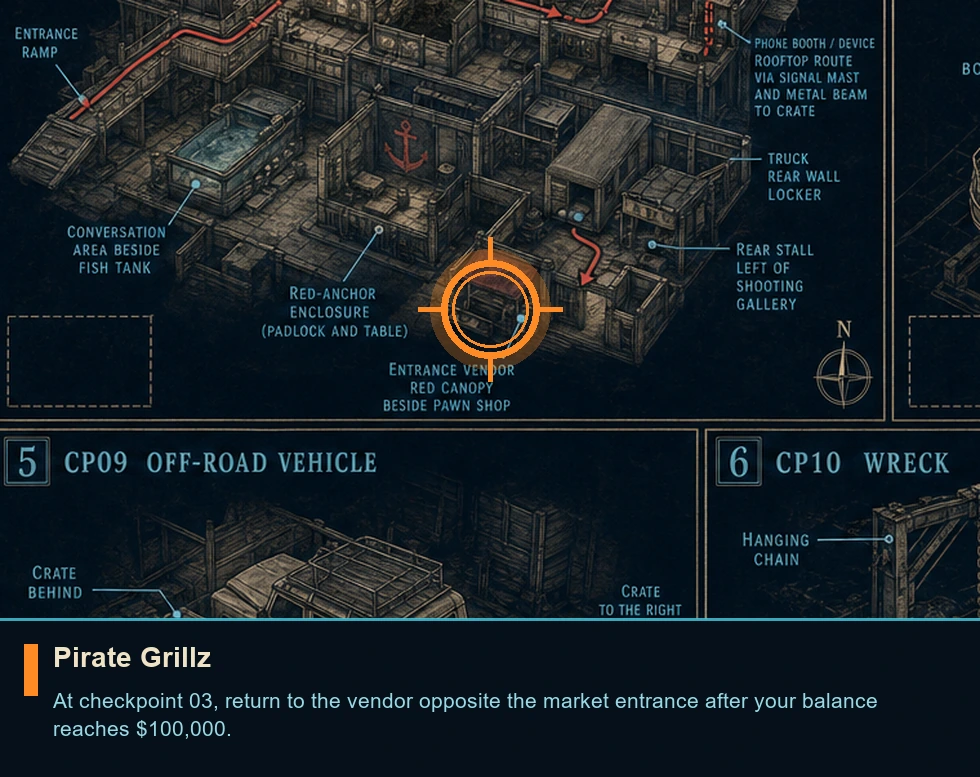
Pirate Grillz
Memento
HintUse the watch scan during quieter exploration and inspect side rooms before following the main route.
WhereAt checkpoint 03, return to the vendor opposite the market entrance after your balance reaches $100,000.
Full detailLoad checkpoint 03 and continue until your available balance reaches $100,000. Return to the market's entrance ramp and approach the vendor under the red canopy, beside the pawn shop. Interact with the displayed grillz to purchase them; the prompt is disabled before the required funds are available.
Banner of Shields
Playing card
HintUse the watch scan during quieter exploration and inspect side rooms before following the main route.
WhereAt checkpoint 07, inspect the front of the upper deck.
Full detailLoad checkpoint 07. In the vessel containing tripwires, take the right stairway and turn back toward the bow after reaching the upper level. The card lies at the forward end of that deck. The pickup saves immediately.
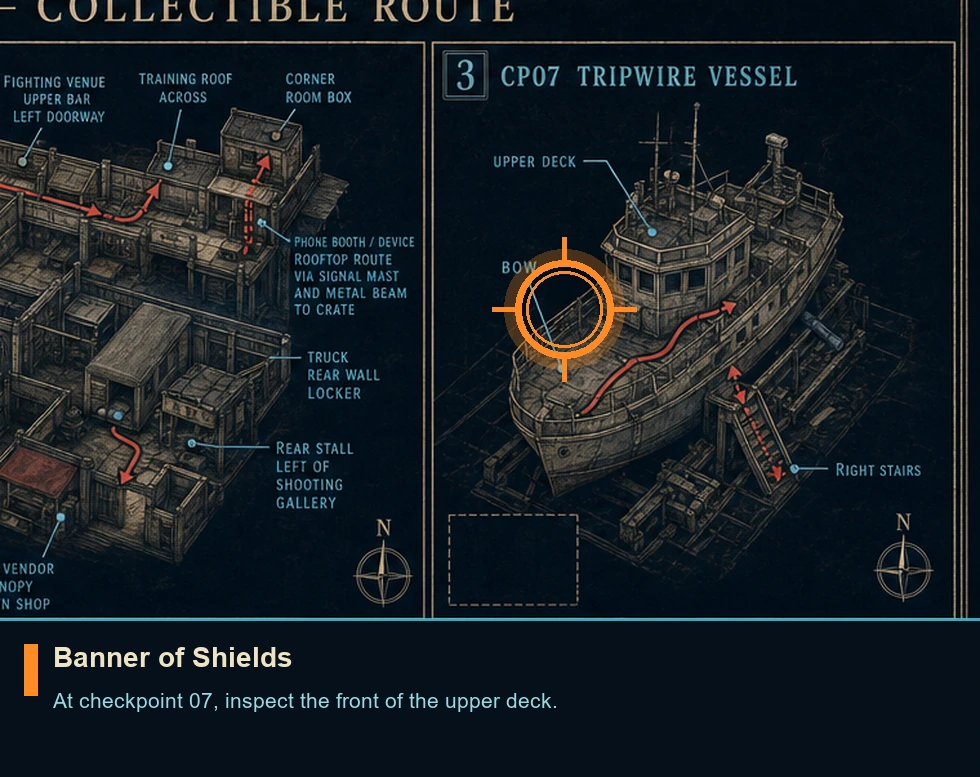
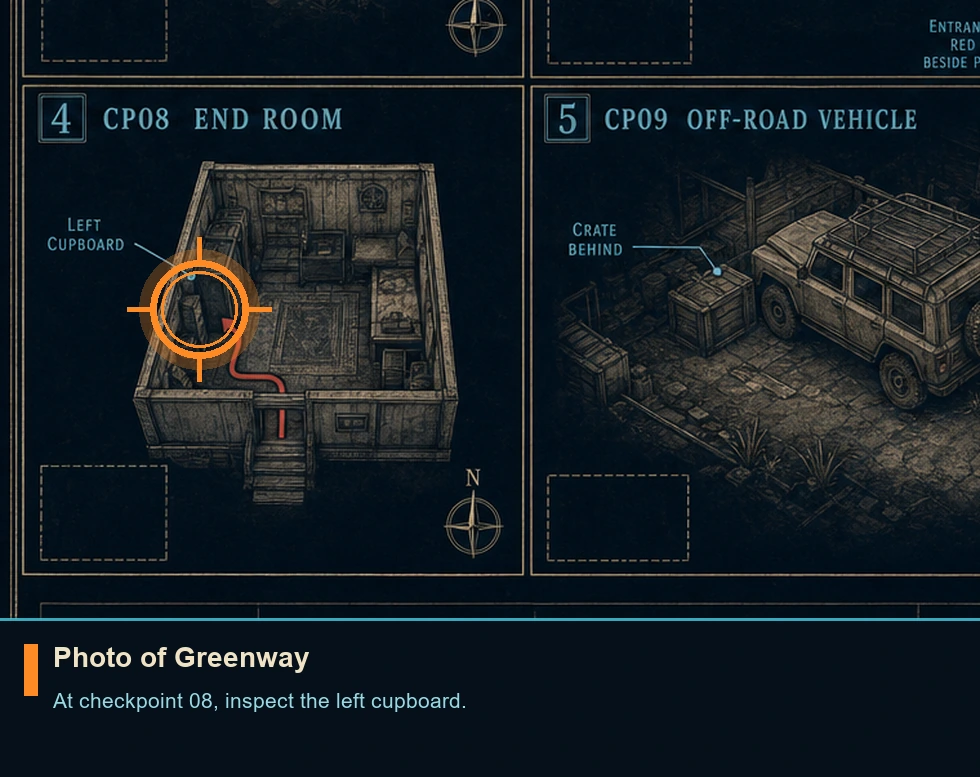
Photo of Greenway
Intel file
HintUse the watch scan during quieter exploration and inspect side rooms before following the main route.
WhereAt checkpoint 08, inspect the left cupboard.
Full detailWhile examining the marked room, enter the space at the end and take the photograph from the cupboard on the left. The pickup saves immediately.
Crocodile Tooth
Memento
HintUse the watch scan during quieter exploration and inspect side rooms before following the main route.
WhereAt checkpoint 09, inspect right side, on a crate.
Full detailLoad checkpoint 09. Walk behind the parked off-road vehicle and inspect the crate on its right side. The tooth is on top and saves immediately.
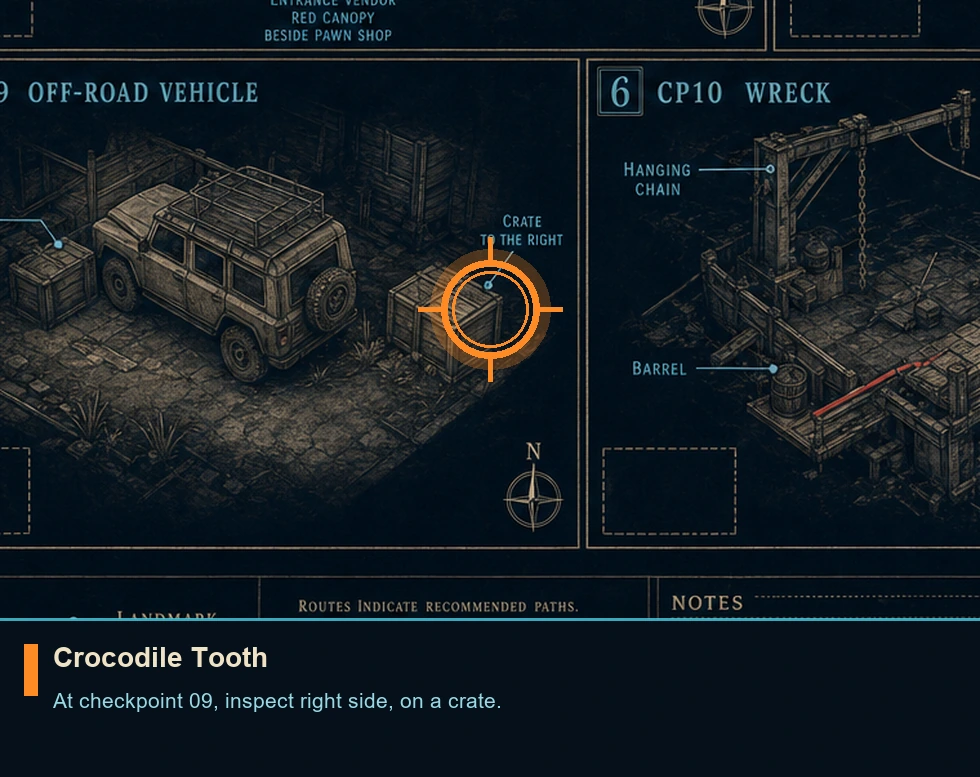
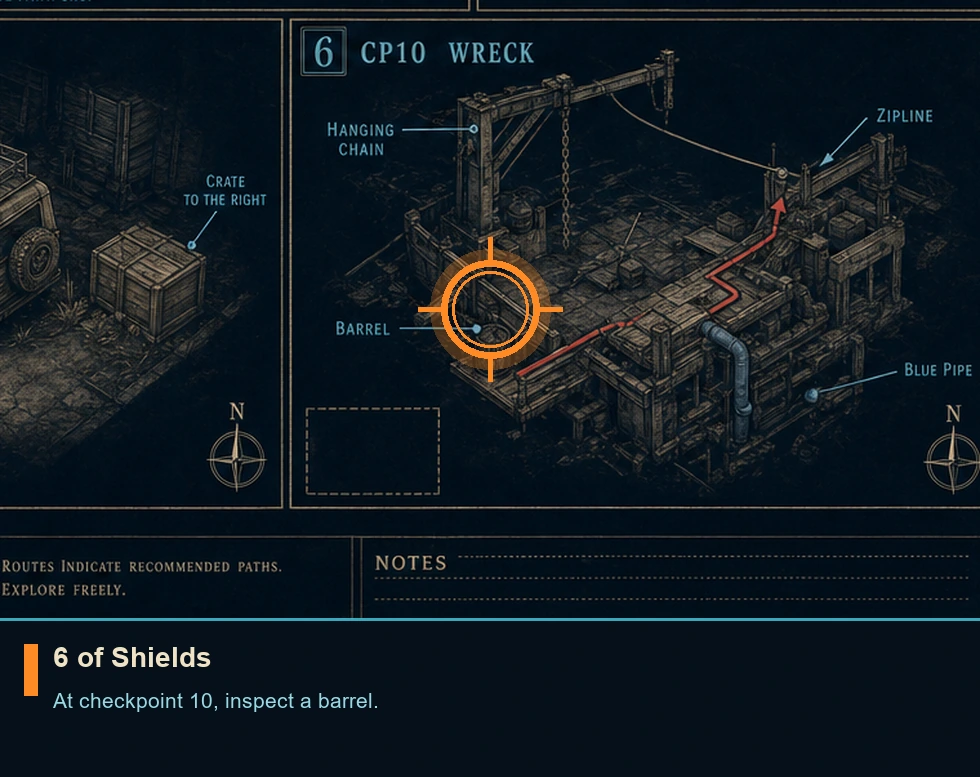
6 of Shields
Playing card
HintUse the watch scan during quieter exploration and inspect side rooms before following the main route.
WhereAt checkpoint 10, inspect a barrel.
Full detailLoad checkpoint 10. Inside the wreck, climb the hanging chain and ride the zipline across the gap. Continue to the barrel beside the blue pipe, before climbing up to release the bridge. The pickup saves immediately.
Completionist: The Past Never Dies
Mission challenge
HintPin this Journal entry and give it a focused attempt instead of combining incompatible routes.
WhereOpen this area's Journal challenge list and track the umbrella entry.
Full detailClear every challenge in this area to unlock the Mauritania Outfit in TacSim. Finish every Journal inspect the simulation run. Confirm the Journal mark appears before changing to another checkpoint.
Pacifist: The Past Never Dies
Mission challenge
HintPin this Journal entry and give it a focused attempt instead of combining incompatible routes.
WhereOpen this area's Journal challenge list and track the umbrella entry.
Full detailFinish every component Journal check displayed beneath this umbrella entry. Focus on non-lethal stealth throughout the simulation run. Confirm the Journal mark appears before changing to another checkpoint.
Ghost: The Past Never Dies
Mission challenge
HintPin this Journal entry and give it a focused attempt instead of combining incompatible routes.
WhereOpen this area's Journal challenge list and track the umbrella entry.
Full detailFinish every component Journal check displayed beneath this umbrella entry. Remain undetected while completing the required objectives. Confirm the Journal mark appears before changing to another checkpoint.
Assault: The Past Never Dies
Mission challenge
HintPin this Journal entry and give it a focused attempt instead of combining incompatible routes.
WhereOpen this area's Journal challenge list and track the umbrella entry.
Full detailFinish every component Journal check displayed beneath this umbrella entry. Play aggressively and prioritize combat challenges. Confirm the Journal mark appears before changing to another checkpoint.
Fall Guy
Mission challenge
HintPin this Journal entry and give it a focused attempt instead of combining incompatible routes.
WhereStart from checkpoint 1; open the Journal and track this entry.
Full detailHurl the arena opponent over the railing. Grab the arena opponent and push him over the edge. Confirm the Journal mark appears before changing to another checkpoint.
Bottled It!
Mission challenge
HintPin this Journal entry and give it a focused attempt instead of combining incompatible routes.
WhereStart from checkpoint 1; open the Journal and track this entry.
Full detailStrike each required opponent with a thrown prop before they are defeated. Rotate bottles, chairs, and other loose objects, and use the Journal counter to ensure nobody was skipped.
Hammer Time
Mission challenge
HintPin this Journal entry and give it a focused attempt instead of combining incompatible routes.
WhereStart from checkpoint 1; open the Journal and track this entry.
Full detailDefeat the heavily armored arena opponent. Evade the committed swings, punish the recovery windows, and confirm the challenge record when the encounter ends.
Silent Line
Mission challenge
HintPin this Journal entry and give it a focused attempt instead of combining incompatible routes.
WhereStart from checkpoint 2; open the Journal and track this entry.
Full detailReach the burner phone without eliminating or incapacitating anyone. Bypass every patrol with cover and timing, then inspect the Journal before continuing.
Soldier Boy
Mission challenge
HintPin this Journal entry and give it a focused attempt instead of combining incompatible routes.
WhereStart from checkpoint 2; open the Journal and track this entry.
Full detailUse the disguise inside the hideout. Locate and equip the disguise before progressing. Confirm the Journal mark appears before changing to another checkpoint.
Art Lover
Mission challenge
HintPin this Journal entry and give it a focused attempt instead of combining incompatible routes.
WhereStart from checkpoint 3; open the Journal and track this entry.
Full detailComplete the marked market deal without interrupting it. Remain nearby until the exchange ends and the Journal mark appears.
Secure Transaction
Mission challenge
HintPin this Journal entry and give it a focused attempt instead of combining incompatible routes.
WhereStart from checkpoint 3; open the Journal and track this entry.
Full detailHack the cryptocurrency hardware device. Reach its physical location, complete every override step without leaving the interface, and check the Journal after the sequence closes.
Shoot 'Em Up
Mission challenge
HintPin this Journal entry and give it a focused attempt instead of combining incompatible routes.
WhereStart from checkpoint 3; open the Journal and track this entry.
Full detailComplete the shooting-range activity by interacting with its start control and finishing the round. Wait for the Journal confirmation before leaving the checkpoint.
Gunslinger
Mission challenge
HintPin this Journal entry and give it a focused attempt instead of combining incompatible routes.
WhereStart from checkpoint 3; open the Journal and track this entry.
Full detailHit all ten shooting-gallery targets in a single round. Take deliberate shots, restart after any miss, and verify the Journal record when the round closes.
Cupped
Mission challenge
HintPin this Journal entry and give it a focused attempt instead of combining incompatible routes.
WhereStart from checkpoint 3; open the Journal and track this entry.
Full detailPlay the cup game. Operate the cup game vendor. Confirm the Journal mark appears before changing to another checkpoint.
Show Me the Money
Mission challenge
HintPin this Journal entry and give it a focused attempt instead of combining incompatible routes.
WhereStart from checkpoint 3; open the Journal and track this entry.
Full detailGather $140,000. Search thoroughly and finish optional opportunities for cash. Confirm the Journal mark appears before changing to another checkpoint.
Tech Support
Mission challenge
HintPin this Journal entry and give it a focused attempt instead of combining incompatible routes.
WhereStart from checkpoint 3; open the Journal and track this entry.
Full detailHelp the market technician fix his setup. Operate the market technician and finish the task. Confirm the Journal mark appears before changing to another checkpoint.
Sightseeing
Mission challenge
HintPin this Journal entry and give it a focused attempt instead of combining incompatible routes.
WhereStart from checkpoint 4; open the Journal and track this entry.
Full detailReach the antenna without incapacitating or eliminating anyone. Stay outside patrol sightlines and avoid every takedown, then wait for the Journal confirmation before leaving the checkpoint.
Easy Does It
Mission challenge
HintPin this Journal entry and give it a focused attempt instead of combining incompatible routes.
WhereStart from checkpoint 5; open the Journal and track this entry.
Full detailReach the crane without eliminating or incapacitating anyone. Avoid every patrol through cover and alternate paths, then inspect the Journal at the crane.
No Trouble At All
Mission challenge
HintPin this Journal entry and give it a focused attempt instead of combining incompatible routes.
WhereStart from checkpoint 5; open the Journal and track this entry.
Full detailKeep clear of all confrontations in the simulation run. Ignore combat whenever possible and remain undetected. Confirm the Journal mark appears before changing to another checkpoint.
Silence is Violence
Mission challenge
HintPin this Journal entry and give it a focused attempt instead of combining incompatible routes.
WhereStart from checkpoint 5; open the Journal and track this entry.
Full detailExecute 10 silent takedowns. Isolate hostiles and take them out quietly. Confirm the Journal mark appears before changing to another checkpoint.
The Big Bang
Mission challenge
HintPin this Journal entry and give it a focused attempt instead of combining incompatible routes.
WhereStart from checkpoint 6; open the Journal and track this entry.
Full detailEliminate three hostiles with one explosion. Lure hostiles together before detonating an explosive. Confirm the Journal mark appears before changing to another checkpoint.
Laser Show
Mission challenge
HintPin this Journal entry and give it a focused attempt instead of combining incompatible routes.
WhereStart from checkpoint 7; open the Journal and track this entry.
Full detailExpose the laser barriers through every supported interaction. Sweep them with the Q-Lens and activate each available emitter or reveal method, using the Journal to track progress.
Wheels Up
Mission challenge
HintPin this Journal entry and give it a focused attempt instead of combining incompatible routes.
WhereStart from checkpoint 8; open the Journal and track this entry.
Full detailLaunch the off-road vehicle into the air. Build speed on a clear approach, drive over a ramp or raised terrain edge, and wait for the airborne action to register.
Make Them Count
Mission challenge
HintPin this Journal entry and give it a focused attempt instead of combining incompatible routes.
WhereStart from checkpoint 9; open the Journal and track this entry.
Full detailEliminate six opponents before reloading the same pistol. Start with a full magazine, favor precise headshots, and verify the sixth count before any reload animation begins.
Uninvited
You are here when: The formal estate venue with gala halls, press rooms, workshops, courtyard, and exhibition space.
Finish the visible route once, then use checkpoint replay for collectibles and mutually exclusive Journal approaches.
Area Completion
Story completion
HintFollow the current objective markers and explore at your own pace.
WhereComplete every checkpoint currently listed for this area in Chapter Select.
Full detailReach the area-complete transition on any difficulty. Its checkpoints remain replayable, so collection and Journal cleanup can be handled later without restarting the campaign.
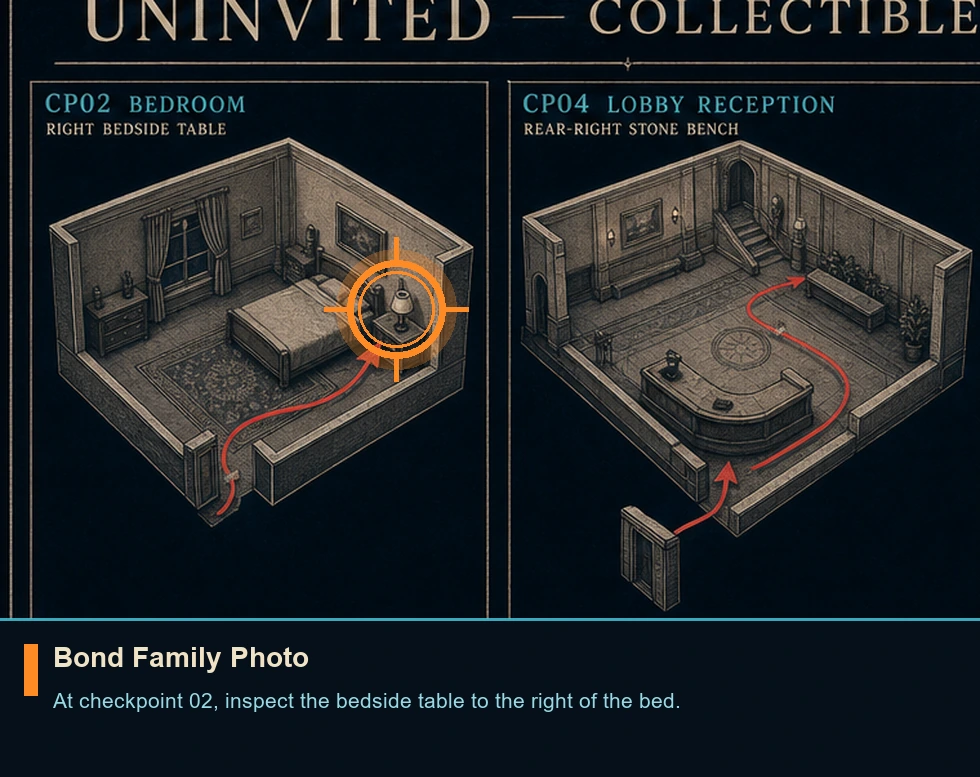
Bond Family Photo
Intel file
HintUse the watch scan during quieter exploration and inspect side rooms before following the main route.
WhereAt checkpoint 02, inspect the bedside table to the right of the bed.
Full detailLoad checkpoint 02. Enter the bedroom and take the photograph from the bedside table on the bed's right. The pickup saves immediately.
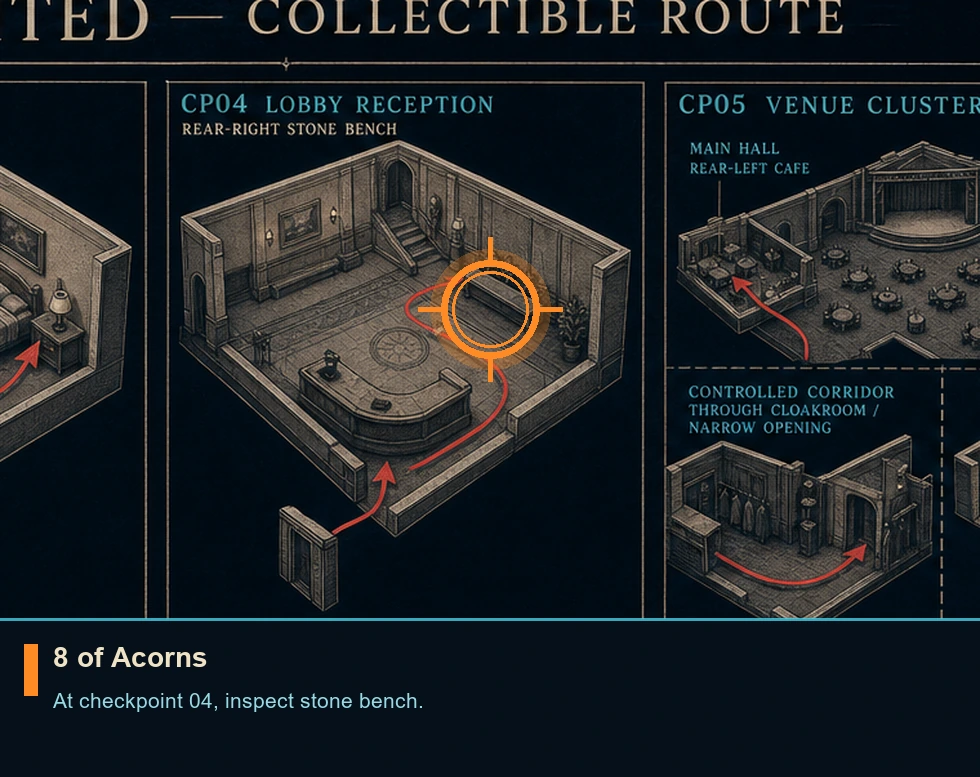
8 of Acorns
Playing card
HintUse the watch scan during quieter exploration and inspect side rooms before following the main route.
WhereAt checkpoint 04, inspect stone bench.
Full detailLoad checkpoint 04. In the entrance lobby, face the reception desk and inspect the stone bench along the rear-right wall. The card is on the bench and saves immediately.
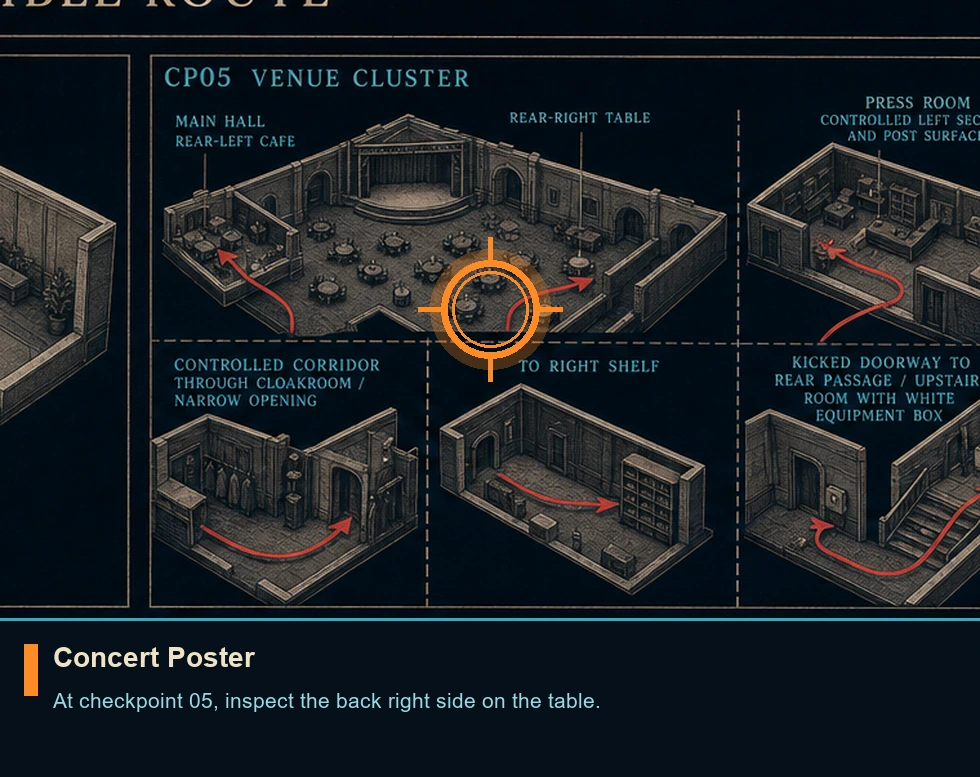
Concert Poster
Legacy item
HintUse the watch scan during quieter exploration and inspect side rooms before following the main route.
WhereAt checkpoint 05, inspect the back right side on the table.
Full detailLoad checkpoint 05. Enter the café at the back-left of the main hall, then inspect the table in the café's rear-right corner. The poster saves immediately when collected.
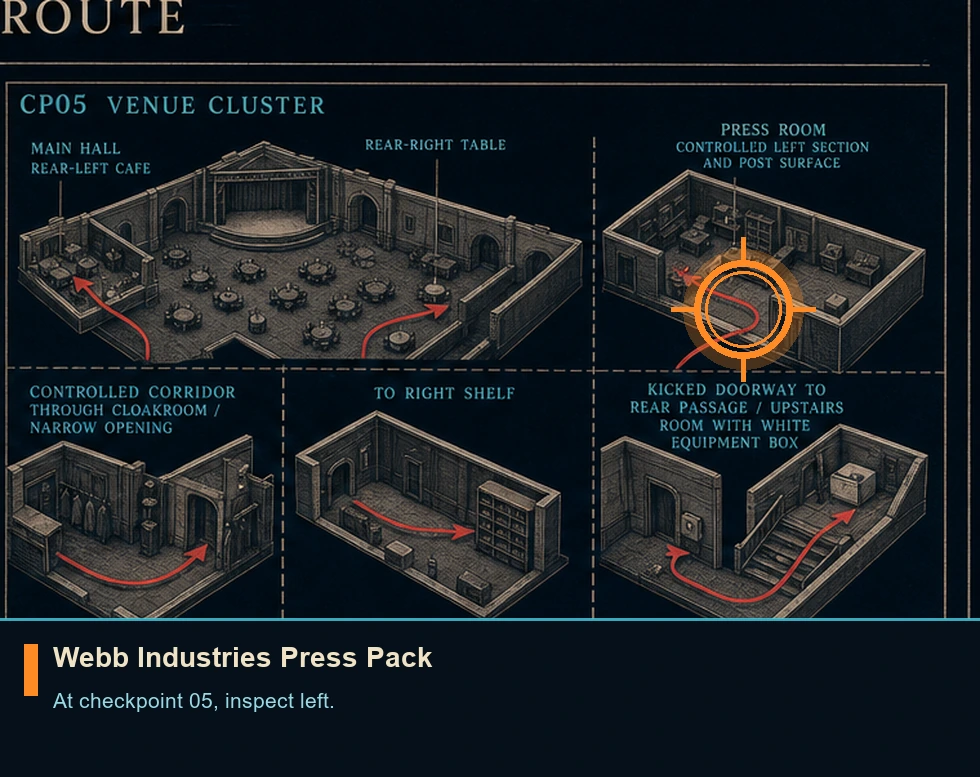
Webb Industries Press Pack
Intel file
HintUse the watch scan during quieter exploration and inspect side rooms before following the main route.
WhereAt checkpoint 05, inspect left.
Full detailLoad checkpoint 05. Leave the café and cross the corridor into the press room. Trigger the fuse box in the far-right corner to draw away the sentry, enter the controlled section on the left, bluff the remaining employee if necessary, and collect the press pack from the surface beside the post. The pickup saves immediately.
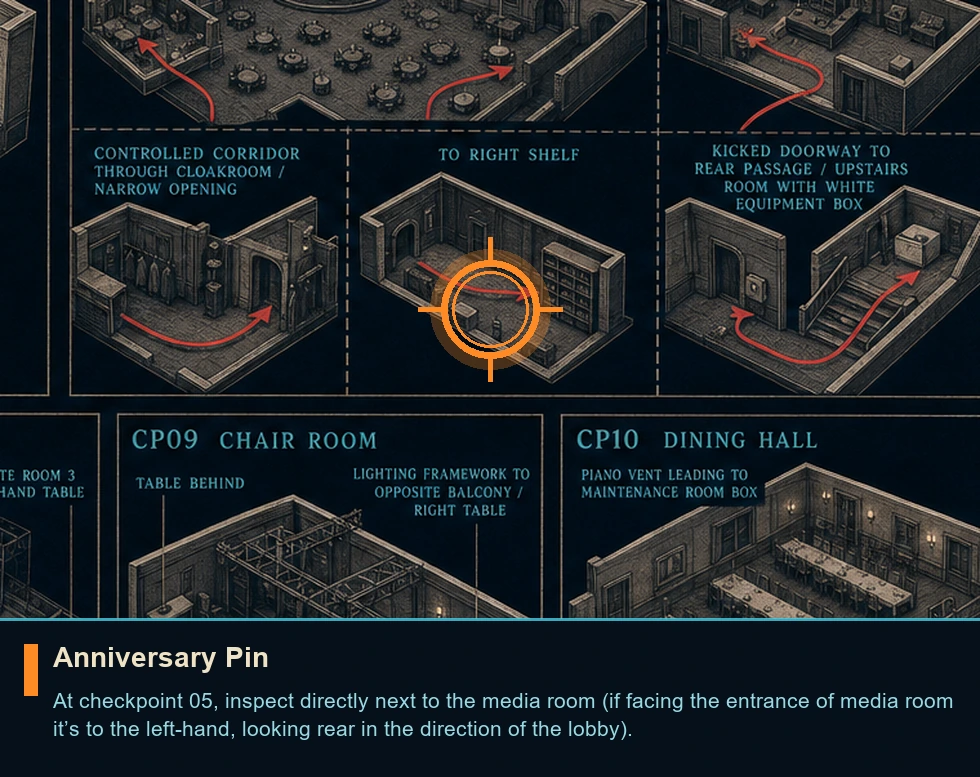
Anniversary Pin
Memento
HintUse the watch scan during quieter exploration and inspect side rooms before following the main route.
WhereAt checkpoint 05, inspect directly next to the media room (if facing the entrance of media room it’s to the left-hand, looking rear in the direction of the lobby).
Full detailLoad checkpoint 05. Exit the press room and turn right toward the controlled corridor beside it. Distract the lone sentry with the Dart Phone or Laser Strap, pass into the cloakroom, squeeze through the narrow opening on the right, and take the pin from the shelf. The pickup saves immediately.
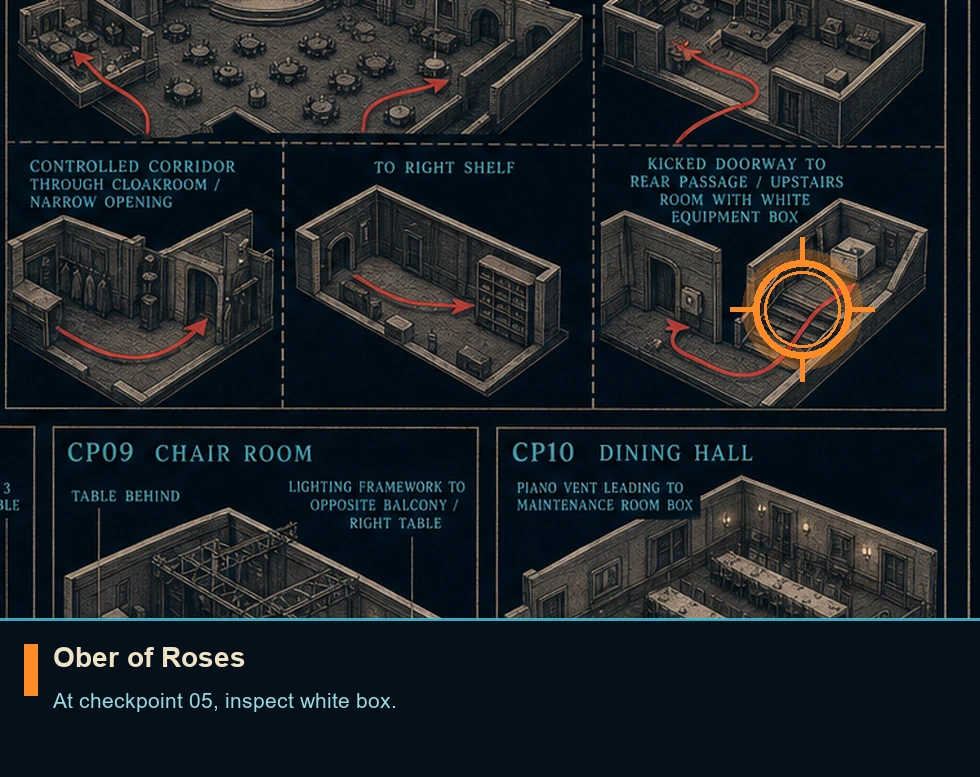
Ober of Roses
Playing card
HintUse the watch scan during quieter exploration and inspect side rooms before following the main route.
WhereAt checkpoint 05, inspect white box.
Full detailLoad checkpoint 05. Kick through the doorway beside the previous pickup, follow the rear passage upstairs, and clear the occupied room. The card rests on a white equipment box near the room's center; its matching color makes it easy to miss. The pickup saves immediately.
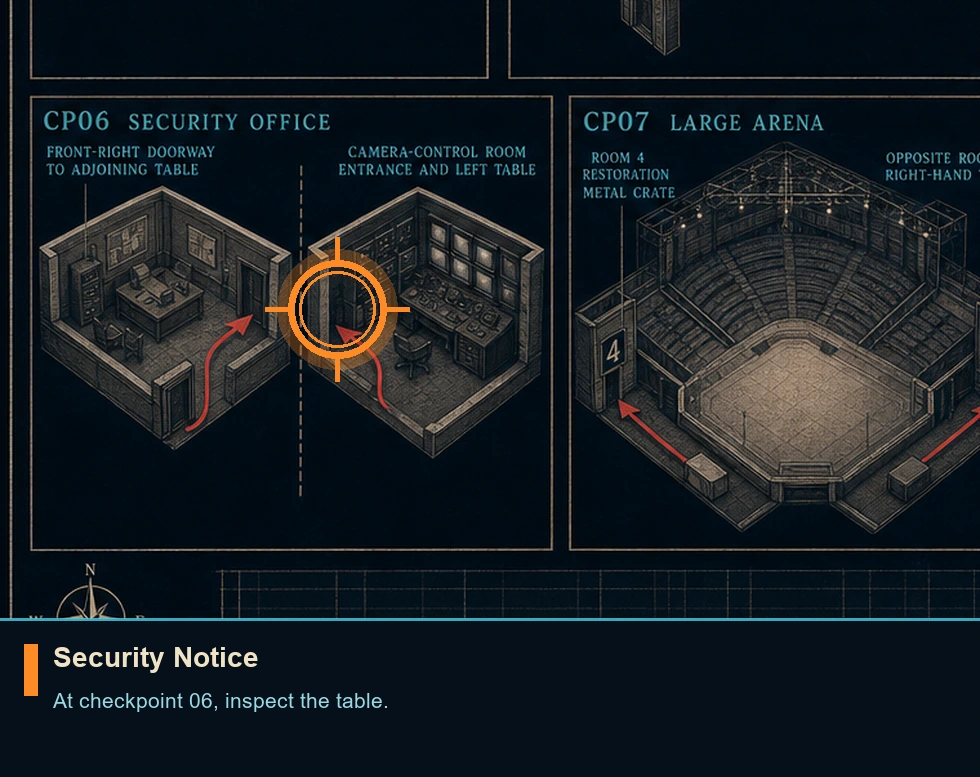
Security Notice
Intel file
HintUse the watch scan during quieter exploration and inspect side rooms before following the main route.
WhereAt checkpoint 06, inspect the table.
Full detailLoad checkpoint 06. Enter the security office, use the front-right doorway, and take the notice from the table in the adjoining room. The pickup saves immediately.
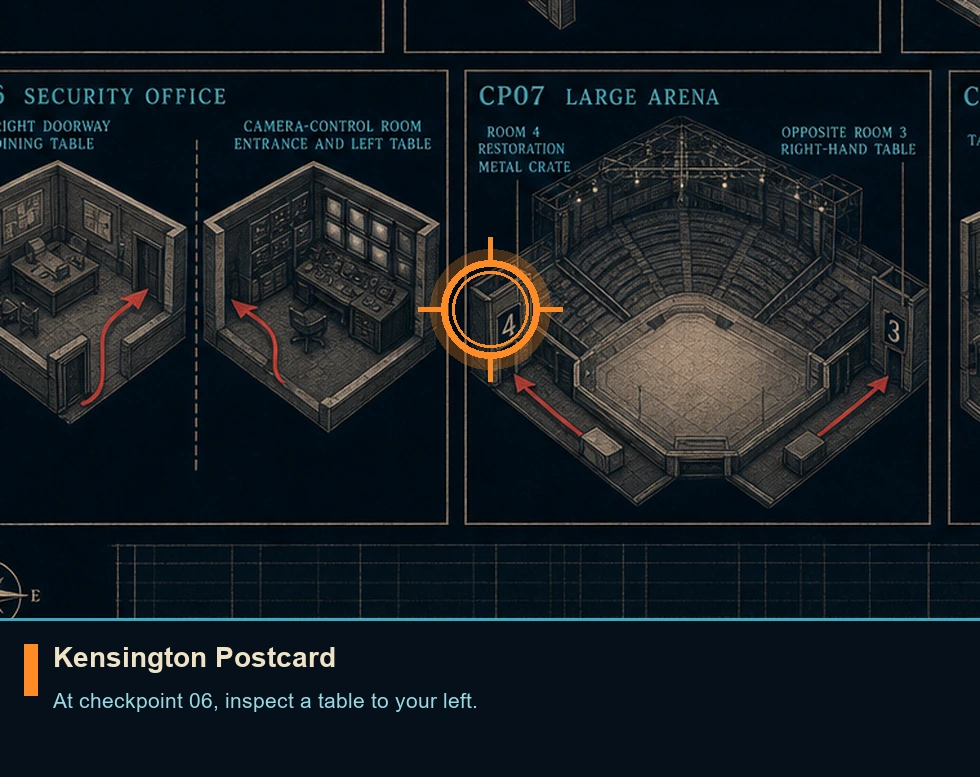
Kensington Postcard
Postcard
HintUse the watch scan during quieter exploration and inspect side rooms before following the main route.
WhereAt checkpoint 06, inspect a table to your left.
Full detailLoad checkpoint 06. Upon entering the camera-control room, inspect the table immediately to your left. The postcard saves as soon as it is collected.
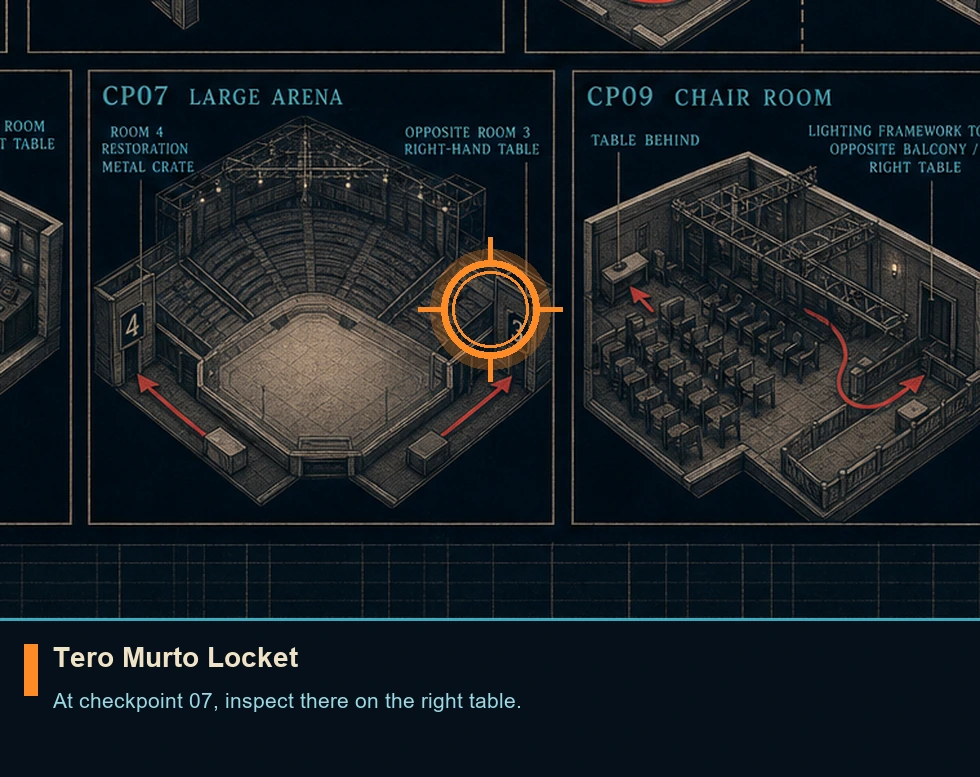
Tero Murto Locket
Memento
HintUse the watch scan during quieter exploration and inspect side rooms before following the main route.
WhereAt checkpoint 07, inspect there on the right table.
Full detailLoad checkpoint 07. Beyond the large arena, enter Room 4 Restoration on the right and open its metal crate for the Restoration Room Keycard. Use that card on the door opposite Room 3 Restoration, then take the locket from the right-hand table. The pickup saves immediately.
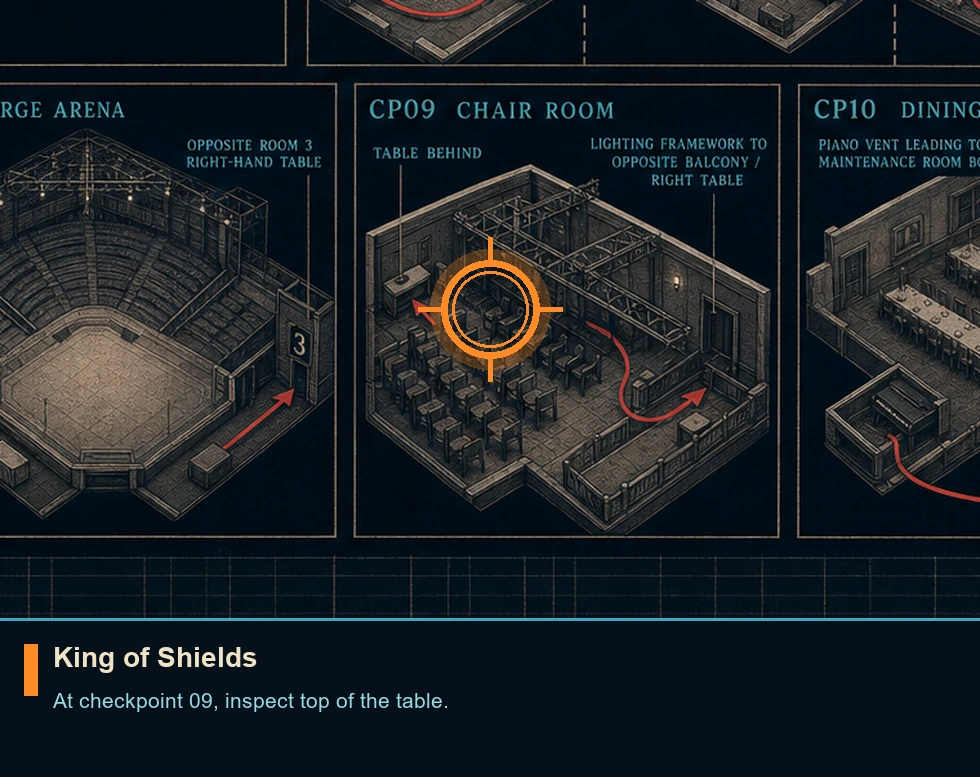
King of Shields
Playing card
HintUse the watch scan during quieter exploration and inspect side rooms before following the main route.
WhereAt checkpoint 09, inspect top of the table.
Full detailOnce control returns in the chair room, turn around and take the card from the tabletop. The pickup saves immediately.
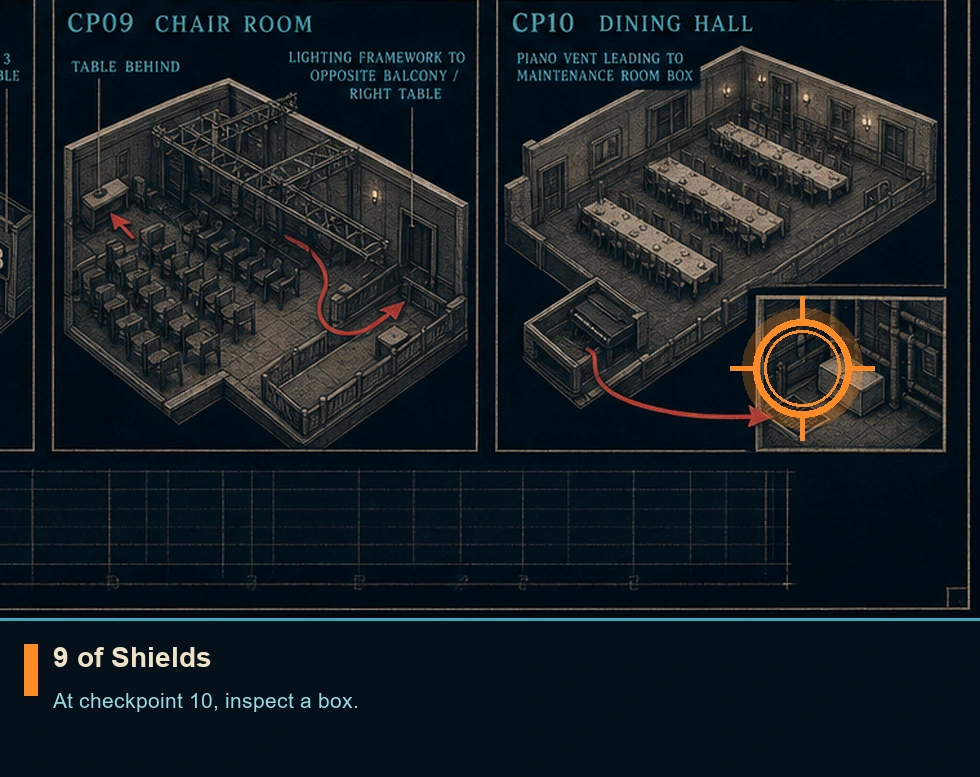
8 of Roses
Playing card
HintUse the watch scan during quieter exploration and inspect side rooms before following the main route.
WhereAt checkpoint 09, inspect a table.
Full detailLoad checkpoint 09. Cross the lighting framework to the opposite balcony, turn right, and inspect the nearby table. The card saves immediately when collected.
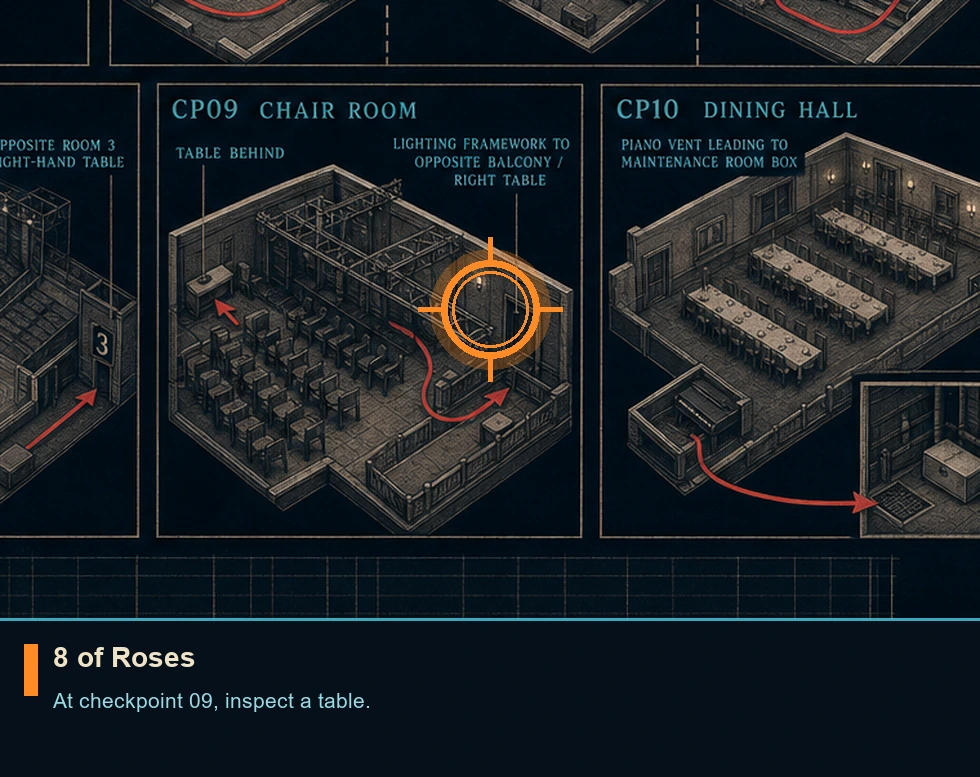
9 of Shields
Playing card
HintUse the watch scan during quieter exploration and inspect side rooms before following the main route.
WhereAt checkpoint 10, inspect a box.
Full detailLoad checkpoint 10. On the ground floor, enter the dining hall and crawl into the vent beside the piano. Follow it to the maintenance-room lock, cut that lock with the Laser Strap, and take the card from the box inside. Alternatively, open the door with 3256, found on the library computer. The pickup saves immediately.
Completionist: Uninvited
Mission challenge
HintPin this Journal entry and give it a focused attempt instead of combining incompatible routes.
WhereStart from checkpoint 1; open the Journal and track this entry.
Full detailClear every challenge in this area to unlock its challenge outfit in TacSim. Track the stealth, combat, and disguise routes across separate runs as needed, then verify the Journal completion mark.
Pacifist: Uninvited
Mission challenge
HintPin this Journal entry and give it a focused attempt instead of combining incompatible routes.
WhereOpen this area's Journal challenge list and track the umbrella entry.
Full detailFill every Pacifist component shown below this umbrella record. They may be completed across separate attempts; reopen the Journal after the third component to verify the umbrella completion.
Ghost: Uninvited
Mission challenge
HintPin this Journal entry and give it a focused attempt instead of combining incompatible routes.
WhereOpen this area's Journal challenge list and track the umbrella entry.
Full detailFinish every component Journal check displayed beneath this umbrella entry. Remain undetected during each stealth section. Confirm the Journal mark appears before changing to another checkpoint.
Assault: Uninvited
Mission challenge
HintPin this Journal entry and give it a focused attempt instead of combining incompatible routes.
WhereOpen this area's Journal challenge list and track the umbrella entry.
Full detailFinish every component Journal check displayed beneath this umbrella entry. Complete all Assault challenges across the simulation run. Confirm the Journal mark appears before changing to another checkpoint.
Hard Man
Mission challenge
HintPin this Journal entry and give it a focused attempt instead of combining incompatible routes.
WhereStart from checkpoint 1; open the Journal and track this entry.
Full detailTake out the major opponent without suffering a hit. Dodge, parry, and keep clear of trading hits. Confirm the Journal mark appears before changing to another checkpoint.
Kitchen Wars!
Mission challenge
HintPin this Journal entry and give it a focused attempt instead of combining incompatible routes.
WhereStart from checkpoint 1; open the Journal and track this entry.
Full detailHurl 3 objects at the major opponent. Take and hurl nearby objects during the fight. Confirm the Journal mark appears before changing to another checkpoint.
Missed Me!
Mission challenge
HintPin this Journal entry and give it a focused attempt instead of combining incompatible routes.
WhereStart from checkpoint 2; open the Journal and track this entry.
Full detailCross the sniper-controlled route without being hit. Stay behind solid cover and move only after the aiming laser sweeps away, then verify the Journal mark.
Gate Crasher
Mission challenge
HintPin this Journal entry and give it a focused attempt instead of combining incompatible routes.
WhereStart from checkpoint 3; open the Journal and track this entry.
Full detailEnter the gala without presenting an invitation. Combine a Phone Dart distraction with the Laser Strap route around security, then check the Journal once you are inside.
Say 'Cheese'!
Mission challenge
HintPin this Journal entry and give it a focused attempt instead of combining incompatible routes.
WhereStart from checkpoint 3; open the Journal and track this entry.
Full detailReach the upper level while using the photographer route. Listen near the central bar to reveal it, obtain the camera, and follow the resulting access prompt until the Journal updates.
Always on Duty
Mission challenge
HintPin this Journal entry and give it a focused attempt instead of combining incompatible routes.
WhereStart from checkpoint 3; open the Journal and track this entry.
Full detailReach the upper level through the security-uniform route. Learn the duty rotation by listening in the café, obtain the required access, and verify the Journal after going upstairs.
Behind the Scenes
Mission challenge
HintPin this Journal entry and give it a focused attempt instead of combining incompatible routes.
WhereStart from checkpoint 3; open the Journal and track this entry.
Full detailReach the upper level through the press room's backstage doorway. Distract its guard, slip through unseen, and wait for the Journal confirmation.
VIP Entrance
Mission challenge
HintPin this Journal entry and give it a focused attempt instead of combining incompatible routes.
WhereStart from checkpoint 3; open the Journal and track this entry.
Full detailUse a stolen keycard to reach the upper level. Separate the cardholder from the nearby guard with distractions, take the card unseen, and pass through the controlled doorway.
All Clear
Mission challenge
HintPin this Journal entry and give it a focused attempt instead of combining incompatible routes.
WhereStart from checkpoint 4; open the Journal and track this entry.
Full detailIncapacitate ten guards within the security office area before entering camera control. Monitor the Journal counter and remain in the room until all ten register.
Dropping In
Mission challenge
HintPin this Journal entry and give it a focused attempt instead of combining incompatible routes.
WhereStart from checkpoint 4; open the Journal and track this entry.
Full detailEnter the camera-control room through its skylight. Reach the roof, open the gated route, override the skylight mechanism, and confirm the Journal update after dropping inside.
A Quiet Night
Mission challenge
HintPin this Journal entry and give it a focused attempt instead of combining incompatible routes.
WhereStart from checkpoint 4; open the Journal and track this entry.
Full detailCross the CCTV room without taking out any security personnel. Use stealth and keep clear of all takedowns. Confirm the Journal mark appears before changing to another checkpoint.
Top Notch Security
Mission challenge
HintPin this Journal entry and give it a focused attempt instead of combining incompatible routes.
WhereStart from checkpoint 4; open the Journal and track this entry.
Full detailReach the CCTV room while remaining unseen. Remain hidden and use distractions where needed. Confirm the Journal mark appears before changing to another checkpoint.
Simon Says
Mission challenge
HintPin this Journal entry and give it a focused attempt instead of combining incompatible routes.
WhereStart from checkpoint 4; open the Journal and track this entry.
Full detailReach the camera-control room after incapacitating only the marked guard and the nearby companion. Avoid every other takedown and confirm the Journal entry before leaving.
Workplace Agreement
Mission challenge
HintPin this Journal entry and give it a focused attempt instead of combining incompatible routes.
WhereStart from checkpoint 5; open the Journal and track this entry.
Full detailCross the workshop without taking down the security personnel. Use vents and keep clear of all hostiles. Confirm the Journal mark appears before changing to another checkpoint.
Rack N' Roll
Mission challenge
HintPin this Journal entry and give it a focused attempt instead of combining incompatible routes.
WhereStart from checkpoint 5; open the Journal and track this entry.
Full detailLeave the workshop by way of the server room without detection. Remain on the high walkways, move only between clear sightlines, and inspect the Journal after reaching the exit.
Nothing to Report
Mission challenge
HintPin this Journal entry and give it a focused attempt instead of combining incompatible routes.
WhereStart from checkpoint 5; open the Journal and track this entry.
Full detailSubdue every guard in the workshop without detection. Distract security personnel and take them out individually. Confirm the Journal mark appears before changing to another checkpoint.
Art Attack
Mission challenge
HintPin this Journal entry and give it a focused attempt instead of combining incompatible routes.
WhereStart from checkpoint 5; open the Journal and track this entry.
Full detailTake out 3 security personnel with explosives in the workshop. Lure hostiles to explosive canisters before shooting them. Confirm the Journal mark appears before changing to another checkpoint.
Closed for Maintenance
Mission challenge
HintPin this Journal entry and give it a focused attempt instead of combining incompatible routes.
WhereStart from checkpoint 6; open the Journal and track this entry.
Full detailOpen the courtyard maintenance room. Read the library computer to obtain 3256, enter that code at the locked door, and verify the Journal record once it opens.
The Big Bluff
Mission challenge
HintPin this Journal entry and give it a focused attempt instead of combining incompatible routes.
WhereStart from checkpoint 6; open the Journal and track this entry.
Full detailSuccessfully bluff a group of three guards in the courtyard. Gather their attention within one interaction radius, use Focus to sustain the exchange, and verify the Journal afterward.
Just Passing Through
Mission challenge
HintPin this Journal entry and give it a focused attempt instead of combining incompatible routes.
WhereStart from checkpoint 6; open the Journal and track this entry.
Full detailCross the courtyard without killing any security personnel. Remain stealthy and keep clear of lethal force. Confirm the Journal mark appears before changing to another checkpoint.
Fast Track
Mission challenge
HintPin this Journal entry and give it a focused attempt instead of combining incompatible routes.
WhereStart from checkpoint 6; open the Journal and track this entry.
Full detailCross the full courtyard without entering a compromised state. Remain outside sightlines, avoid suspicious actions, and inspect the Journal after reaching the opposite side.
8 for 8
Mission challenge
HintPin this Journal entry and give it a focused attempt instead of combining incompatible routes.
WhereStart from checkpoint 6; open the Journal and track this entry.
Full detailSubdue 8 security personnel in the courtyard without detection. Use gadgets to isolate and silently take out security personnel. Confirm the Journal mark appears before changing to another checkpoint.
Health & Safety
Mission challenge
HintPin this Journal entry and give it a focused attempt instead of combining incompatible routes.
WhereStart from checkpoint 6; open the Journal and track this entry.
Full detailTake out 3 security personnel with scaffolding. Drop scaffolding with the Laser Strap. Confirm the Journal mark appears before changing to another checkpoint.
Green Fingers
Mission challenge
HintPin this Journal entry and give it a focused attempt instead of combining incompatible routes.
WhereStart from checkpoint 6; open the Journal and track this entry.
Full detailIncapacitate fifteen guards in the courtyard. Keep every takedown inside that area's boundary and watch the Journal counter until the fifteenth registers.
IT Specialist
Mission challenge
HintPin this Journal entry and give it a focused attempt instead of combining incompatible routes.
WhereStart from checkpoint 7; open the Journal and track this entry.
Full detailBreak 15 screens in the Webb exhibition. Break the display screens throughout the room. Confirm the Journal mark appears before changing to another checkpoint.
Bin Collection
Mission challenge
HintPin this Journal entry and give it a focused attempt instead of combining incompatible routes.
WhereStart from checkpoint 8; open the Journal and track this entry.
Full detailDuring the vehicle escape, take the construction detour on the right. Drive the refuse truck through that entire branch and wait for the route record to appear.
Knightfall
You are here when: The glass high-rise interior with executive offices, maintenance vents, data floors, and cargo levels.
Finish the visible route once, then use checkpoint replay for collectibles and mutually exclusive Journal approaches.
Area Completion
Story completion
HintFollow the current objective markers and explore at your own pace.
WhereComplete every checkpoint currently listed for this area in Chapter Select.
Full detailReach the area-complete transition on any difficulty. Its checkpoints remain replayable, so collection and Journal cleanup can be handled later without restarting the campaign.
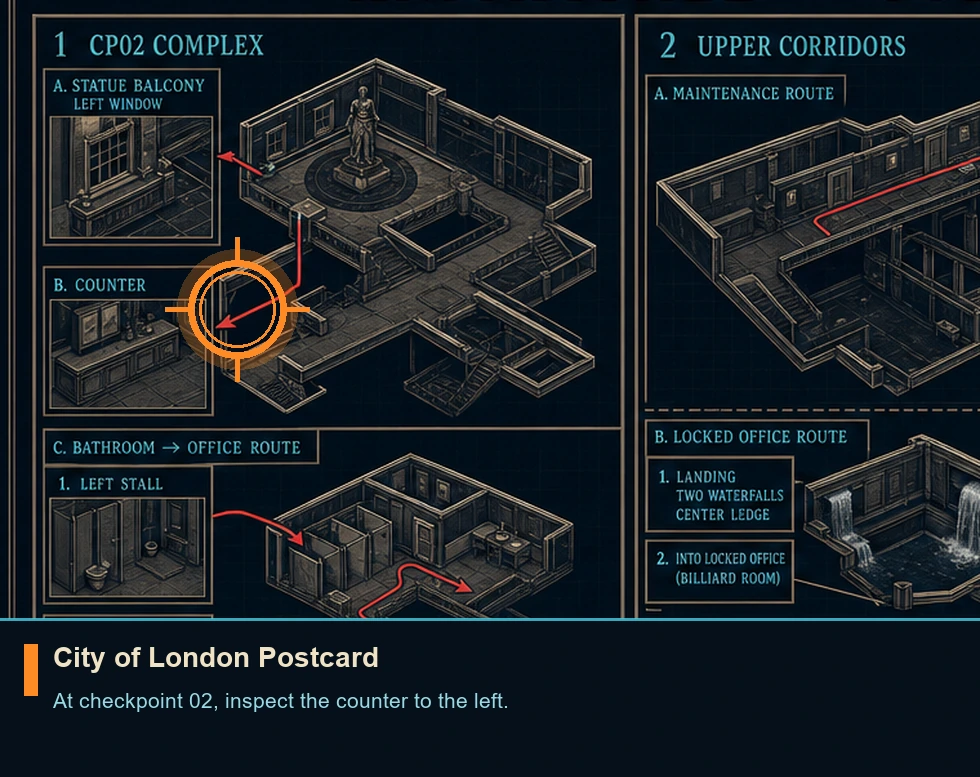
City of London Postcard
Postcard
HintUse the watch scan during quieter exploration and inspect side rooms before following the main route.
WhereAt checkpoint 02, inspect the counter to the left.
Full detailLoad checkpoint 02. After climbing onto the statue, jump to the next balcony and follow it left. Vault the rail, shimmy along the ledge, and climb through the window. The postcard is on the counter to the left. The pickup saves immediately.
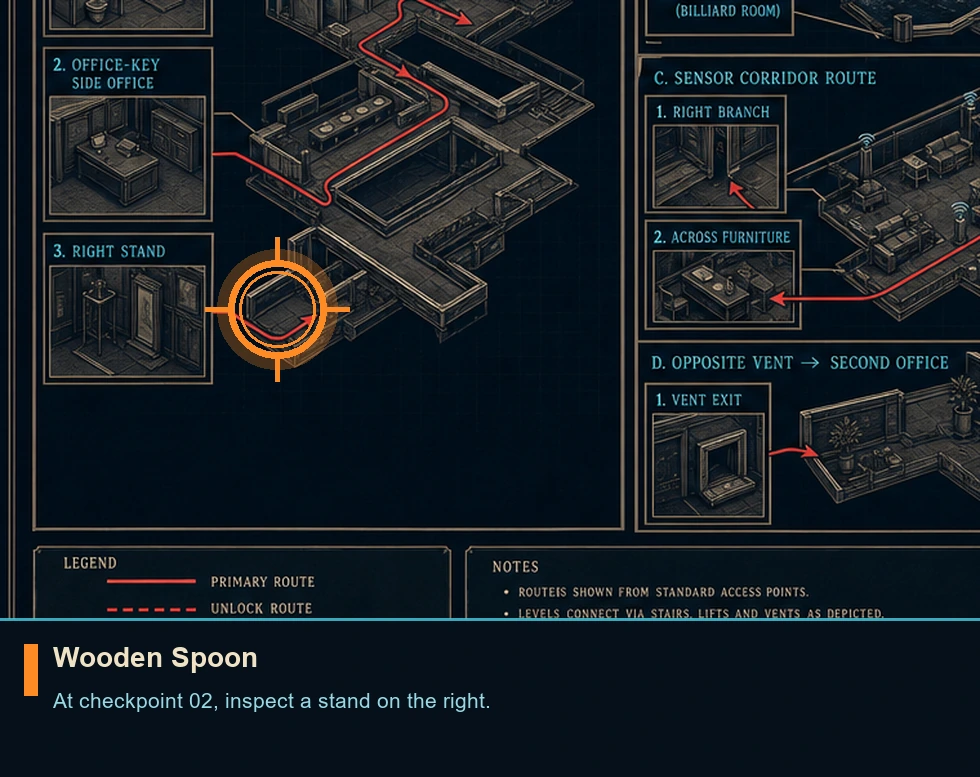
Wooden Spoon
Intel file
HintUse the watch scan during quieter exploration and inspect side rooms before following the main route.
WhereAt checkpoint 02, inspect a stand on the right.
Full detailLoad checkpoint 02. Descend to the bathroom, break open the left stall, and take the office key. Return to the route corridor, unlock the marked side office, and inspect the stand on the right. The pickup saves immediately.
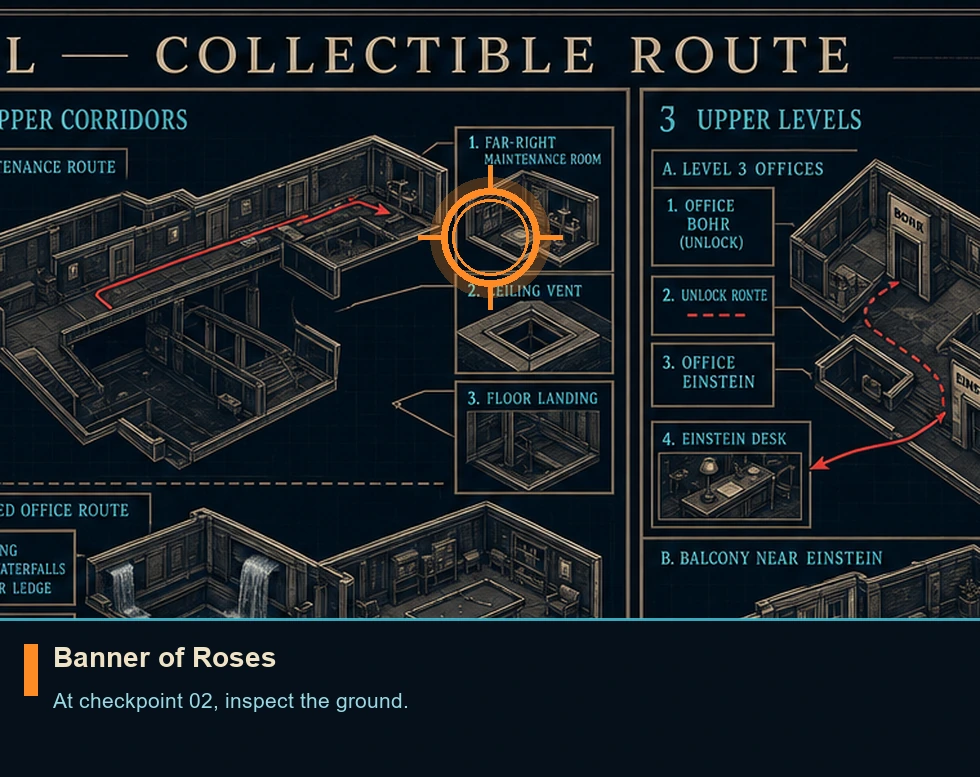
Banner of Roses
Playing card
HintUse the watch scan during quieter exploration and inspect side rooms before following the main route.
WhereAt checkpoint 02, inspect the ground.
Full detailLoad checkpoint 02. On the upper corridor, enter the Maintenance room at the far-right end. Cut open the ceiling vent with the Laser Strap, climb inside, and collect the card from the floor. The pickup saves immediately.
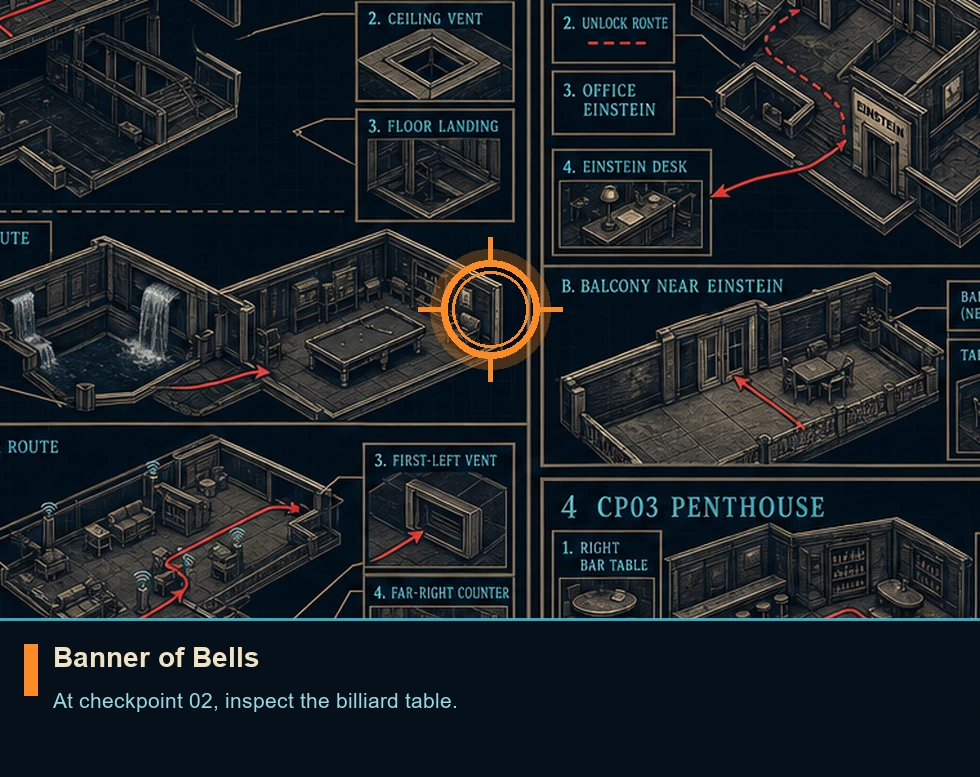
Banner of Bells
Playing card
HintUse the watch scan during quieter exploration and inspect side rooms before following the main route.
WhereAt checkpoint 02, inspect the billiard table.
Full detailLoad checkpoint 02. At the landing facing two waterfalls, vault the rail and shimmy along the narrow center ledge. Climb up opposite, turn left, and remotely open the door sensor from inside the locked office. Once the other side is opened, take the card from the billiard table. The pickup saves immediately.
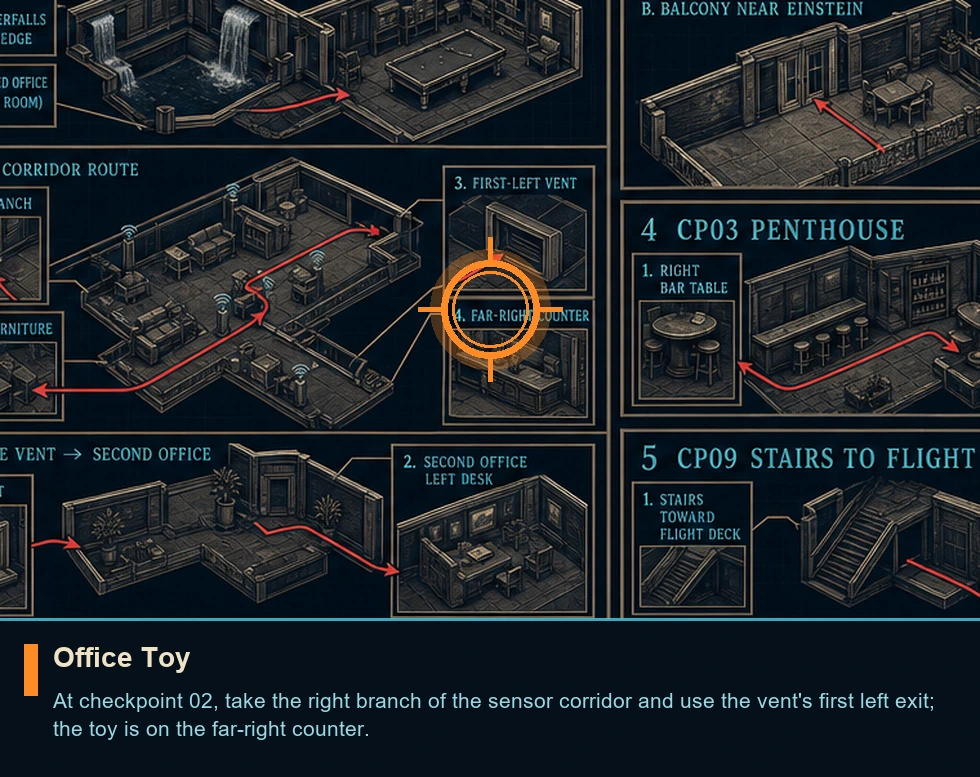
Office Toy
Memento
HintUse the watch scan during quieter exploration and inspect side rooms before following the main route.
WhereAt checkpoint 02, take the right branch of the sensor corridor and use the vent's first left exit; the toy is on the far-right counter.
Full detailLoad checkpoint 02. In the corridor lined with sensors, take the right branch and move the obstructing furniture. Enter the vent and use its first left exit. The toy is on the far-right counter in that office. The pickup saves immediately.
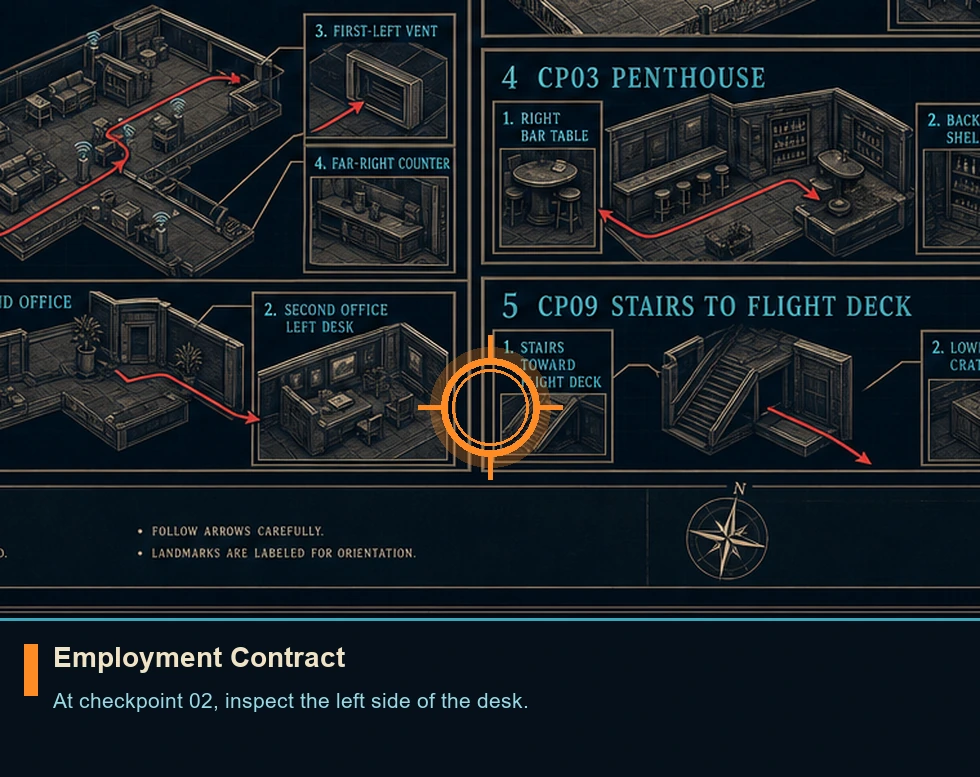
Employment Contract
Intel file
HintUse the watch scan during quieter exploration and inspect side rooms before following the main route.
WhereAt checkpoint 02, inspect the left side of the desk.
Full detailLoad checkpoint 02. From the office-toy room, re-enter the vent and take the opposite exit. The contract lies on the left side of the desk in the second office. The pickup saves immediately.
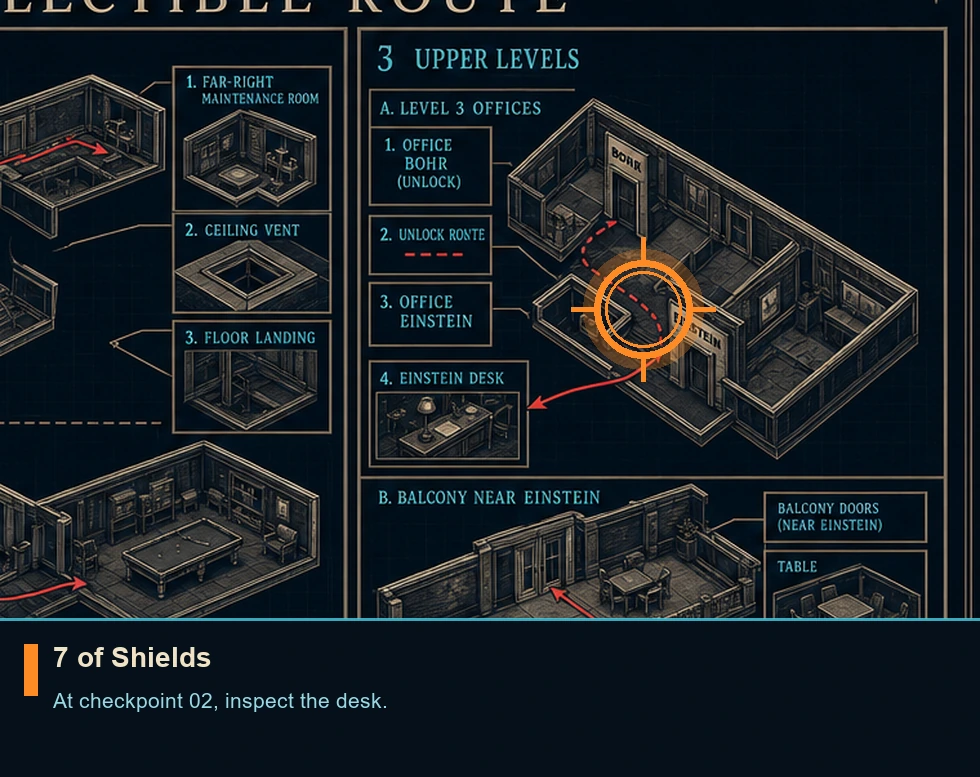
7 of Shields
Playing card
HintUse the watch scan during quieter exploration and inspect side rooms before following the main route.
WhereAt checkpoint 02, inspect the desk.
Full detailLoad checkpoint 02. On Level 3, enter the office marked Bohr near the corridor's far end. Use its interior control to unlock the Einstein office, then enter that room and take the card from the desk. The pickup saves immediately.
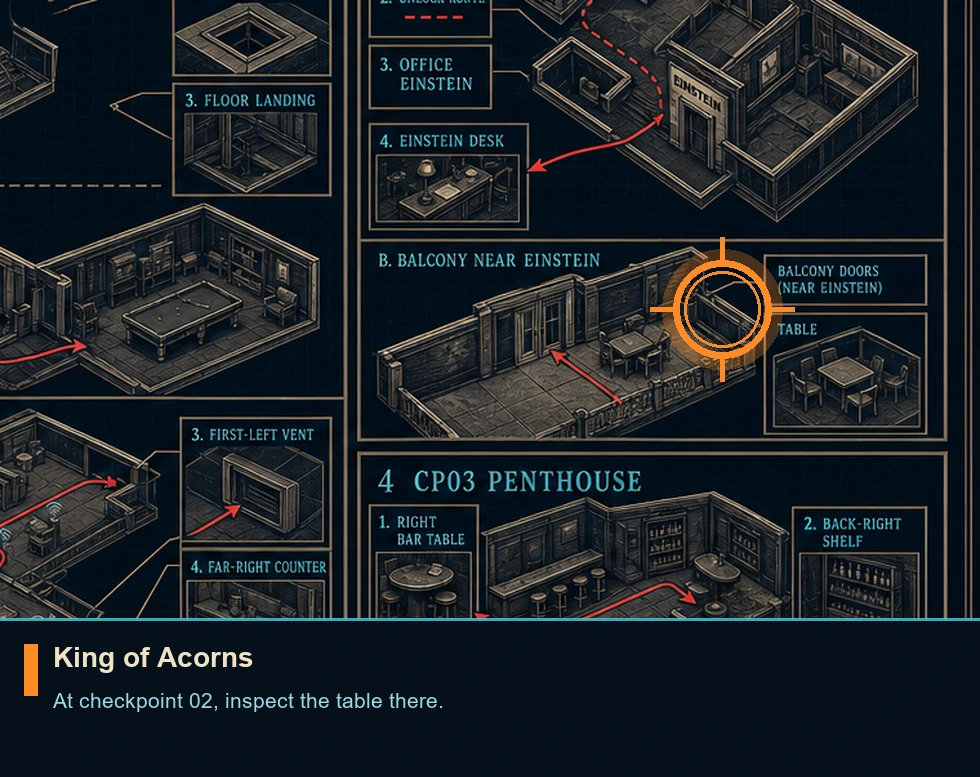
King of Acorns
Playing card
HintUse the watch scan during quieter exploration and inspect side rooms before following the main route.
WhereAt checkpoint 02, inspect the table there.
Full detailLoad checkpoint 02. After obtaining the Security Key, return to the Level 3 corridor near the Einstein office. Unlock the balcony doors near the corridor entrance and collect the card from the table outside. The pickup saves immediately.
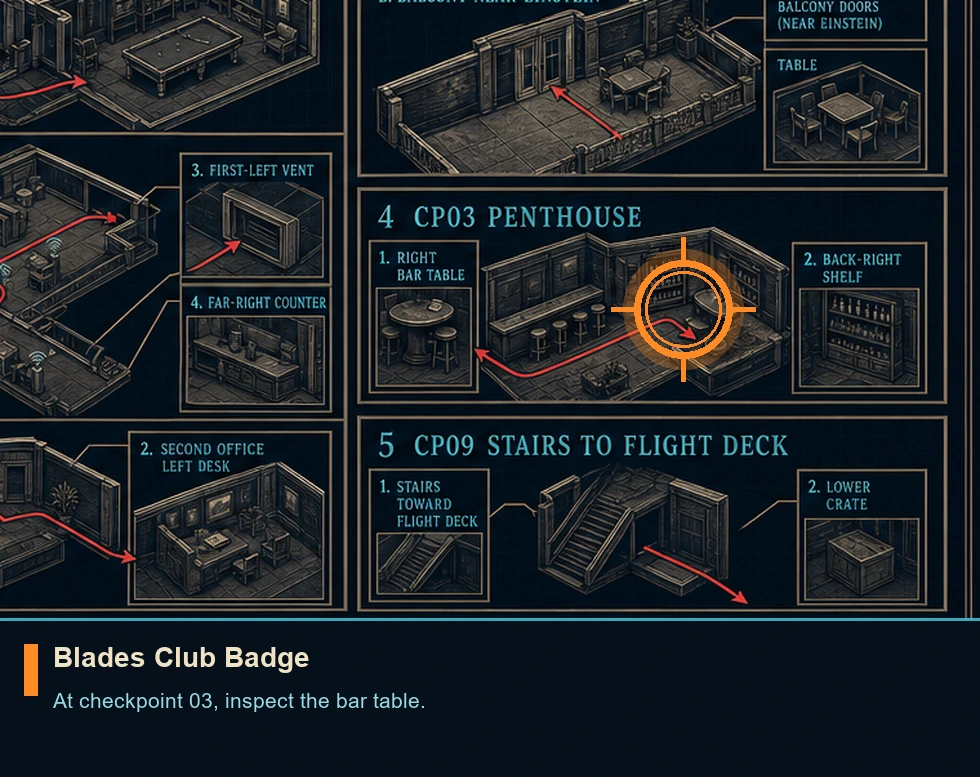
Blades Club Badge
Legacy item
HintUse the watch scan during quieter exploration and inspect side rooms before following the main route.
WhereAt checkpoint 03, inspect the bar table.
Full detailLoad checkpoint 03. As soon as you access the penthouse, turn right to locate this on the bar table. The pickup saves immediately; once its new-item notice appears, checkpoint completion is not required.
Psych Profile
Intel file
HintUse the watch scan during quieter exploration and inspect side rooms before following the main route.
WhereAt checkpoint 03, inspect shelf.
Full detailLoad checkpoint 03. In the back right side of the penthouse on the shelf. The pickup saves immediately; once its new-item notice appears, checkpoint completion is not required.
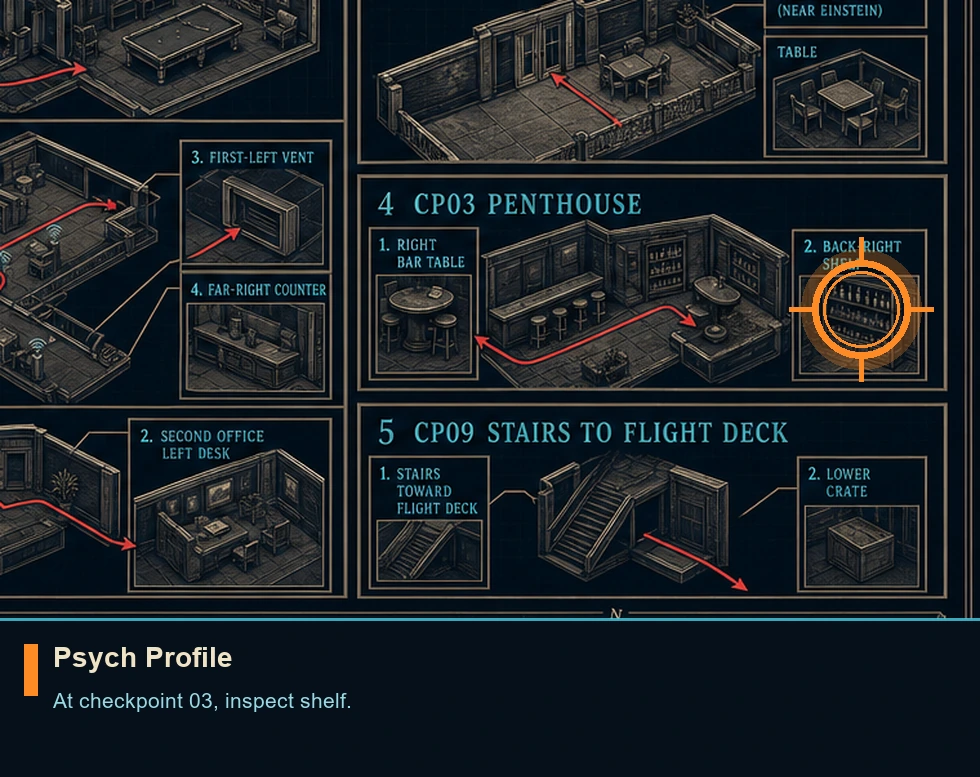
Under of Shields
Playing card
HintUse the watch scan during quieter exploration and inspect side rooms before following the main route.
WhereAt checkpoint 09, inspect a crate.
Full detailLoad checkpoint 09. At the stairs leading upward toward the flight deck, descend instead. The card rests on a crate at the lower level and saves immediately.
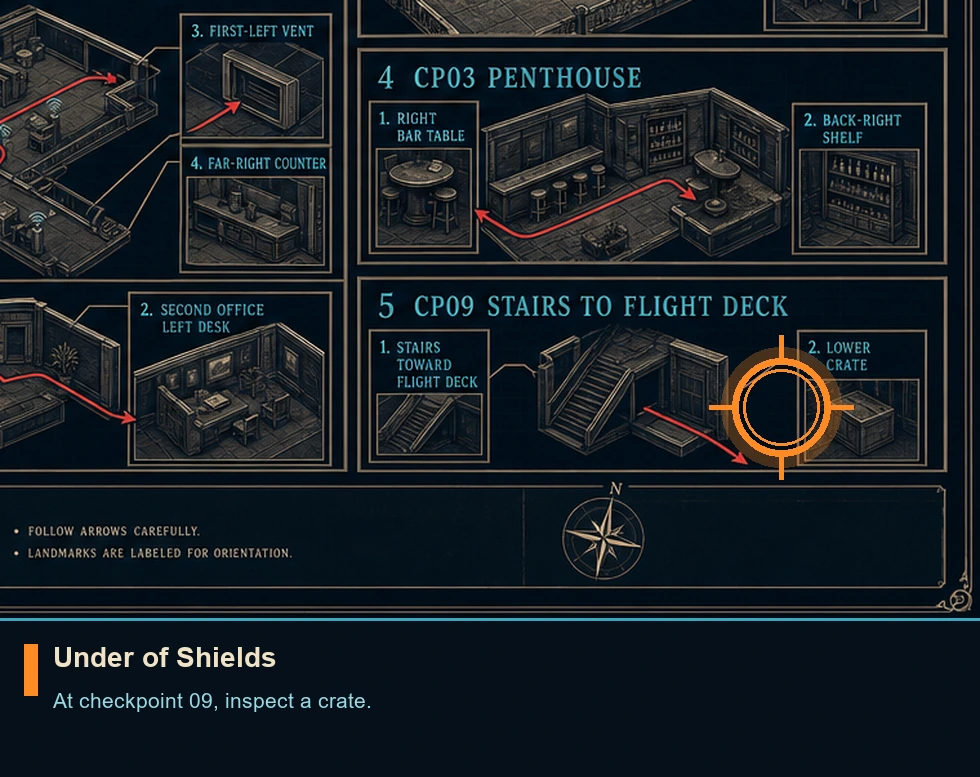
Completionist: Knightfall
Mission challenge
HintPin this Journal entry and give it a focused attempt instead of combining incompatible routes.
WhereStart from checkpoint 1; open the Journal and track this entry.
Full detailComplete every challenge record in this area to receive its TacSim outfit. Combine compatible stealth, combat, and puzzle checks where practical, then reopen the Journal to verify the completion record.
Pacifist: Knightfall
Mission challenge
HintPin this Journal entry and give it a focused attempt instead of combining incompatible routes.
WhereStart from checkpoint 1; open the Journal and track this entry.
Full detailFinish every component Journal check displayed beneath this umbrella entry. Keep clear of kills; use stealth movement and gadgets. Confirm the Journal mark appears before changing to another checkpoint.
Ghost: Knightfall
Mission challenge
HintPin this Journal entry and give it a focused attempt instead of combining incompatible routes.
WhereStart from checkpoint 1; open the Journal and track this entry.
Full detailFinish every component Journal check displayed beneath this umbrella entry. Remain undetected throughout executive areas. Confirm the Journal mark appears before changing to another checkpoint.
Assault: Knightfall
Mission challenge
HintPin this Journal entry and give it a focused attempt instead of combining incompatible routes.
WhereStart from checkpoint 1; open the Journal and track this entry.
Full detailFinish every component Journal check displayed beneath this umbrella entry. Expect full combat encounters and environmental kills. Confirm the Journal mark appears before changing to another checkpoint.
Exclusive Access
Mission challenge
HintPin this Journal entry and give it a focused attempt instead of combining incompatible routes.
WhereStart from checkpoint 1; open the Journal and track this entry.
Full detailObtain the office keycard from the bathroom stall reached after the balcony traversal. Collect it before leaving that floor and verify the Journal mark.
Tactical Pause
Mission challenge
HintPin this Journal entry and give it a focused attempt instead of combining incompatible routes.
WhereStart from checkpoint 1; open the Journal and track this entry.
Full detailComplete every conversation with your companion. Exhaust dialogue near waterfalls on second floor. Confirm the Journal mark appears before changing to another checkpoint.
High Ground (Knightfall)
Mission challenge
HintPin this Journal entry and give it a focused attempt instead of combining incompatible routes.
WhereStart from checkpoint 1; open the Journal and track this entry.
Full detailUse the overhead vent on the second executive floor to unlock the blocked door from inside. Wait for the Journal confirmation before continuing.
Discretion Advised
Mission challenge
HintPin this Journal entry and give it a focused attempt instead of combining incompatible routes.
WhereStart from checkpoint 1; open the Journal and track this entry.
Full detailPass through the meeting area without alerts or takedowns. Use slow covered movement, leave every occupant untouched, and verify the Journal after exiting.
Hand of God
Mission challenge
HintPin this Journal entry and give it a focused attempt instead of combining incompatible routes.
WhereStart from checkpoint 1; open the Journal and track this entry.
Full detailTake out all targets without detection. Use vent flanks and timed distractions. Confirm the Journal mark appears before changing to another checkpoint.
Makeover
Mission challenge
HintPin this Journal entry and give it a focused attempt instead of combining incompatible routes.
WhereStart from checkpoint 1; open the Journal and track this entry.
Full detailHurl 4 security personnel through windows. Use grab-and-hurl mechanics (RT/R2). Confirm the Journal mark appears before changing to another checkpoint.
Blackball
Mission challenge
HintPin this Journal entry and give it a focused attempt instead of combining incompatible routes.
WhereStart from checkpoint 1; open the Journal and track this entry.
Full detailComplete the pool-table interaction after opening access to its room. Remain until the full interaction ends and the Journal confirmation appears.
Crackerjack
Mission challenge
HintPin this Journal entry and give it a focused attempt instead of combining incompatible routes.
WhereStart from checkpoint 1; open the Journal and track this entry.
Full detailOpen the safe on the first attempt. Code: 1493. Confirm the Journal mark appears before changing to another checkpoint.
Epic Fail
Mission challenge
HintPin this Journal entry and give it a focused attempt instead of combining incompatible routes.
WhereStart from checkpoint 1; open the Journal and track this entry.
Full detailFail safe code seven times. Access incorrect codes repeatedly. Confirm the Journal mark appears before changing to another checkpoint.
All The Time in the World
Mission challenge
HintPin this Journal entry and give it a focused attempt instead of combining incompatible routes.
WhereStart from checkpoint 2; open the Journal and track this entry.
Full detailClear every guard encountered on the route to the marked perch. Check side rooms before advancing, then wait for the Journal confirmation at the route's end.
Underdressed
Mission challenge
HintPin this Journal entry and give it a focused attempt instead of combining incompatible routes.
WhereStart from checkpoint 3; open the Journal and track this entry.
Full detailReach data centre without detection. Use Phone Dart distraction at reception. Confirm the Journal mark appears before changing to another checkpoint.
After Hours
Mission challenge
HintPin this Journal entry and give it a focused attempt instead of combining incompatible routes.
WhereStart from checkpoint 3; open the Journal and track this entry.
Full detailEnter the data centre while wearing the laboratory disguise. Reveal the uniform route by listening nearby, obtain the clothing quietly, and keep it equipped through entry.
IT Specialist
Mission challenge
HintPin this Journal entry and give it a focused attempt instead of combining incompatible routes.
WhereStart from checkpoint 3; open the Journal and track this entry.
Full detailActivate every required server without detection. Crouch between workstations, create distractions away from each console, and use the Journal counter to confirm none were missed.
Service Update
Mission challenge
HintPin this Journal entry and give it a focused attempt instead of combining incompatible routes.
WhereStart from checkpoint 3; open the Journal and track this entry.
Full detailSubdue 8 security personnel, override servers, escape unseen. Isolate hostiles before engagements. Confirm the Journal mark appears before changing to another checkpoint.
Server Crash
Mission challenge
HintPin this Journal entry and give it a focused attempt instead of combining incompatible routes.
WhereStart from checkpoint 3; open the Journal and track this entry.
Full detailIncapacitate ten guards inside the data centre. Remain in that room until the required count and Journal completion mark both register.
Closing Time
Mission challenge
HintPin this Journal entry and give it a focused attempt instead of combining incompatible routes.
WhereStart from checkpoint 3; open the Journal and track this entry.
Full detailLower four shutters during the encounter. Operate each control while moving between covered positions and verify that the Journal counter reaches four.
Blast of Air
Mission challenge
HintPin this Journal entry and give it a focused attempt instead of combining incompatible routes.
WhereStart from checkpoint 3; open the Journal and track this entry.
Full detailPush 4 security personnel off ledges with vents. Time vent hacks near railings. Confirm the Journal mark appears before changing to another checkpoint.
Gun Nut
Mission challenge
HintPin this Journal entry and give it a focused attempt instead of combining incompatible routes.
WhereStart from checkpoint 3; open the Journal and track this entry.
Full detailScore qualifying use with four different firearms during the escape. Swap to weapons found along the route and monitor the Journal after each new category.
Mightier Than The Sword
Mission challenge
HintPin this Journal entry and give it a focused attempt instead of combining incompatible routes.
WhereStart from checkpoint 3; open the Journal and track this entry.
Full detailDestroy three highlighted structural supports with the Missile Pen. Confirm each hit registers, then wait for the Journal completion mark before changing checkpoints.
Moving Target
Mission challenge
HintPin this Journal entry and give it a focused attempt instead of combining incompatible routes.
WhereStart from checkpoint 3; open the Journal and track this entry.
Full detailClear the cargo room without taking damage. Keep moving between solid cover, evade every red warning attack, and check the Journal once the room is secure.
Going Old School
You are here when: The open driving course and its nearby field-equipment station.
Finish the visible route once, then use checkpoint replay for collectibles and mutually exclusive Journal approaches.
Area Completion
Story completion
HintFollow the current objective markers and explore at your own pace.
WhereComplete every checkpoint currently listed for this area in Chapter Select.
Full detailReach the area-complete transition on any difficulty. Its checkpoints remain replayable, so collection and Journal cleanup can be handled later without restarting the campaign.
Driving Gloves
Intel file
HintUse the watch scan during quieter exploration and inspect side rooms before following the main route.
WhereAt checkpoint 04, inspect a desk on the right.
Full detailLoad checkpoint 04. At the reunion point in the open area, inspect the workstation on the right. The gloves save immediately when collected.
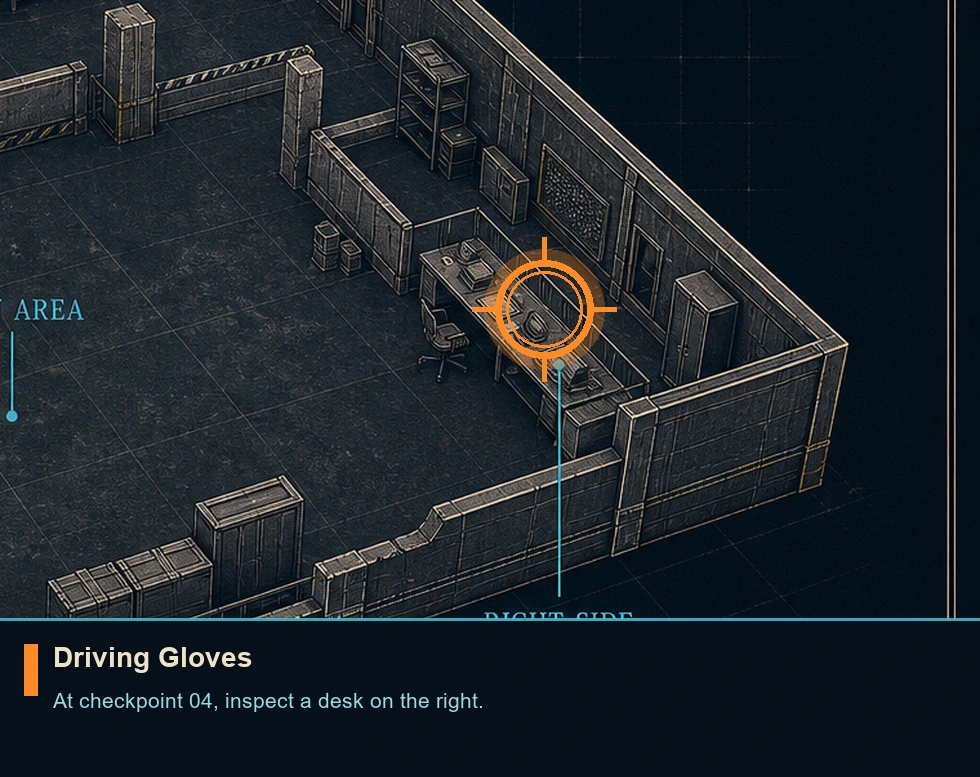
Time to Die
You are here when: The tropical cliffside resort with villas, bars, caves, pools, and quarry roads.
Finish the visible route once, then use checkpoint replay for collectibles and mutually exclusive Journal approaches.
Area Completion
Story completion
HintFollow the current objective markers and explore at your own pace.
WhereComplete every checkpoint currently listed for this area in Chapter Select.
Full detailReach the area-complete transition on any difficulty. Its checkpoints remain replayable, so collection and Journal cleanup can be handled later without restarting the campaign.
Banner of Acorns
Playing card
HintUse the watch scan during quieter exploration and inspect side rooms before following the main route.
WhereAt checkpoint 03, inspect the sink counter.
Full detailLoad checkpoint 03. Enter the villa, climb the stairs, and follow the right corridor into the bathroom. The card is on the sink counter and saves immediately.
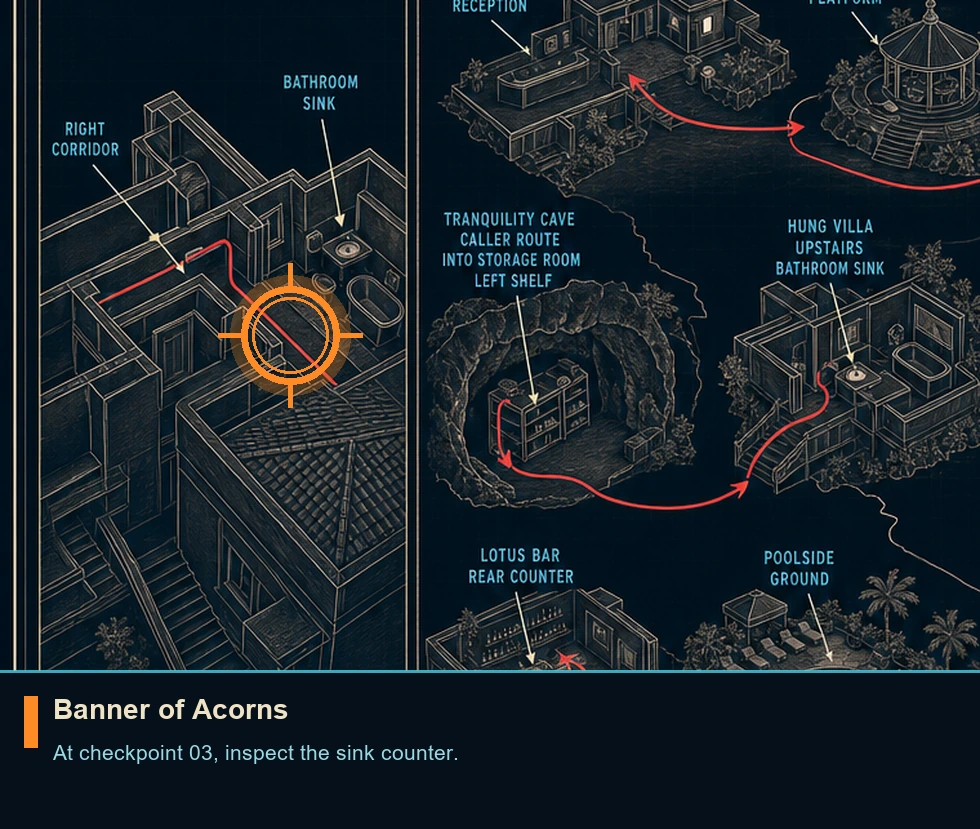
8 of Shields
Playing card
HintUse the watch scan during quieter exploration and inspect side rooms before following the main route.
WhereAt checkpoint 05, inspect top of a lantern beside the edge.
Full detailLoad checkpoint 05. From reception, follow the signs to the Tranquility platform beside the Ocean View Bar. The card rests on a lantern at the platform's outer edge. The pickup saves immediately.
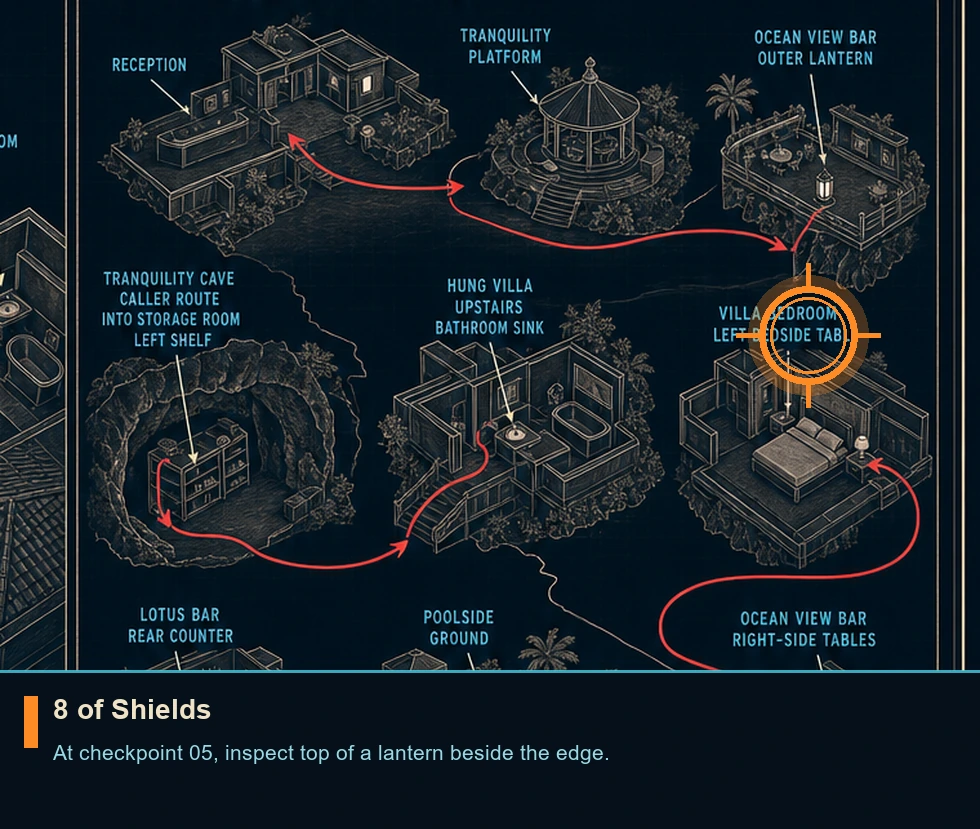
9 of Roses
Playing card
HintUse the watch scan during quieter exploration and inspect side rooms before following the main route.
WhereAt checkpoint 05, inspect the shelf to the left.
Full detailLoad checkpoint 05. Descend into Tranquility Cave and eavesdrop on the caller near its far side. Distract that person with a phone dart, steal the Storage Key, unlock the adjacent room, and take the card from the left shelf. The pickup saves immediately.
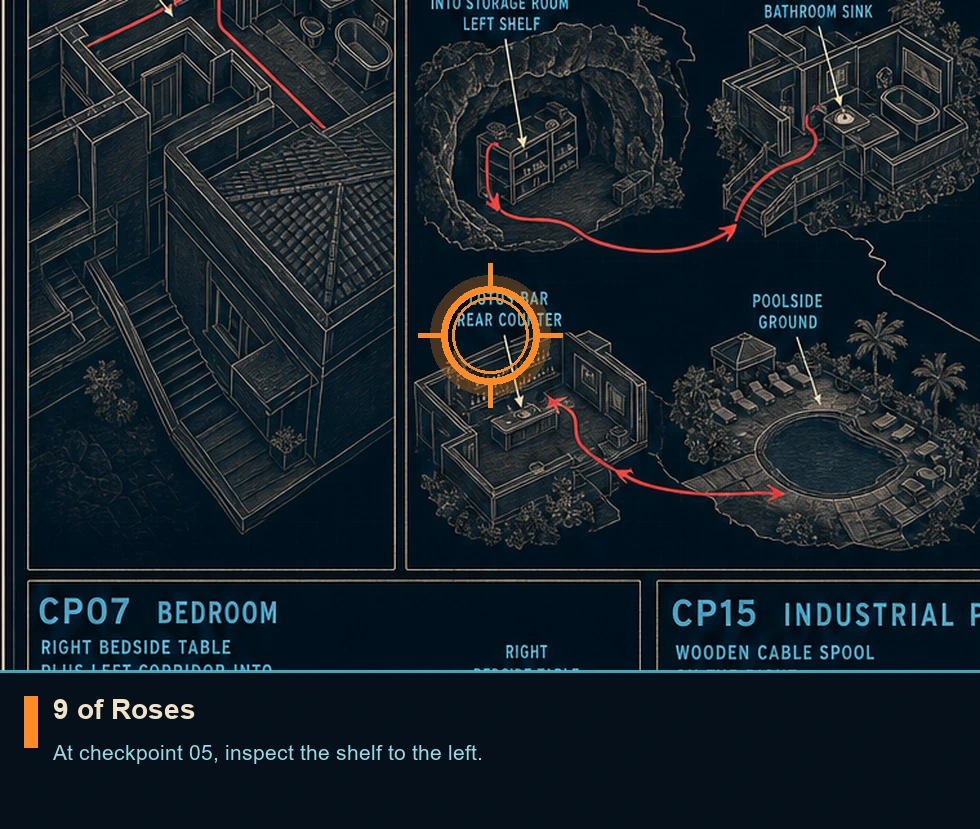
Under of Bells
Playing card
HintUse the watch scan during quieter exploration and inspect side rooms before following the main route.
WhereAt checkpoint 05, enter the upper bathroom of the Hung Villa and inspect the sink counter.
Full detailLoad checkpoint 05. Acquire the yoga disguise by reading the notice and taking the mat in the nearby storage room, then use it to move freely into the Hung Villa. After reaching the upstairs contact, enter the bathroom and take the card from the sink counter. The pickup saves immediately.
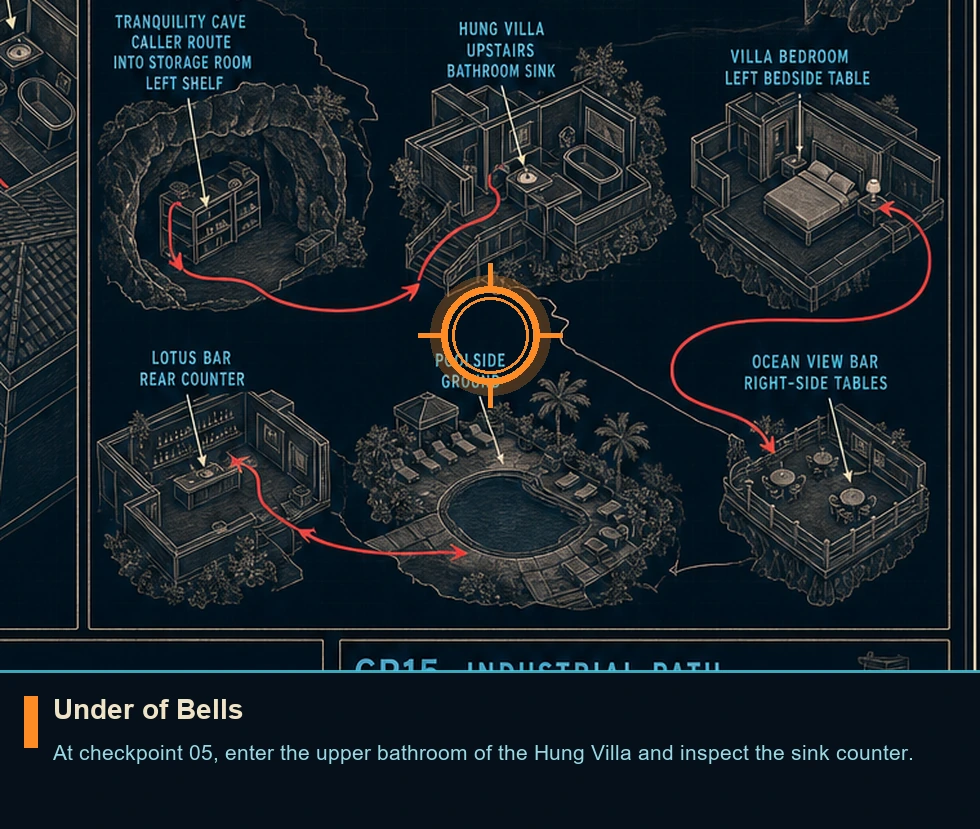
Tarot Deck
Legacy item
HintUse the watch scan during quieter exploration and inspect side rooms before following the main route.
WhereAt checkpoint 05, inspect the bedside table on the left side of the villa bedroom.
Full detailLoad checkpoint 05. Enter the villa bedroom and take the tarot deck from the bedside table on the bed's left. The pickup saves immediately.
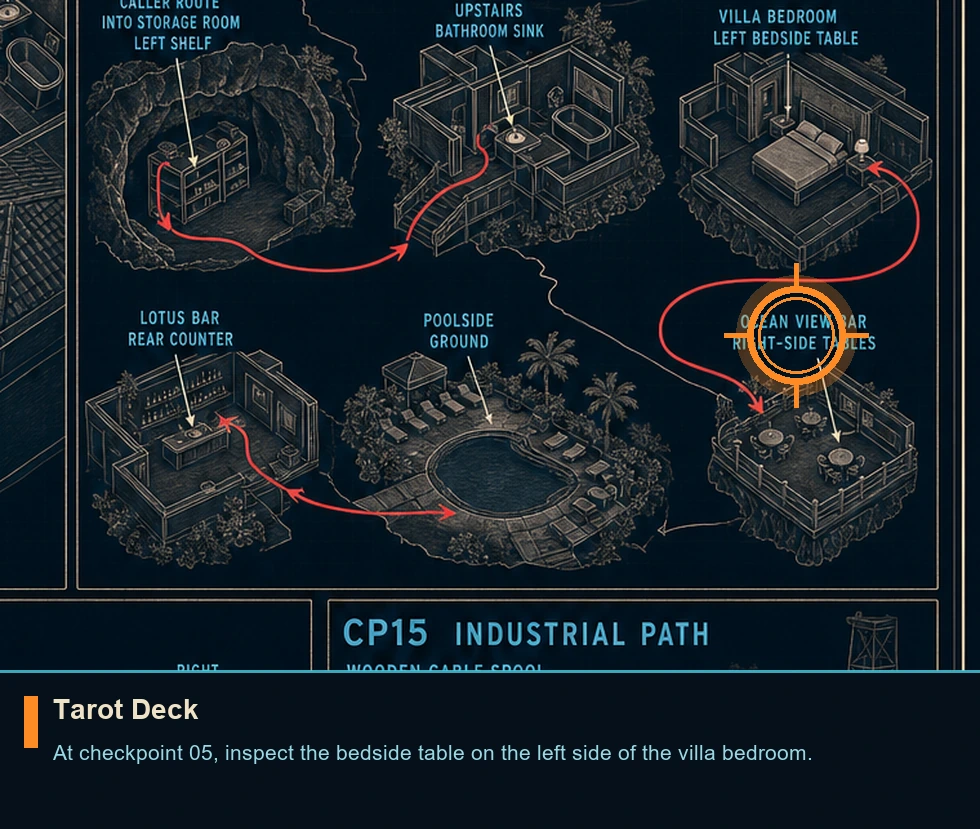
King of Roses
Playing card
HintUse the watch scan during quieter exploration and inspect side rooms before following the main route.
WhereAt checkpoint 05, inspect the counter in the rear of the bar.
Full detailAfter leaving the villa, continue straight and take the next left toward Lotus Bar. The card rests on the rear counter. The pickup saves immediately.
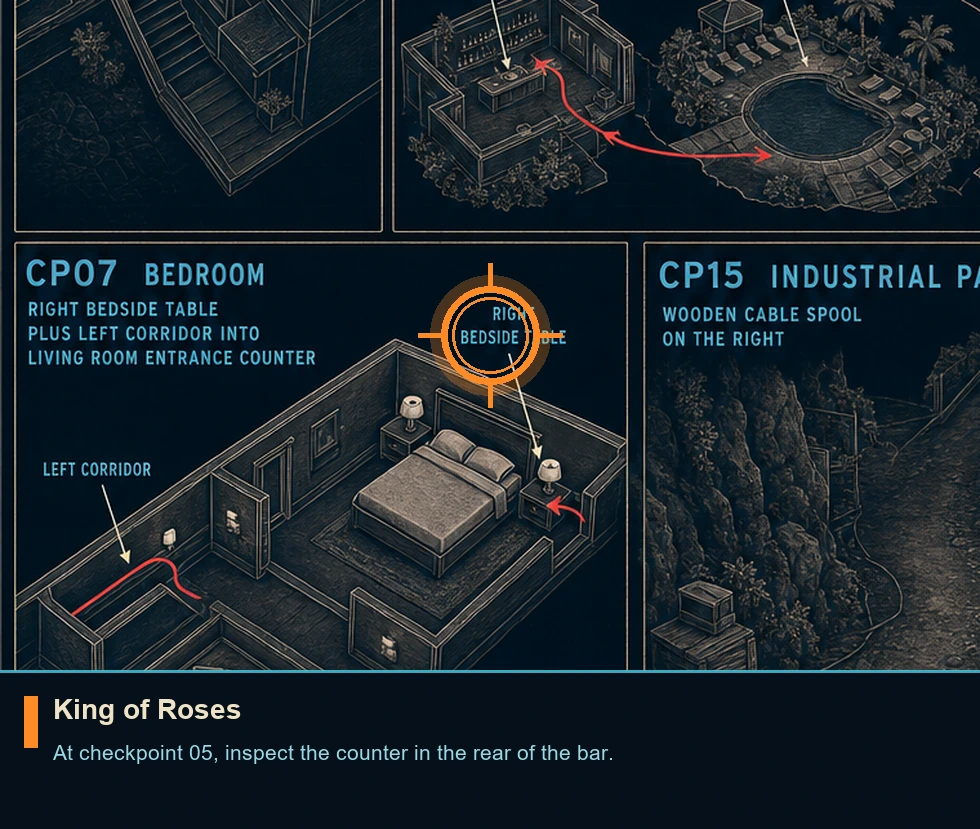
Keynote Presentation
Intel file
HintUse the watch scan during quieter exploration and inspect side rooms before following the main route.
WhereAt checkpoint 05, look on the ground directly in front of the pool after the marked poolside interaction.
Full detailLoad checkpoint 05. Follow the marked route to the poolside conversation, then look down immediately when control returns. The presentation is on the ground beside your feet, directly in front of the pool. The pickup saves immediately.
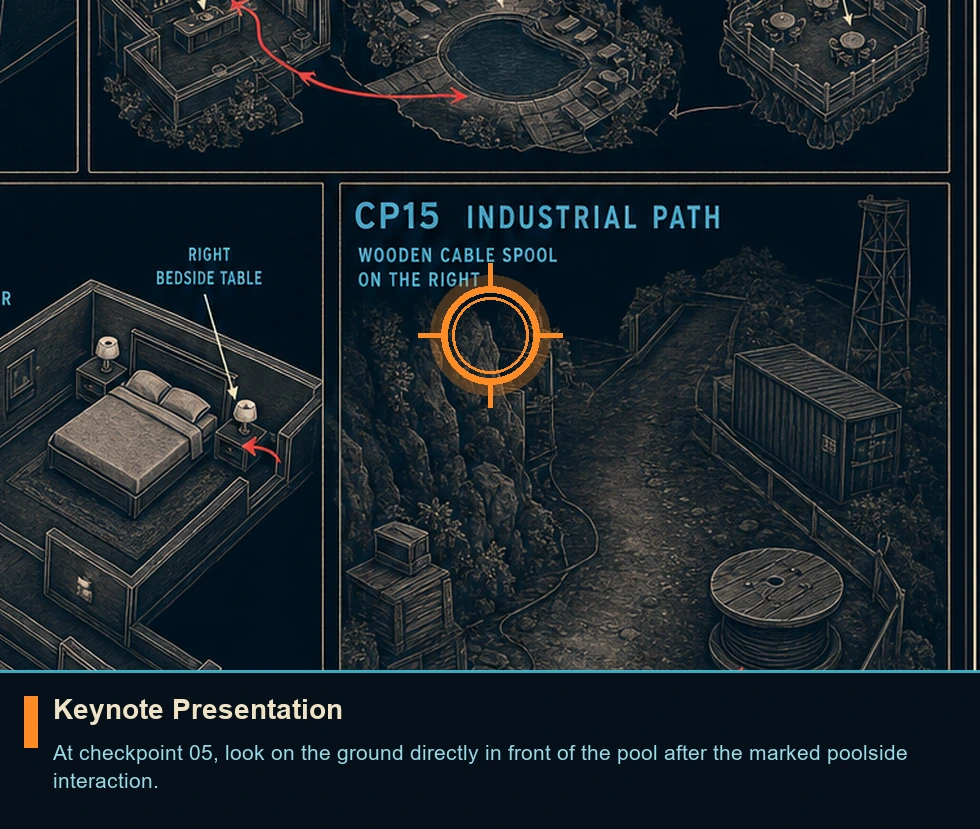
Vietnam Postcard
Postcard
HintUse the watch scan during quieter exploration and inspect side rooms before following the main route.
WhereAt checkpoint 05, inspect one of the surfaces on the right side of the bar.
Full detailLoad checkpoint 05. Reach the Ocean View Bar and inspect the tables along its right side. Enter by vaulting the railing left of security, or steal a Party Flyer from either departing guest nearby. The postcard saves immediately when collected.
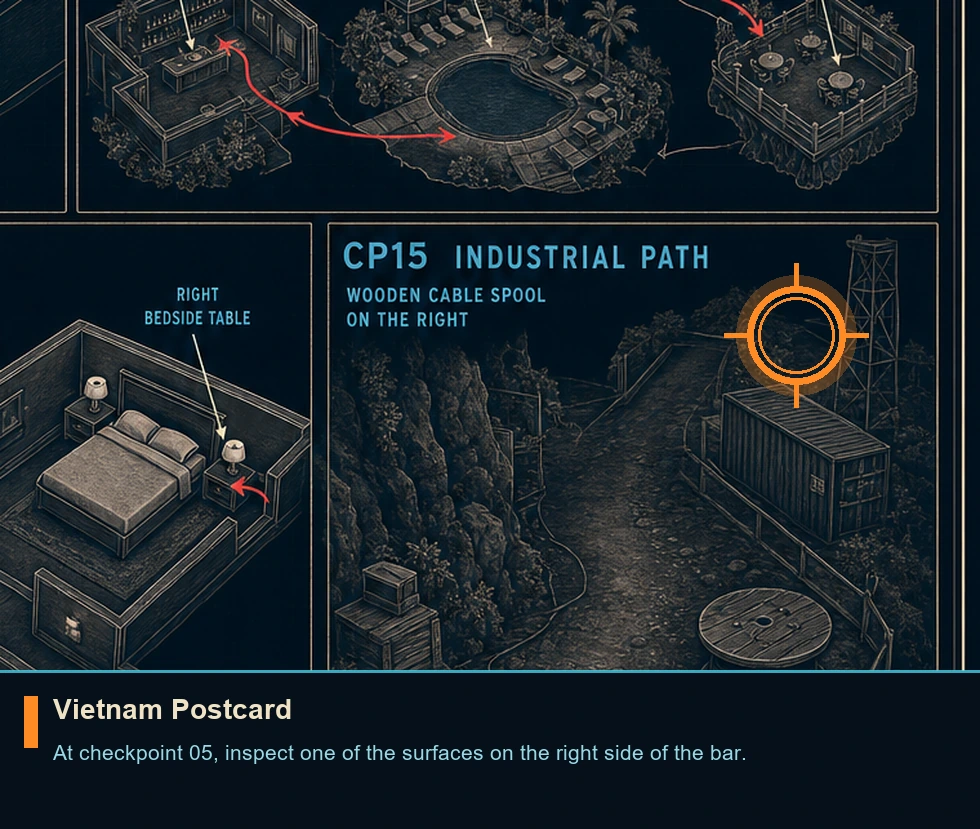
Diving Watch
Memento
HintUse the watch scan during quieter exploration and inspect side rooms before following the main route.
WhereAt checkpoint 07, inspect the bedside table to the right of the bed.
Full detailLoad checkpoint 07. After completing the bow-tie interaction, turn around and take the watch from the bedside table to the right of the bed. The pickup saves immediately.
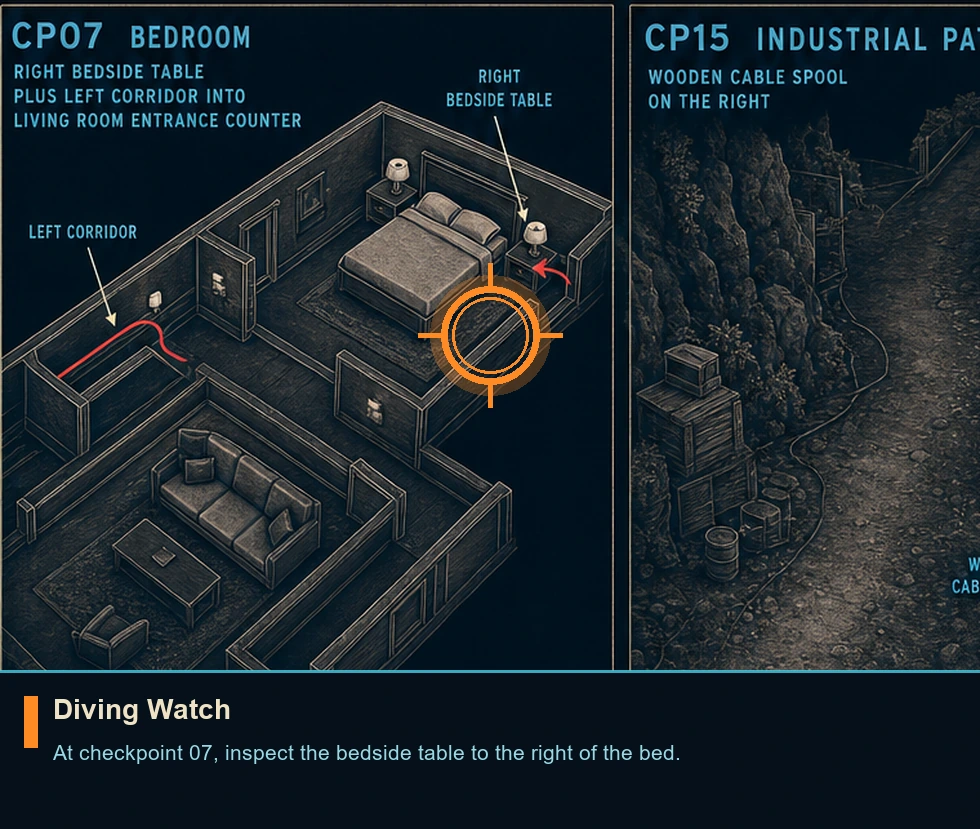
Caliban Profile
Intel file
HintUse the watch scan during quieter exploration and inspect side rooms before following the main route.
WhereAt checkpoint 07, inspect the counter as you access the living room.
Full detailLoad checkpoint 07. From the bedroom, use the left corridor into the living room. The profile is on the counter beside its entrance. The pickup saves immediately.
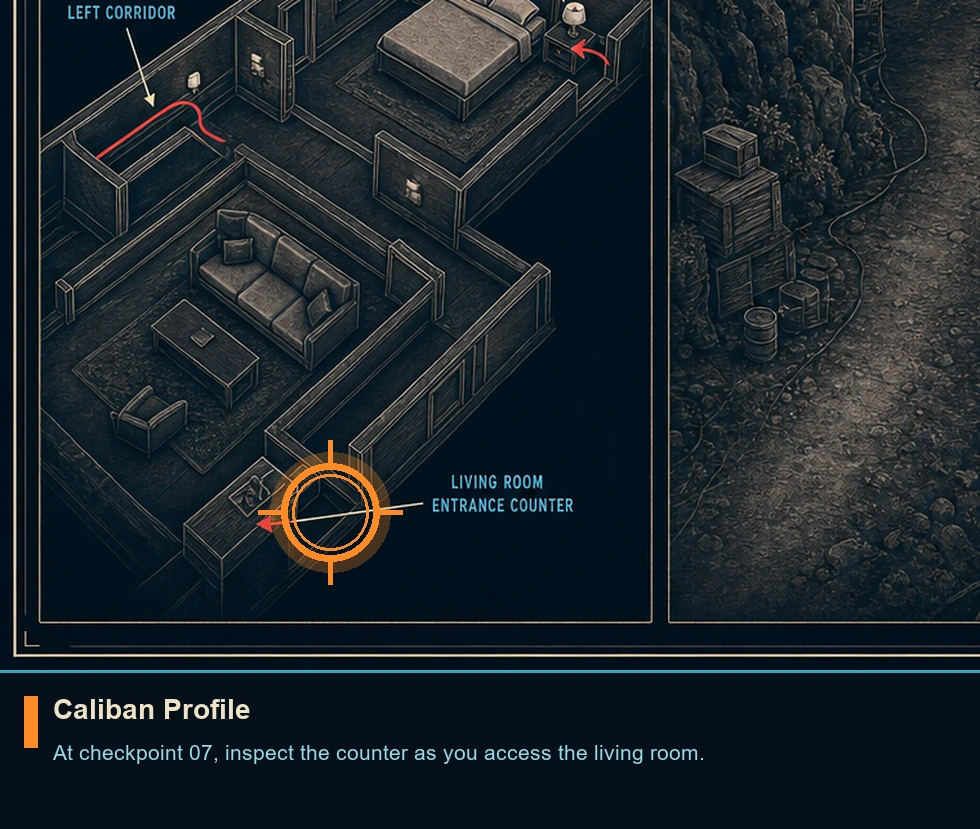
Gun Case
Intel file
HintUse the watch scan during quieter exploration and inspect side rooms before following the main route.
WhereAt checkpoint 15, inspect a wooden coil on the right.
Full detailOnce control returns after the restraint sequence, inspect the wooden cable spool on the right. The pickup saves immediately.
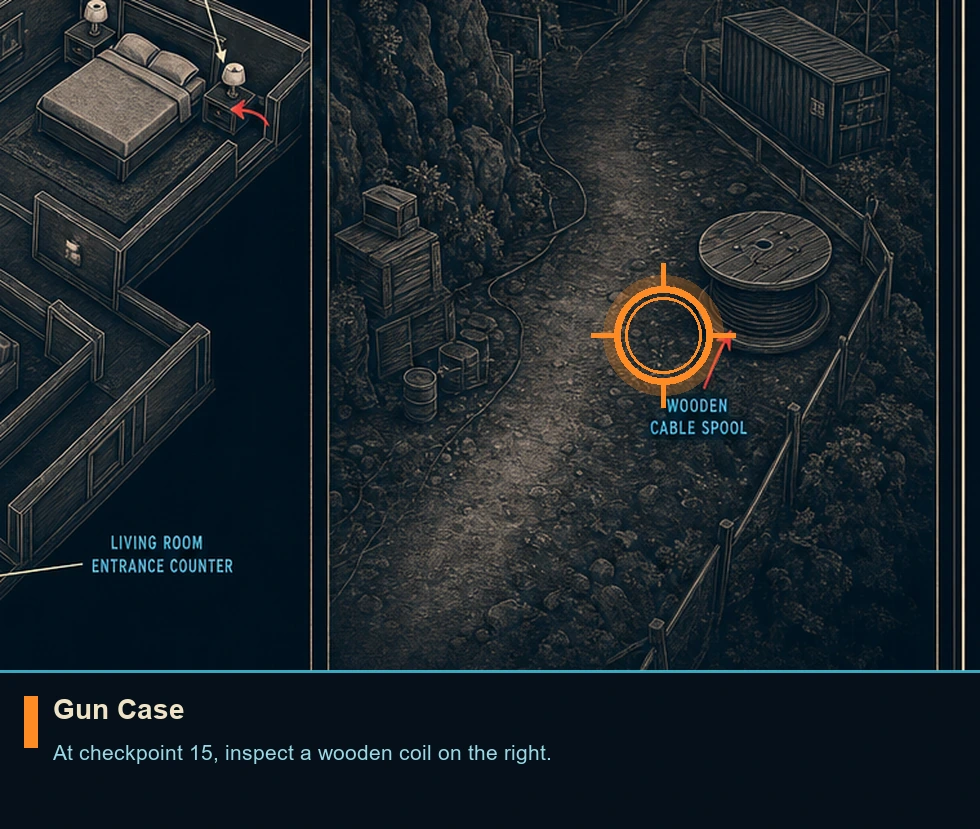
Completionist: Time to Die
Mission challenge
HintPin this Journal entry and give it a focused attempt instead of combining incompatible routes.
WhereStart from checkpoint 1; open the Journal and track this entry.
Full detailComplete every challenge record in this area to receive its TacSim outfit. Use separate attempts for conflicting stealth and combat conditions, then verify the completion record in the Journal.
Pacifist: Time to Die
Mission challenge
HintPin this Journal entry and give it a focused attempt instead of combining incompatible routes.
WhereStart from checkpoint 1; open the Journal and track this entry.
Full detailFinish every component Journal check displayed beneath this umbrella entry. Keep clear of kills; use stealth movement and non-lethal takedowns. Confirm the Journal mark appears before changing to another checkpoint.
Ghost: Time to Die
Mission challenge
HintPin this Journal entry and give it a focused attempt instead of combining incompatible routes.
WhereStart from checkpoint 1; open the Journal and track this entry.
Full detailFinish every component Journal check displayed beneath this umbrella entry. Remain fully undetected through all villa approaches. Confirm the Journal mark appears before changing to another checkpoint.
Assault: Time to Die
Mission challenge
HintPin this Journal entry and give it a focused attempt instead of combining incompatible routes.
WhereStart from checkpoint 1; open the Journal and track this entry.
Full detailFinish every component Journal check displayed beneath this umbrella entry. Expect full combat and aggressive engagement paths. Confirm the Journal mark appears before changing to another checkpoint.
Pool Inspector
Mission challenge
HintPin this Journal entry and give it a focused attempt instead of combining incompatible routes.
WhereStart from checkpoint 1; open the Journal and track this entry.
Full detailEnter the Serenity area without being detected. Use the concealed fence-climbing path along the left boundary and check the Journal after crossing inside.
Yogi
Mission challenge
HintPin this Journal entry and give it a focused attempt instead of combining incompatible routes.
WhereStart from checkpoint 1; open the Journal and track this entry.
Full detailEnter the villa while wearing the yoga disguise. Listen in near the cave staff room, obtain the clothing there, and keep it equipped until the villa-entry record registers.
Zen No More
Mission challenge
HintPin this Journal entry and give it a focused attempt instead of combining incompatible routes.
WhereStart from checkpoint 1; open the Journal and track this entry.
Full detailChange music in Tranquillity Cave. Override the control-room panel through its window while on stair approach. Confirm the Journal mark appears before changing to another checkpoint.
Blanc The Brut
Mission challenge
HintPin this Journal entry and give it a focused attempt instead of combining incompatible routes.
WhereStart from checkpoint 1; open the Journal and track this entry.
Full detailIntimidate or persuade the bar bartender. Simple dialogue interaction; choose confident persuasion. Confirm the Journal mark appears before changing to another checkpoint.
Party Crasher
Mission challenge
HintPin this Journal entry and give it a focused attempt instead of combining incompatible routes.
WhereStart from checkpoint 1; open the Journal and track this entry.
Full detailEnter the private event with a stolen Party Flyer. Take one from either departing guest outside, present it at the controlled entrance, and verify the Journal update inside.
Key Master
Mission challenge
HintPin this Journal entry and give it a focused attempt instead of combining incompatible routes.
WhereStart from checkpoint 1; open the Journal and track this entry.
Full detailRetrieve Ocean View bar key undetected. Keep clear of mechanics and circle behind storage area. Confirm the Journal mark appears before changing to another checkpoint.
Bathroom Bomb
Mission challenge
HintPin this Journal entry and give it a focused attempt instead of combining incompatible routes.
WhereStart from checkpoint 1; open the Journal and track this entry.
Full detailApproach the villa bathroom from the cliff-side roof route and incapacitate the guard through the roof opening. Wait for the Journal confirmation before moving to another checkpoint.
The Quiet Man
Mission challenge
HintPin this Journal entry and give it a focused attempt instead of combining incompatible routes.
WhereStart from checkpoint 1; open the Journal and track this entry.
Full detailReach the marked villa interaction without being detected. Approach across the bathroom roof, perform the required takedown quietly, and trigger the interaction immediately afterward.
Give Me A Minute
Mission challenge
HintPin this Journal entry and give it a focused attempt instead of combining incompatible routes.
WhereStart from checkpoint 1; open the Journal and track this entry.
Full detailAt the marked investigation prompt, wait until the nearby status change finishes before interacting. Advancing too quickly invalidates the condition, so watch for the Journal update first.
Panther
Mission challenge
HintPin this Journal entry and give it a focused attempt instead of combining incompatible routes.
WhereStart from checkpoint 1; open the Journal and track this entry.
Full detailReach the Emperor Villa roof without detection. Keep to the grass along the left boundary, cross only when patrols turn away, and verify the Journal at roof level.
Phantom
Mission challenge
HintPin this Journal entry and give it a focused attempt instead of combining incompatible routes.
WhereStart from checkpoint 1; open the Journal and track this entry.
Full detailReach the party contact in wine cellar undetected. Remain crouched; neutralize only when necessary. Confirm the Journal mark appears before changing to another checkpoint.
Unlicensed To Kill
Mission challenge
HintPin this Journal entry and give it a focused attempt instead of combining incompatible routes.
WhereStart from checkpoint 1; open the Journal and track this entry.
Full detailReach and free the marked captive without killing any mercenary. Bypass patrols or use non-lethal takedowns only, then verify the Journal immediately after the release interaction.
Silent Night
Mission challenge
HintPin this Journal entry and give it a focused attempt instead of combining incompatible routes.
WhereStart from checkpoint 1; open the Journal and track this entry.
Full detailMake five silenced-weapon eliminations without being detected. Fire from concealment, allow searches to settle between shots, and monitor the Journal counter after each one.
Wraith
Mission challenge
HintPin this Journal entry and give it a focused attempt instead of combining incompatible routes.
WhereStart from checkpoint 2; open the Journal and track this entry.
Full detailReach the marked resort interaction without detection. Travel between covered positions, wait out every patrol view, and inspect the Journal when the destination prompt appears.
Two Birds, One Stone
Mission challenge
HintPin this Journal entry and give it a focused attempt instead of combining incompatible routes.
WhereStart from checkpoint 2; open the Journal and track this entry.
Full detailEliminate multiple hostiles with a single coordinated shot. Aim at an explosive or structural weak point when both firing lines are aligned, then verify the Journal mark.
Thief
Mission challenge
HintPin this Journal entry and give it a focused attempt instead of combining incompatible routes.
WhereStart from checkpoint 2; open the Journal and track this entry.
Full detailSteal 3 kills from your companion in quarry fight. Time shots just before your companion fires. Confirm the Journal mark appears before changing to another checkpoint.
Who’s Counting?
Mission challenge
HintPin this Journal entry and give it a focused attempt instead of combining incompatible routes.
WhereStart from checkpoint 2; open the Journal and track this entry.
Full detailGet more kills than your companion. Remain aggressive and maintain constant pressure. Confirm the Journal mark appears before changing to another checkpoint.
Marble Madness
Mission challenge
HintPin this Journal entry and give it a focused attempt instead of combining incompatible routes.
WhereStart from checkpoint 2; open the Journal and track this entry.
Full detailEliminate five mercs with marble slab collapses. Fire at weak points highlighted by the Q-Lens. Confirm the Journal mark appears before changing to another checkpoint.
You Talk Too Much
Mission challenge
HintPin this Journal entry and give it a focused attempt instead of combining incompatible routes.
WhereStart from checkpoint 2; open the Journal and track this entry.
Full detailThrow one mercenary from the mining truck. Grapple the target near an open side, drag them to the edge, perform the hurl, and check the Journal immediately afterward.
Lights Out
Mission challenge
HintPin this Journal entry and give it a focused attempt instead of combining incompatible routes.
WhereStart from checkpoint 2; open the Journal and track this entry.
Full detailBreak power and disable all lights. Fire at red explosive barrels during truck finale. Confirm the Journal mark appears before changing to another checkpoint.
Man of the Hour
You are here when: The multi-level operations complex and gadget laboratory.
Finish the visible route once, then use checkpoint replay for collectibles and mutually exclusive Journal approaches.
Area Completion
Story completion
HintFollow the current objective markers and explore at your own pace.
WhereComplete every checkpoint currently listed for this area in Chapter Select.
Full detailReach the area-complete transition on any difficulty. Its checkpoints remain replayable, so collection and Journal cleanup can be handled later without restarting the campaign.
Niko Murto Locket
Memento
HintUse the watch scan during quieter exploration and inspect side rooms before following the main route.
WhereAt checkpoint 02, inspect the workstation on the second-lowest level near a staff member.
Full detailLoad checkpoint 02. From the starting position, descend the short stairs slightly left to the second-lowest level. The locket rests on a workstation near the staff member. The pickup saves immediately.
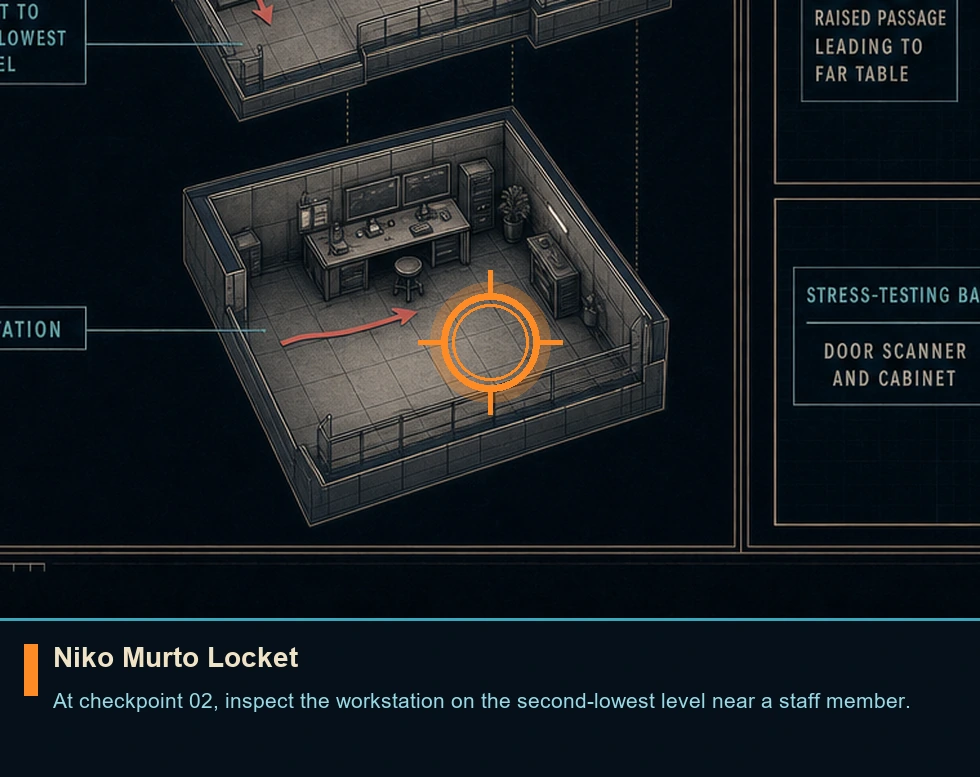
Trilby Hat
Legacy item
HintUse the watch scan during quieter exploration and inspect side rooms before following the main route.
WhereAt checkpoint 04, inspect the changing rooms in the wearables bay.
Full detailLoad checkpoint 04. Enter the wearables bay beside the elevator and inspect each changing room. The hat is inside one of them and saves immediately when collected.
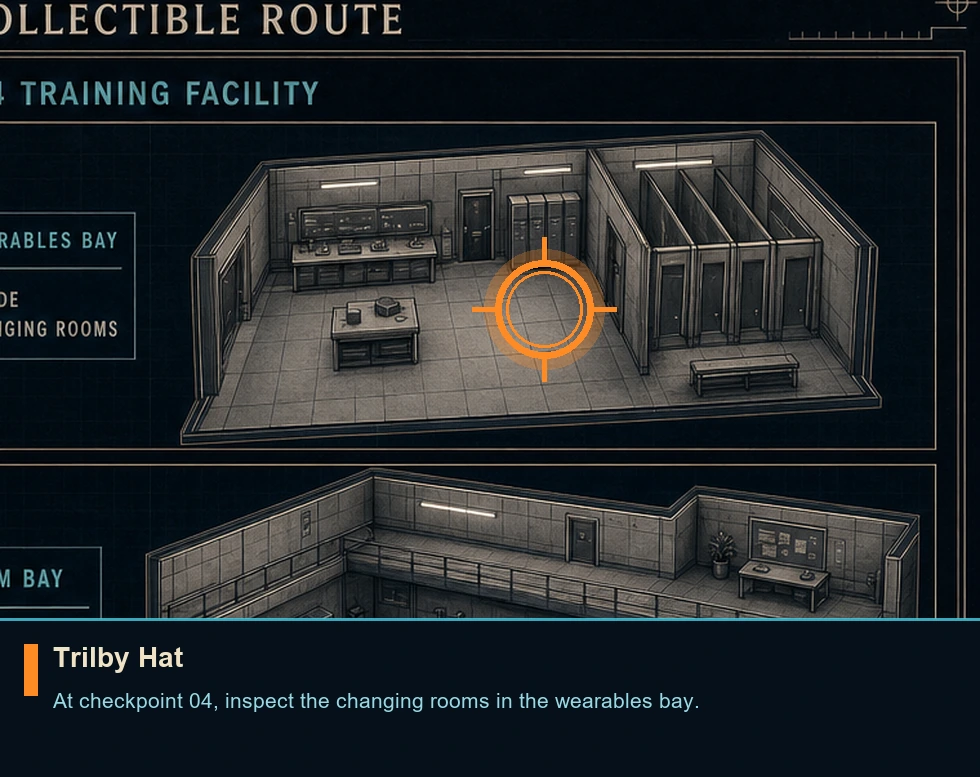
Q-Lab Postcard
Postcard
HintUse the watch scan during quieter exploration and inspect side rooms before following the main route.
WhereAt checkpoint 04, inspect the table at the end of the raised gym passage.
Full detailLoad checkpoint 04. In the gym bay, climb onto the lockers and jump to the upper ledge. Follow the raised passage to its far-end table and collect the postcard. The pickup saves immediately.
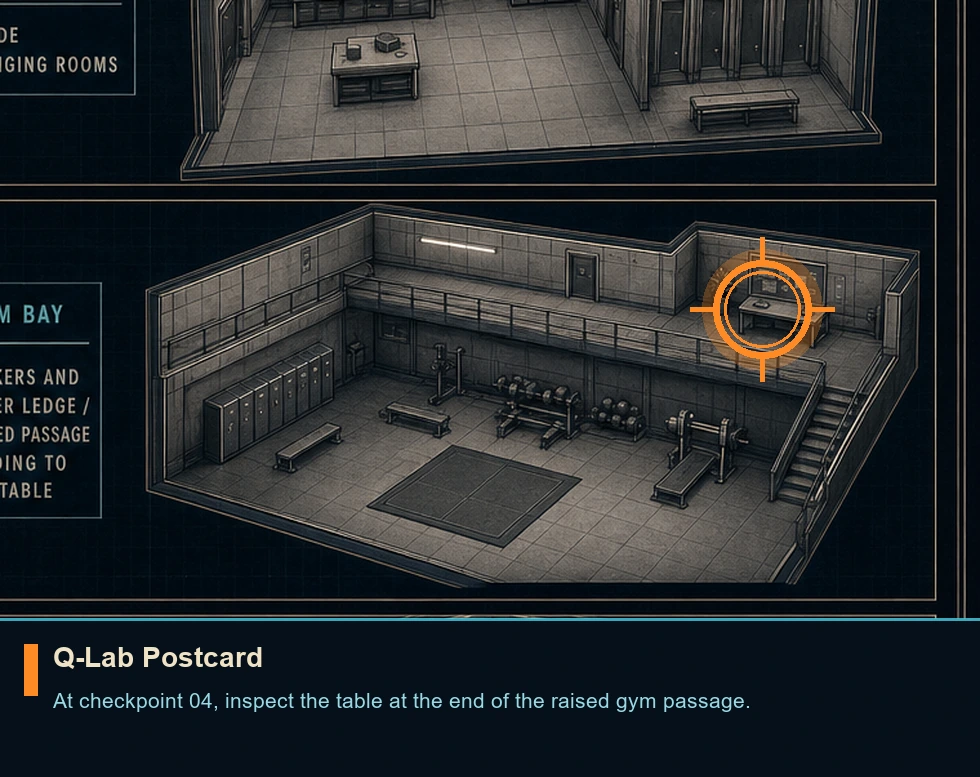
Q’s Photo
Intel file
HintUse the watch scan during quieter exploration and inspect side rooms before following the main route.
WhereAt checkpoint 04, inspect the locked stress-testing bay beside the door scanner.
Full detailLoad checkpoint 04. Fire the Laser Strap at the extinguisher above the stress-testing door scanner. Inside, enter 4397 on the cabinet, the test car's registration plate provides the code, and take the photograph. The pickup saves immediately.
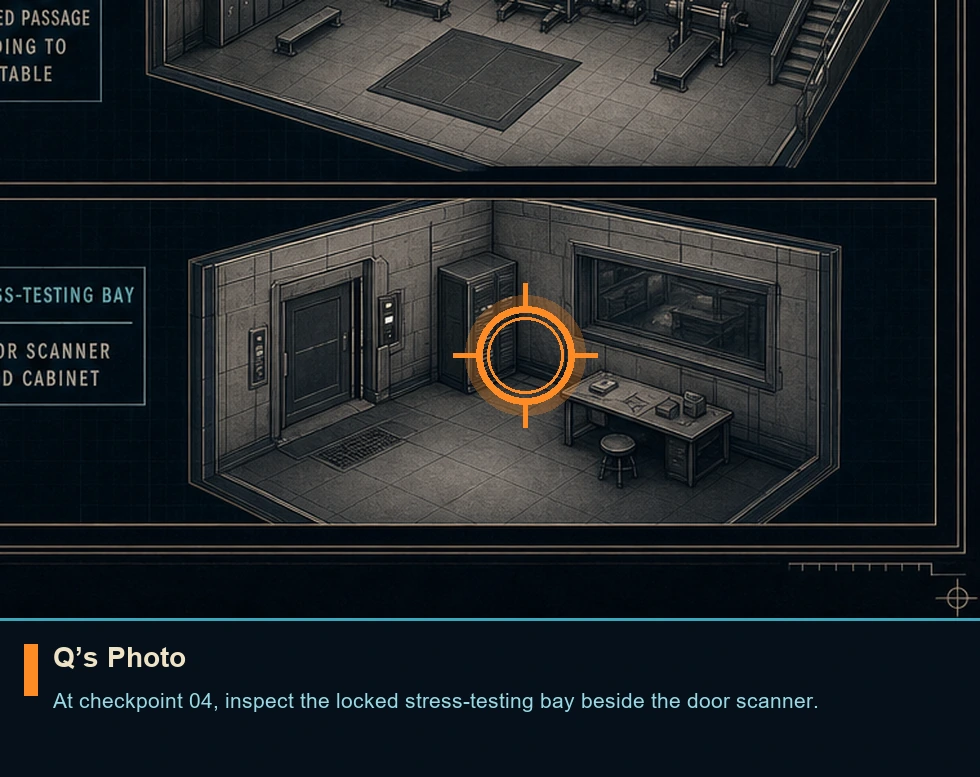
Wave of the Future
You are here when: The polar industrial complex with gantries, robotics floors, offices, lifts, and a silo.
Finish the visible route once, then use checkpoint replay for collectibles and mutually exclusive Journal approaches.
Area Completion
Story completion
HintFollow the current objective markers and explore at your own pace.
WhereComplete every checkpoint currently listed for this area in Chapter Select.
Full detailReach the area-complete transition on any difficulty. Its checkpoints remain replayable, so collection and Journal cleanup can be handled later without restarting the campaign.
Under of Roses
Playing card
HintUse the watch scan during quieter exploration and inspect side rooms before following the main route.
WhereAt checkpoint 03, inspect the end of the corridor, before climbing the yellow scaffolding.
Full detailLoad checkpoint 03. Enter the building after the first patrol group and continue to the corridor's far end. Take the card before climbing the yellow scaffolding. The pickup saves immediately.
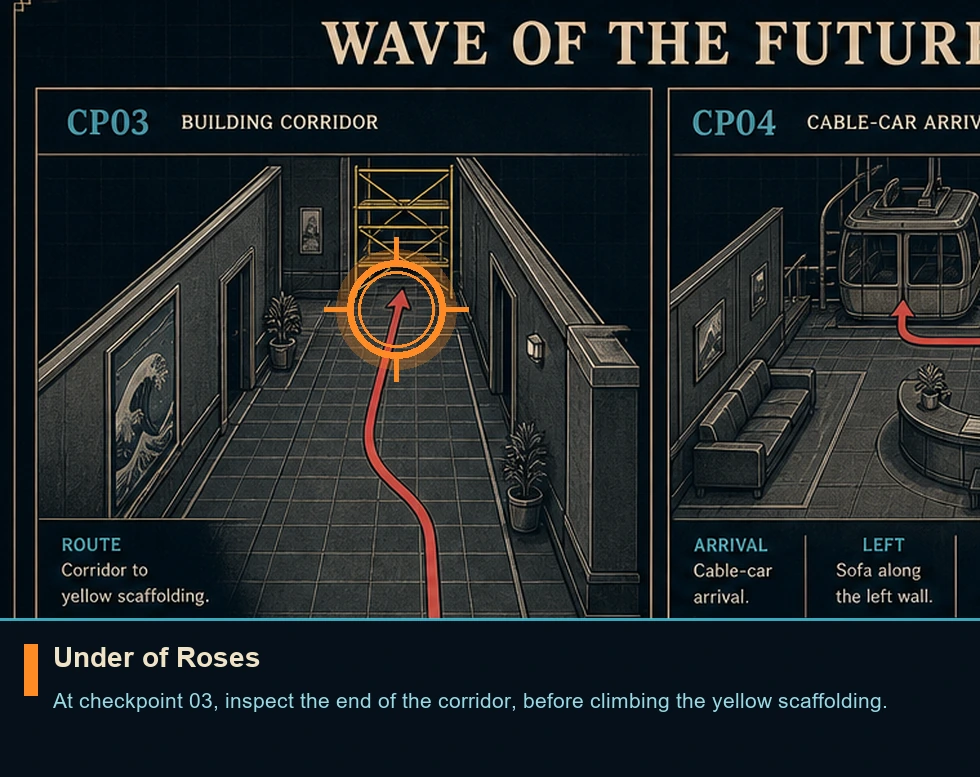
Ace of Bells
Playing card
HintUse the watch scan during quieter exploration and inspect side rooms before following the main route.
WhereAt checkpoint 04, inspect one of the sofas on the left.
Full detailLoad checkpoint 04. At the cable car, climb the stairs on the right and turn around at the landing. The card rests on a sofa to the left. The pickup saves immediately.
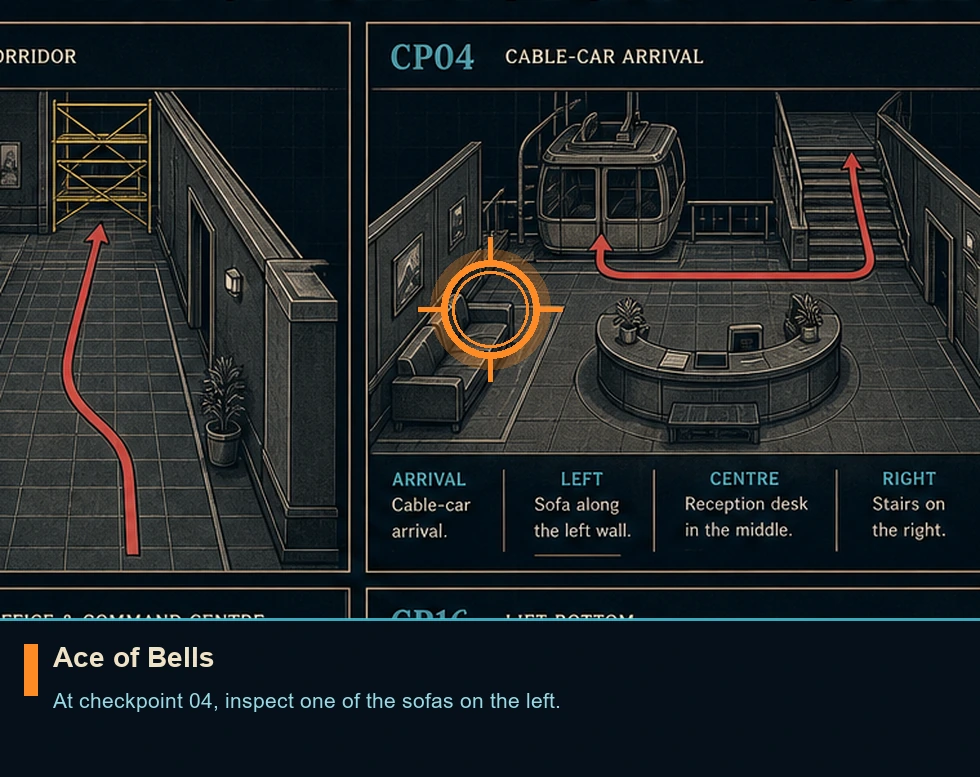
Snow Globe
Memento
HintUse the watch scan during quieter exploration and inspect side rooms before following the main route.
WhereAt checkpoint 04, inspect the desk.
Full detailLoad checkpoint 04. From the sofa area, turn toward the central reception desk. The snow globe rests on that desk and saves immediately when collected.
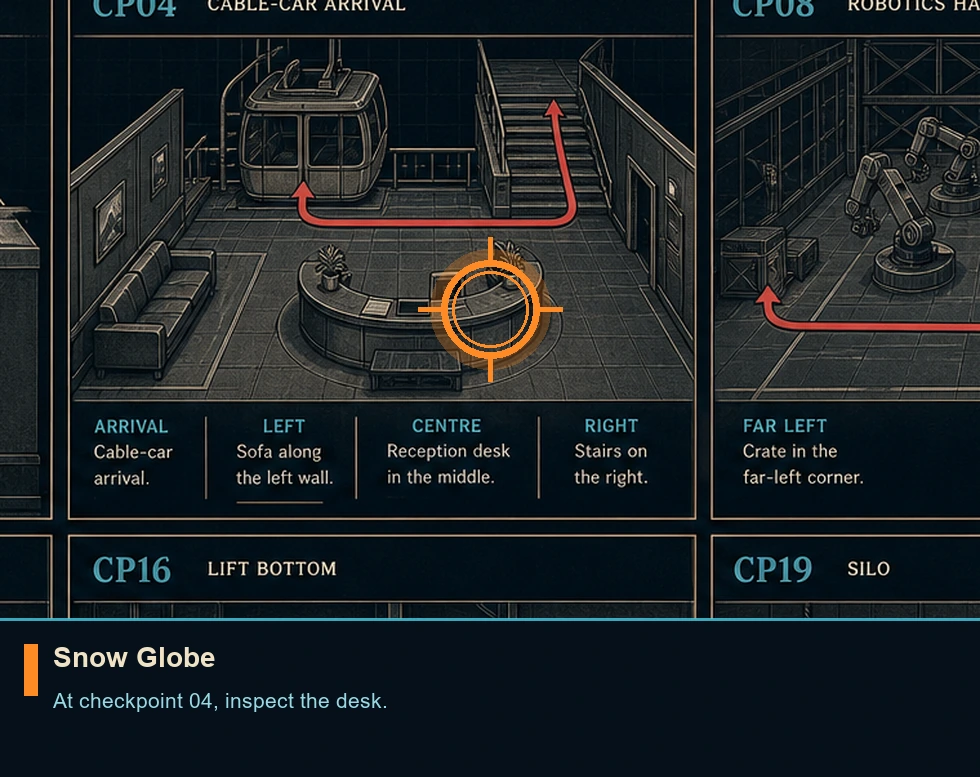
Jaws Design Specs
Legacy item
HintUse the watch scan during quieter exploration and inspect side rooms before following the main route.
WhereAt checkpoint 08, inspect a crate.
Full detailLoad checkpoint 08. Leave the elevator and cross the robotics hall toward its far-left corner. The design sheets are on a crate there. The pickup saves immediately.
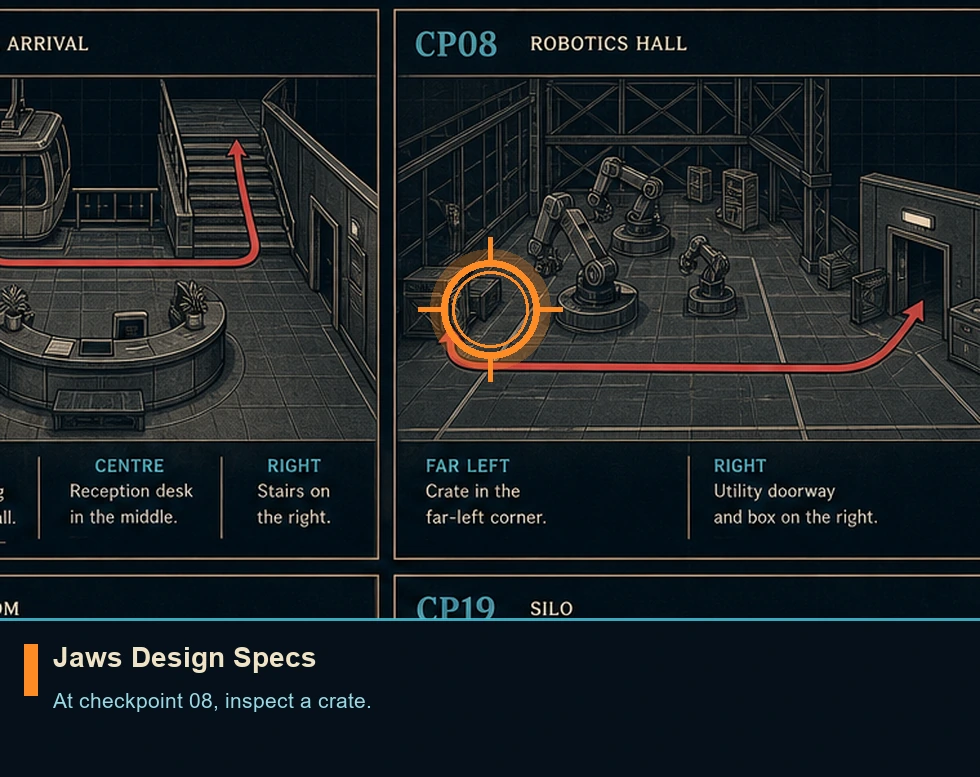
9 of Bells
Playing card
HintUse the watch scan during quieter exploration and inspect side rooms before following the main route.
WhereAt checkpoint 08, inspect a box.
Full detailLoad checkpoint 08. From the robotics entrance, walk straight toward the Utility doorway and turn right. The card is on the nearby box. The pickup saves immediately.
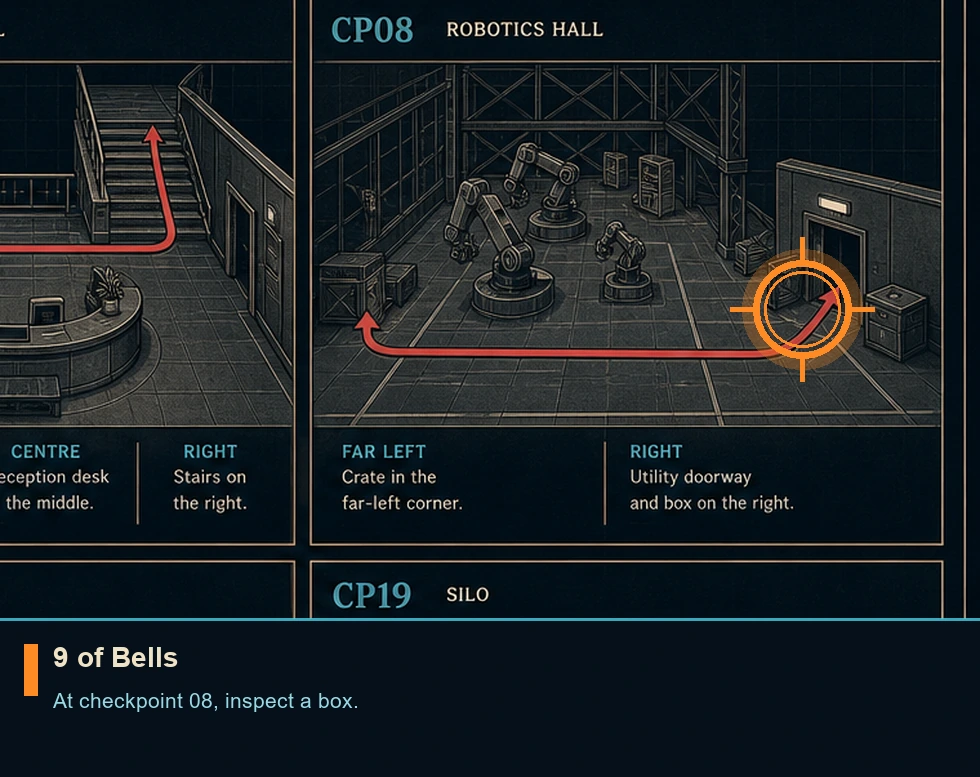
M Profile
Intel file
HintUse the watch scan during quieter exploration and inspect side rooms before following the main route.
WhereAt checkpoint 12, inspect the desk.
Full detailLoad checkpoint 12. Enter the security office used for the ID-band upgrade and inspect its main desk. The profile saves immediately when collected.
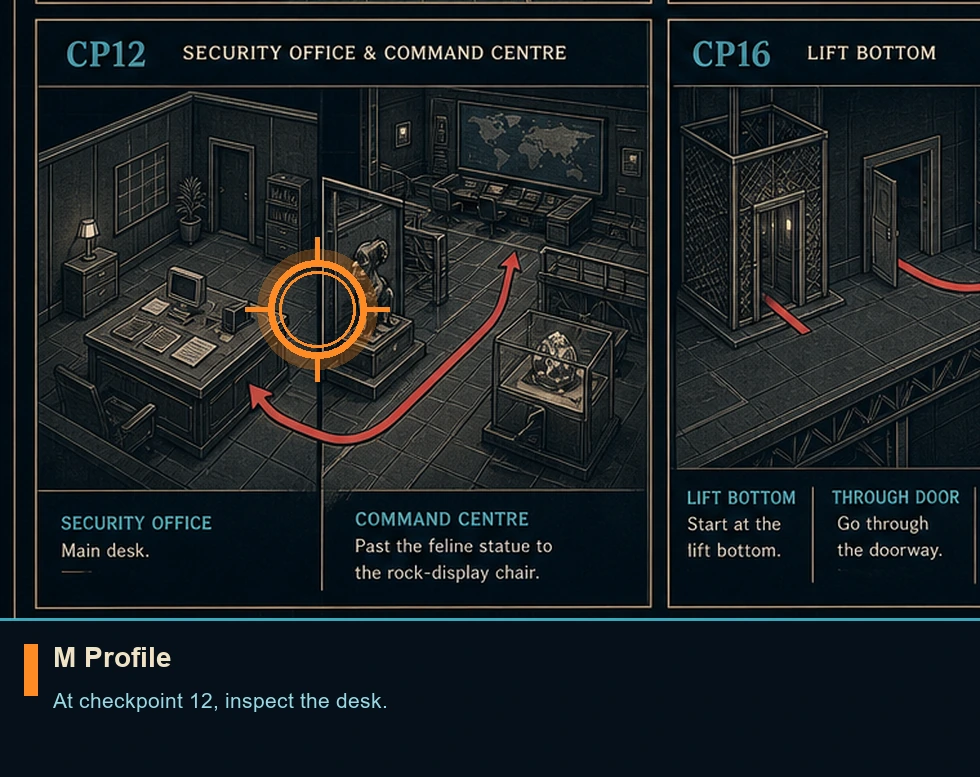
Webb’s Manuscript
Intel file
HintUse the watch scan during quieter exploration and inspect side rooms before following the main route.
WhereAt checkpoint 12, inspect the stone-like display seat beside the feline statue on the command-centre route.
Full detailLoad checkpoint 12. Follow the command-centre route until reaching a feline statue and a chair incorporated into the nearby rock display. Take the manuscript from that chair. The pickup saves immediately.
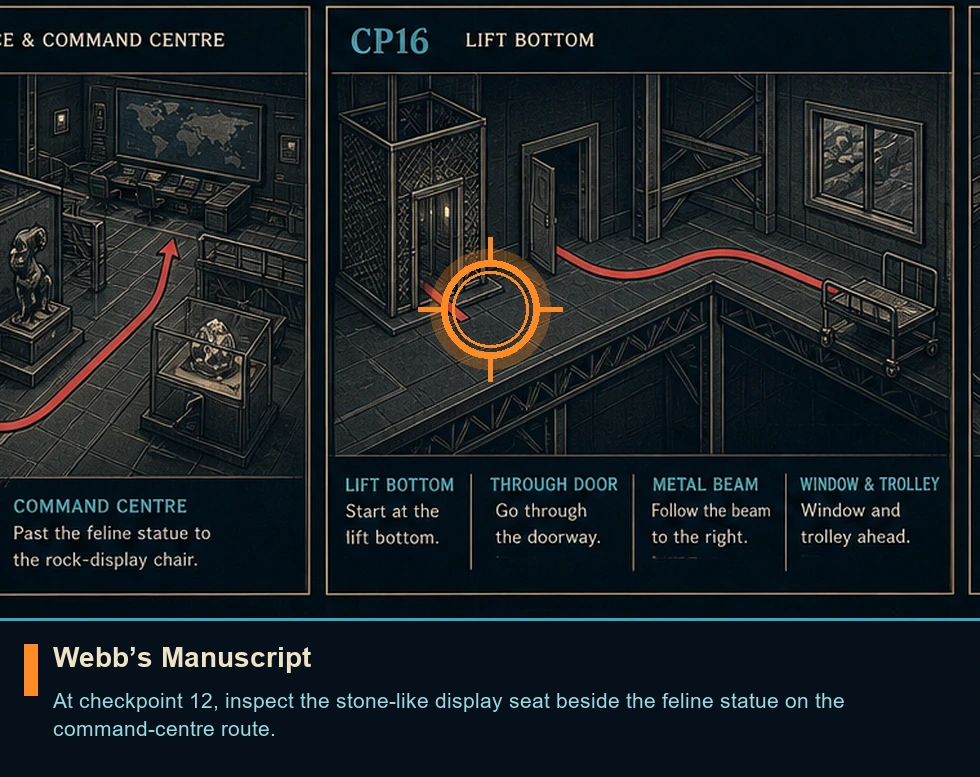
Antarctica Postcard
Postcard
HintUse the watch scan during quieter exploration and inspect side rooms before following the main route.
WhereAt checkpoint 16, inspect directly ahead on a trolley by the window.
Full detailLoad checkpoint 16. At the bottom of the lift, recover the Override Key and neutralize the android with gadgets. Insert the key into the marked doorway, continue across the metal beam, and take the postcard from the trolley beside the window. The pickup saves immediately.
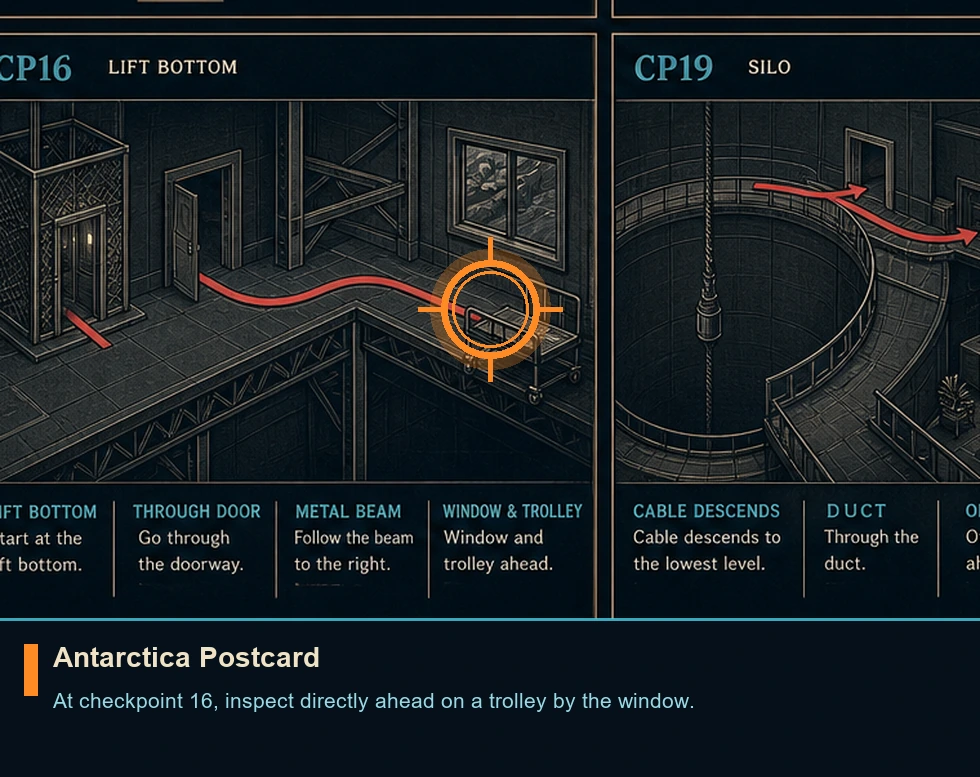
Robot Keychain
Memento
HintUse the watch scan during quieter exploration and inspect side rooms before following the main route.
WhereAt checkpoint 19, inspect a podium behind you.
Full detailLoad checkpoint 19. Descend through the silo, ride the cable to its lowest level, crawl through the air-conditioning duct, and drop into the office. Turn around after landing; the keychain is on the podium behind you. The pickup saves immediately.
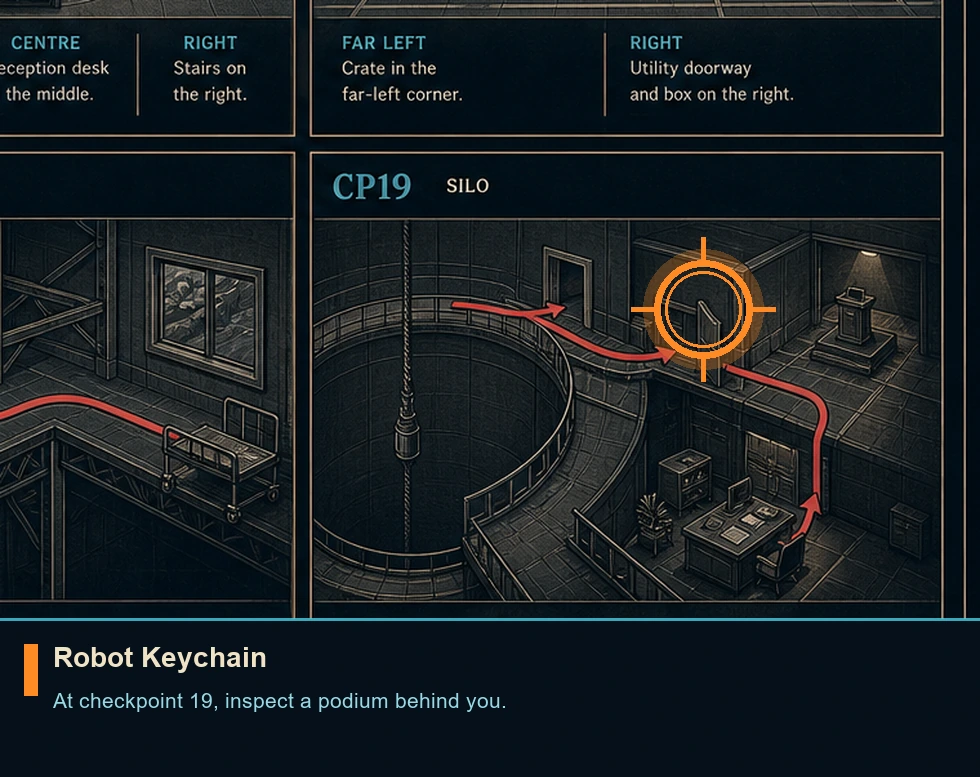
Completionist: Wave of the Future
Mission challenge
HintPin this Journal entry and give it a focused attempt instead of combining incompatible routes.
WhereStart from checkpoint 1; open the Journal and track this entry.
Full detailComplete every challenge record in this area to receive its TacSim outfit. Resolve conflicting approaches on separate attempts, then verify the umbrella record after the final check fills.
Pacifist: Wave of the Future
Mission challenge
HintPin this Journal entry and give it a focused attempt instead of combining incompatible routes.
WhereStart from checkpoint 1; open the Journal and track this entry.
Full detailFinish every component Journal check displayed beneath this umbrella entry. Keep clear of kills; use stealth movement and compliance options. Confirm the Journal mark appears before changing to another checkpoint.
Ghost: Wave of the Future
Mission challenge
HintPin this Journal entry and give it a focused attempt instead of combining incompatible routes.
WhereStart from checkpoint 1; open the Journal and track this entry.
Full detailFinish every component Journal check displayed beneath this umbrella entry. Maintain full stealth with zero detection. Confirm the Journal mark appears before changing to another checkpoint.
Assault: Wave of the Future
Mission challenge
HintPin this Journal entry and give it a focused attempt instead of combining incompatible routes.
WhereStart from checkpoint 1; open the Journal and track this entry.
Full detailFinish every component Journal check displayed beneath this umbrella entry. Expect full combat encounters and aggressive pushes. Confirm the Journal mark appears before changing to another checkpoint.
Hide and Seek
Mission challenge
HintPin this Journal entry and give it a focused attempt instead of combining incompatible routes.
WhereStart from checkpoint 1; open the Journal and track this entry.
Full detailCross the restricted gatehouse without being detected. Use its ledges and cover, advance only while guards face away, and verify the Journal after leaving the restricted boundary.
Knock Knock
Mission challenge
HintPin this Journal entry and give it a focused attempt instead of combining incompatible routes.
WhereStart from checkpoint 1; open the Journal and track this entry.
Full detailKnock out David Somerset in the toilet. Access restroom and execute takedown after interaction prompt. Confirm the Journal mark appears before changing to another checkpoint.
First Day At Work
Mission challenge
HintPin this Journal entry and give it a focused attempt instead of combining incompatible routes.
WhereStart from checkpoint 2; open the Journal and track this entry.
Full detailComplete every opportunity in Robotics. Operate every station marked by objective icons. Confirm the Journal mark appears before changing to another checkpoint.
Special Intelligence Task Force
Mission challenge
HintPin this Journal entry and give it a focused attempt instead of combining incompatible routes.
WhereStart from checkpoint 2; open the Journal and track this entry.
Full detailBail out your companion when recognized by the staff member. Trigger and select “Intervene” during QTE prompt. Confirm the Journal mark appears before changing to another checkpoint.
Pacifist Protocols
Mission challenge
HintPin this Journal entry and give it a focused attempt instead of combining incompatible routes.
WhereStart from checkpoint 2; open the Journal and track this entry.
Full detailFinish both the gantry and utility sections without shooting anyone. Leave firearms unused, rely on movement and non-ballistic tools, and confirm the record after both sections.
Death From Above
Mission challenge
HintPin this Journal entry and give it a focused attempt instead of combining incompatible routes.
WhereStart from checkpoint 2; open the Journal and track this entry.
Full detailPerform three aerial takedowns in the Utility area. Use the raised server racks to position above separate guards, and confirm the Journal mark before leaving.
Deadly Delivery
Mission challenge
HintPin this Journal entry and give it a focused attempt instead of combining incompatible routes.
WhereStart from checkpoint 2; open the Journal and track this entry.
Full detailAttach a proximity mine to a robot vacuum with Q-Lens targeting, then let its route carry the mine to a guard. Wait for the resulting elimination and the Journal confirmation.
Server Breakdown
Mission challenge
HintPin this Journal entry and give it a focused attempt instead of combining incompatible routes.
WhereStart from checkpoint 2; open the Journal and track this entry.
Full detailEliminate one guard with exploding server module. Lure hostiles to server rack, then fire at red tank. Confirm the Journal mark appears before changing to another checkpoint.
Attention To Detail
Mission challenge
HintPin this Journal entry and give it a focused attempt instead of combining incompatible routes.
WhereStart from checkpoint 2; open the Journal and track this entry.
Full detailOpen the Archive safe. First collect its key in the Legal Department, return to the Archive, unlock the safe, and remain until the Journal records the interaction.
Snoop Around
Mission challenge
HintPin this Journal entry and give it a focused attempt instead of combining incompatible routes.
WhereStart from checkpoint 2; open the Journal and track this entry.
Full detailLocate and solve math puzzle. Solution: 1864. Confirm the Journal mark appears before changing to another checkpoint.
Surrender
Mission challenge
HintPin this Journal entry and give it a focused attempt instead of combining incompatible routes.
WhereStart from checkpoint 3; open the Journal and track this entry.
Full detailTrigger a guard's surrender interaction and comply with every prompt. Do not break the sequence with movement or a gadget; wait for the Journal update before resuming control.
Expert Marksman
Mission challenge
HintPin this Journal entry and give it a focused attempt instead of combining incompatible routes.
WhereStart from checkpoint 3; open the Journal and track this entry.
Full detailEliminate ten hostiles with headshots. Remain behind cover and prioritize precision shots. Confirm the Journal mark appears before changing to another checkpoint.
Proxy Agent
Mission challenge
HintPin this Journal entry and give it a focused attempt instead of combining incompatible routes.
WhereStart from checkpoint 3; open the Journal and track this entry.
Full detailOverride five servers during Red Alert. Use each workstation as temporary cover, finish its full interaction, and monitor the Journal counter until five register.
Stay Stealthy
Mission challenge
HintPin this Journal entry and give it a focused attempt instead of combining incompatible routes.
WhereStart from checkpoint 3; open the Journal and track this entry.
Full detailTake out 4 hostiles without alerting anyone. Let isolated security personnel approach and neutralize quietly. Confirm the Journal mark appears before changing to another checkpoint.
Going Down?
Mission challenge
HintPin this Journal entry and give it a focused attempt instead of combining incompatible routes.
WhereStart from checkpoint 4; open the Journal and track this entry.
Full detailHurl all security personnel off descending freight lift. Grapple hostiles and push them over edges. Confirm the Journal mark appears before changing to another checkpoint.
Terminated
Mission challenge
HintPin this Journal entry and give it a focused attempt instead of combining incompatible routes.
WhereStart from checkpoint 4; open the Journal and track this entry.
Full detailDestroy the rogue android with the room's lift mechanism. Draw it into the lift's crushing zone, trigger the machinery at the correct moment, and verify the Journal result.
No Time to Reload
Mission challenge
HintPin this Journal entry and give it a focused attempt instead of combining incompatible routes.
WhereStart from checkpoint 4; open the Journal and track this entry.
Full detailMake qualifying eliminations with five different firearms during one encounter. Rotate through dropped weapons without leaving combat and verify each category in the Journal.
Wrecking Baller
Mission challenge
HintPin this Journal entry and give it a focused attempt instead of combining incompatible routes.
WhereStart from checkpoint 5; open the Journal and track this entry.
Full detailBreak 15 androids without suffering a hit. Maintain spacing and keep clear of flanking attacks. Confirm the Journal mark appears before changing to another checkpoint.
A Perfect Strike
Mission challenge
HintPin this Journal entry and give it a focused attempt instead of combining incompatible routes.
WhereStart from checkpoint 5; open the Journal and track this entry.
Full detailBreak 10 androids in one roll. Group hostiles before activating Wreckie charge. Confirm the Journal mark appears before changing to another checkpoint.
Icecap-Tain
Mission challenge
HintPin this Journal entry and give it a focused attempt instead of combining incompatible routes.
WhereStart from checkpoint 6; open the Journal and track this entry.
Full detailDuring the chase, use an iceberg as a launch ramp. Steer slightly away from the direct line to hit a raised ice edge at speed, then wait for the jump to register.
Running Man
Mission challenge
HintPin this Journal entry and give it a focused attempt instead of combining incompatible routes.
WhereStart from checkpoint 6; open the Journal and track this entry.
Full detailComplete the chase without failing a prompt or restarting a segment. Watch the environmental warnings, respond to each obstacle cleanly, and confirm the Journal at the endpoint.
For England
You are here when: The damaged secure complex with holding cells, operations rooms, utility tunnels, and laboratory spaces.
Finish the visible route once, then use checkpoint replay for collectibles and mutually exclusive Journal approaches.
Area Completion
Story completion
HintFollow the current objective markers and explore at your own pace.
WhereComplete every checkpoint currently listed for this area in Chapter Select.
Full detailReach the area-complete transition on any difficulty. Its checkpoints remain replayable, so collection and Journal cleanup can be handled later without restarting the campaign.
King of Bells
Playing card
HintUse the watch scan during quieter exploration and inspect side rooms before following the main route.
WhereAt checkpoint 03, inspect the table.
Full detailLoad checkpoint 03. Use the next doorway after the medical area and enter the room directly ahead. The card rests on the table and saves immediately.
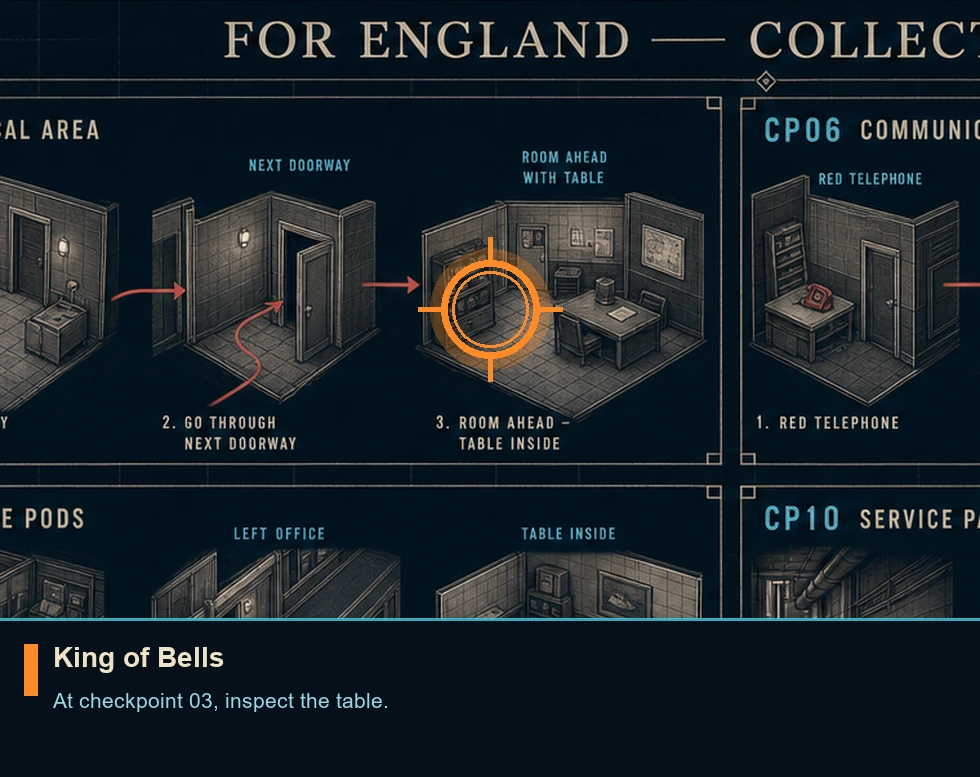
MI6 Postcard
Postcard
HintUse the watch scan during quieter exploration and inspect side rooms before following the main route.
WhereAt checkpoint 06, inspect the ground.
Full detailLoad checkpoint 06. After using the red telephone, take the receiver item and continue through the next doorway. Squeeze past the shelving and look down immediately; the postcard is on the floor. The pickup saves immediately.
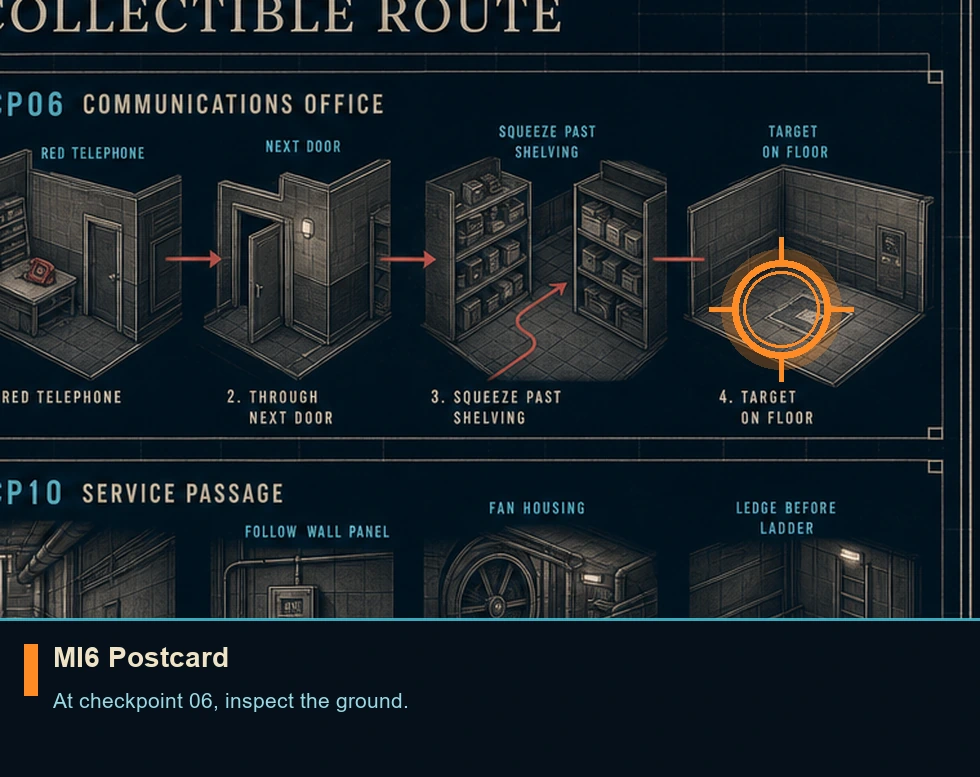
Ace of Shields
Playing card
HintUse the watch scan during quieter exploration and inspect side rooms before following the main route.
WhereAt checkpoint 08, break into the left office beside the marked pod and inspect its table.
Full detailLoad checkpoint 08. At the office pods, force open the left office door and take the card from the table inside. The pickup saves immediately.
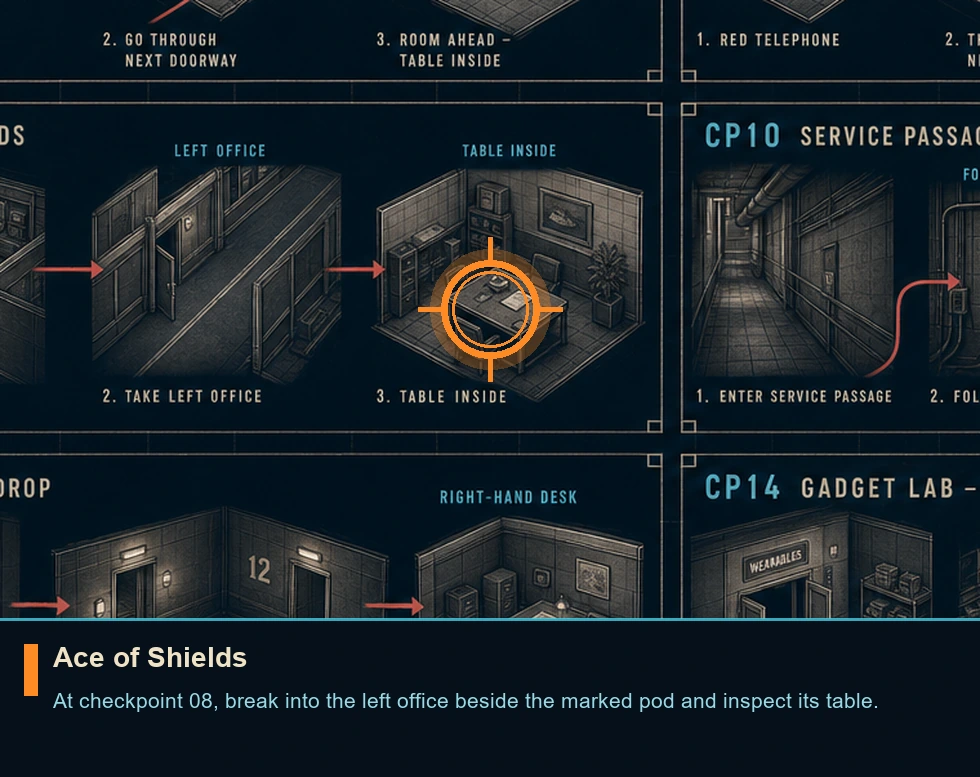
Wallet
Intel file
HintUse the watch scan during quieter exploration and inspect side rooms before following the main route.
WhereAt checkpoint 10, inspect ledge.
Full detailLoad checkpoint 10. In the service passage, operate the wall panel to stop the ventilation fan, pass through its housing, and take the wallet from the ledge immediately beyond it. Do this before descending the ladder. The pickup saves immediately.
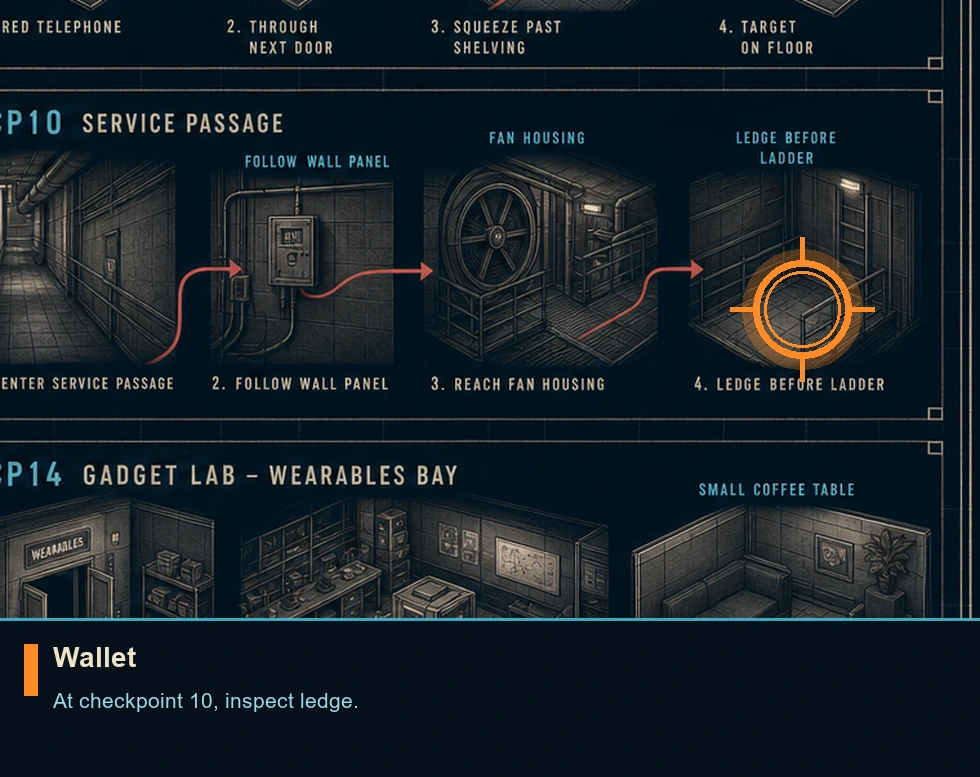
8 of Bells
Playing card
HintUse the watch scan during quieter exploration and inspect side rooms before following the main route.
WhereAt checkpoint 12, inspect the desk to the right.
Full detailLoad checkpoint 12. After dropping through the elevator route, clear the three hostiles and inspect the desk on the right. The card saves immediately when collected.
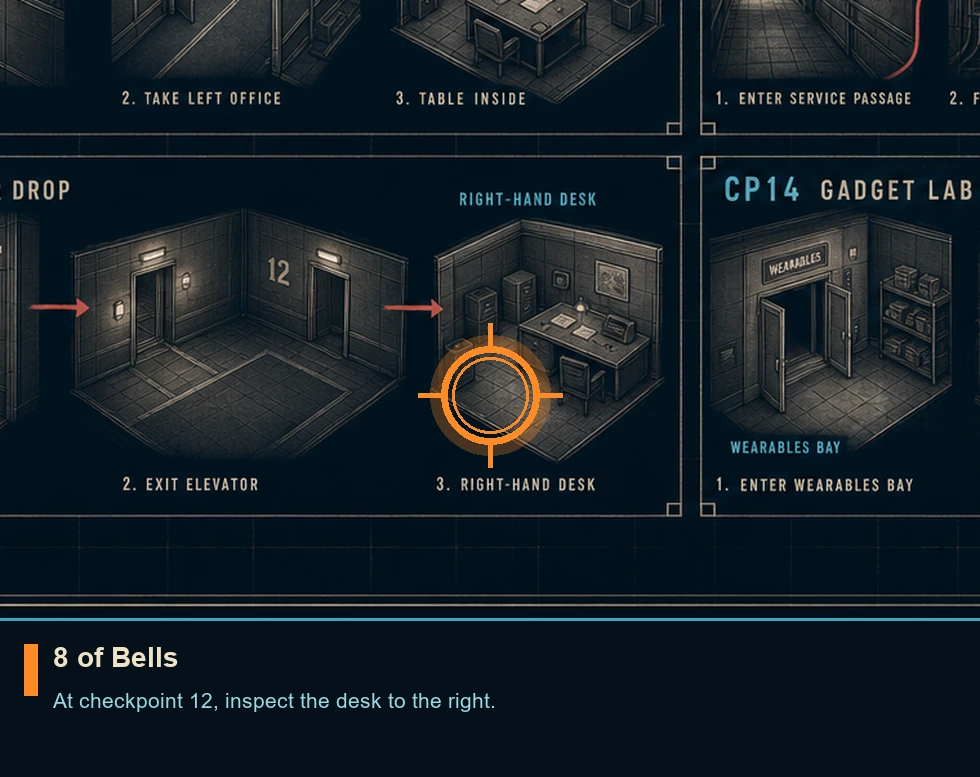
Dashboard Toy
Memento
HintUse the watch scan during quieter exploration and inspect side rooms before following the main route.
WhereAt checkpoint 14, inspect the small coffee table in the wearables bay.
Full detailLoad checkpoint 14. Enter the gadget lab's wearables bay and inspect the small coffee table beside the marked route. The toy saves immediately when collected.
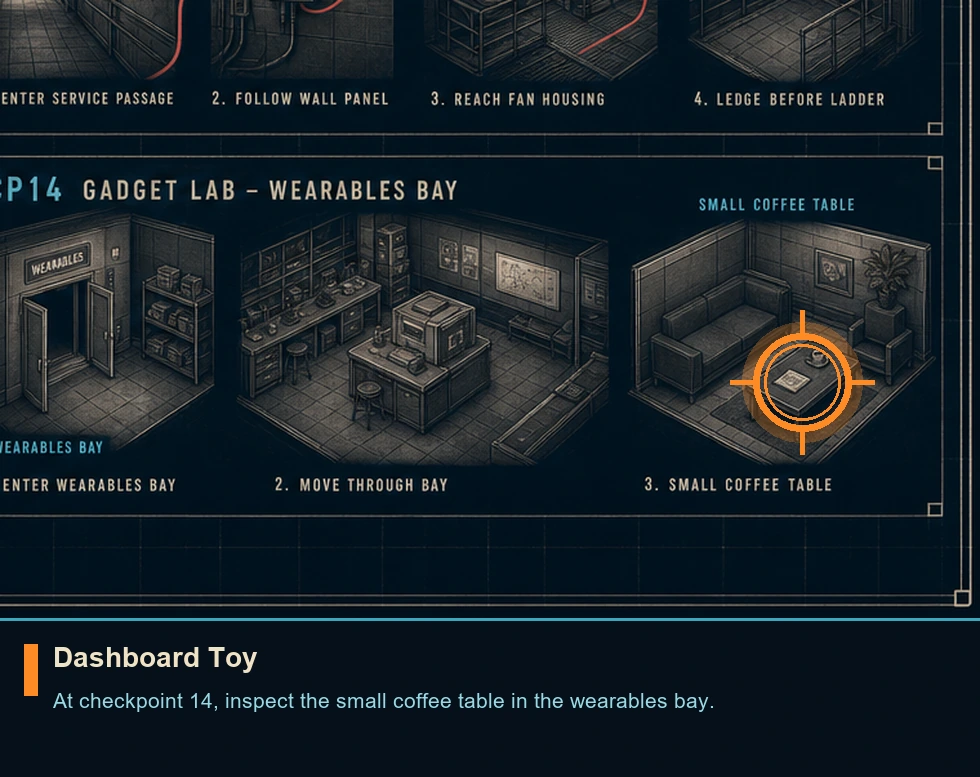
Completionist: For England
Mission challenge
HintPin this Journal entry and give it a focused attempt instead of combining incompatible routes.
WhereStart from checkpoint 1; open the Journal and track this entry.
Full detailComplete every challenge record in this area to receive its TacSim outfit. Split incompatible stealth and combat routes across replays, then confirm the umbrella entry in the Journal.
Pacifist: For England
Mission challenge
HintPin this Journal entry and give it a focused attempt instead of combining incompatible routes.
WhereStart from checkpoint 1; open the Journal and track this entry.
Full detailFinish every component Journal check displayed beneath this umbrella entry. Keep clear of weapon kills and use melee or non-lethal options. Confirm the Journal mark appears before changing to another checkpoint.
Ghost: For England
Mission challenge
HintPin this Journal entry and give it a focused attempt instead of combining incompatible routes.
WhereStart from checkpoint 1; open the Journal and track this entry.
Full detailFinish every component Journal check displayed beneath this umbrella entry. Maintain full stealth with no detections. Confirm the Journal mark appears before changing to another checkpoint.
Assault: For England
Mission challenge
HintPin this Journal entry and give it a focused attempt instead of combining incompatible routes.
WhereStart from checkpoint 1; open the Journal and track this entry.
Full detailFill every component beneath this Assault umbrella record. Complete the area's combat and gadget-heavy conditions, then reopen the Journal to ensure the umbrella entry also registered.
Lock, Stock and 1 Trapped Hostile
Mission challenge
HintPin this Journal entry and give it a focused attempt instead of combining incompatible routes.
WhereStart from checkpoint 1; open the Journal and track this entry.
Full detailTrap one opponent inside a holding cell. Isolate the target between the cell doors, operate the nearby wall control, and verify the Journal once the lock engages.
The Great Escape
Mission challenge
HintPin this Journal entry and give it a focused attempt instead of combining incompatible routes.
WhereStart from checkpoint 1; open the Journal and track this entry.
Full detailMake your way through null space undetected. Remain crouched and move slowly through patrol gaps. Confirm the Journal mark appears before changing to another checkpoint.
All Smoke and Mirrors
Mission challenge
HintPin this Journal entry and give it a focused attempt instead of combining incompatible routes.
WhereStart from checkpoint 1; open the Journal and track this entry.
Full detailRelease smoke from the rafters above the security office. Climb into the overhead structure, operate its smoke valve, and remain there until the Journal updates.
Apex Predator
Mission challenge
HintPin this Journal entry and give it a focused attempt instead of combining incompatible routes.
WhereStart from checkpoint 1; open the Journal and track this entry.
Full detailSilently incapacitate every opponent in the security room. Move between cubicles, engage only isolated patrols, and inspect the Journal before exiting the room.
Reduce Your Screen Time
Mission challenge
HintPin this Journal entry and give it a focused attempt instead of combining incompatible routes.
WhereStart from checkpoint 2; open the Journal and track this entry.
Full detailDestroy fifty display screens in the operations room. Sweep the room with any firearm and watch the Journal counter until it reaches fifty before leaving.
Untouchable
Mission challenge
HintPin this Journal entry and give it a focused attempt instead of combining incompatible routes.
WhereStart from checkpoint 2; open the Journal and track this entry.
Full detailNeutralize snipers without suffering a hit. Use cover and environmental kills (pipes/lights). Confirm the Journal mark appears before changing to another checkpoint.
Be Q-uiet
Mission challenge
HintPin this Journal entry and give it a focused attempt instead of combining incompatible routes.
WhereStart from checkpoint 2; open the Journal and track this entry.
Full detailTraverse the gadget lab without detection. Favor the less-populated path along the right, wait for patrol gaps, and inspect the Journal after exiting the lab.
Technomage
Mission challenge
HintPin this Journal entry and give it a focused attempt instead of combining incompatible routes.
WhereStart from checkpoint 2; open the Journal and track this entry.
Full detailEliminate ten opponents with Flash Mine damage. Target clustered patrols, confirm each qualifying elimination in the counter, and remain until all ten register.
Bring A Fist To A Gun Fight
Mission challenge
HintPin this Journal entry and give it a focused attempt instead of combining incompatible routes.
WhereStart from checkpoint 3; open the Journal and track this entry.
Full detailFinish lift fight without with weapons. Use melee finishers and scripted takedowns. Confirm the Journal mark appears before changing to another checkpoint.
Astonishing
Mission challenge
HintPin this Journal entry and give it a focused attempt instead of combining incompatible routes.
WhereStart from checkpoint 3; open the Journal and track this entry.
Full detailEliminate three hostiles with one explosion. Use clustered hostiles and explosive environments. Confirm the Journal mark appears before changing to another checkpoint.
Fire In The Hole!
Mission challenge
HintPin this Journal entry and give it a focused attempt instead of combining incompatible routes.
WhereStart from checkpoint 4; open the Journal and track this entry.
Full detailRemove all protection from the armored opponent using proximity hacks only. Trigger nearby hazards rather than attacking directly, and verify the condition before dealing any other damage.
Turret Aficionado
Mission challenge
HintPin this Journal entry and give it a focused attempt instead of combining incompatible routes.
WhereStart from checkpoint 4; open the Journal and track this entry.
Full detailDamage the armored opponent with the first turret within two minutes. Move between cover toward the turret immediately, activate it early, and verify the timed record after the hit.
Global Challenge Records
You are here when: The Journal's global tab and the wardrobe after mission-specific challenge cleanup.
These cumulative and umbrella checks span multiple areas; mission-specific entries appear in their physical areas above.
Completionist
Mission challenge
HintPin this Journal entry and give it a focused attempt instead of combining incompatible routes.
WhereStart from checkpoint 1; open the Journal and track this entry.
Full detailClear every challenge in the main story. Pin the entry and use its live Journal tracker. Confirm the Journal mark appears before changing to another checkpoint.
Pacifist
Mission challenge
HintPin this Journal entry and give it a focused attempt instead of combining incompatible routes.
WhereStart from checkpoint 1; open the Journal and track this entry.
Full detailFinish every component Journal check displayed beneath this umbrella entry. Pin the entry and use its live Journal tracker. Confirm the Journal mark appears before changing to another checkpoint.
Ghost
Mission challenge
HintPin this Journal entry and give it a focused attempt instead of combining incompatible routes.
WhereStart from checkpoint 1; open the Journal and track this entry.
Full detailFinish every component Journal check displayed beneath this umbrella entry. Pin the entry and use its live Journal tracker. Confirm the Journal mark appears before changing to another checkpoint.
Assault
Mission challenge
HintPin this Journal entry and give it a focused attempt instead of combining incompatible routes.
WhereStart from checkpoint 1; open the Journal and track this entry.
Full detailFinish every component Journal check displayed beneath this umbrella entry. Pin the entry and use its live Journal tracker. Confirm the Journal mark appears before changing to another checkpoint.
CQC Expertise
Mission challenge
HintPin this Journal entry and give it a focused attempt instead of combining incompatible routes.
WhereStart from checkpoint 2; open the Journal and track this entry.
Full detailNeutralize 100 hostiles in melee combat. Pin the entry and use its live Journal tracker. Confirm the Journal mark appears before changing to another checkpoint.
Shadow Tactics
Mission challenge
HintPin this Journal entry and give it a focused attempt instead of combining incompatible routes.
WhereStart from checkpoint 2; open the Journal and track this entry.
Full detailExecute 50 stealth takedowns. Pin the entry and use its live Journal tracker. Confirm the Journal mark appears before changing to another checkpoint.
Firearms Expertise
Mission challenge
HintPin this Journal entry and give it a focused attempt instead of combining incompatible routes.
WhereStart from checkpoint 2; open the Journal and track this entry.
Full detailNeutralize 150 hostiles with firearms. Pin the entry and use its live Journal tracker. Confirm the Journal mark appears before changing to another checkpoint.
Social Engineering
Mission challenge
HintPin this Journal entry and give it a focused attempt instead of combining incompatible routes.
WhereStart from checkpoint 3; open the Journal and track this entry.
Full detailExecute 15 bluffs. Pin the entry and use its live Journal tracker. Confirm the Journal mark appears before changing to another checkpoint.
Watch Expertise
Mission challenge
HintPin this Journal entry and give it a focused attempt instead of combining incompatible routes.
WhereStart from checkpoint 3; open the Journal and track this entry.
Full detailOverride 25 devices with your watch. Pin the entry and use its live Journal tracker. Confirm the Journal mark appears before changing to another checkpoint.
Dart Phone Expertise
Mission challenge
HintPin this Journal entry and give it a focused attempt instead of combining incompatible routes.
WhereStart from checkpoint 3; open the Journal and track this entry.
Full detailUse Dart Phone 15 times. Pin the entry and use its live Journal tracker. Confirm the Journal mark appears before changing to another checkpoint.
Laser Strap Expertise
Mission challenge
HintPin this Journal entry and give it a focused attempt instead of combining incompatible routes.
WhereStart from checkpoint 3; open the Journal and track this entry.
Full detailUse Laser Strap 15 times. Pin the entry and use its live Journal tracker. Confirm the Journal mark appears before changing to another checkpoint.
Smoke Pod Expertise
Mission challenge
HintPin this Journal entry and give it a focused attempt instead of combining incompatible routes.
WhereStart from checkpoint 3; open the Journal and track this entry.
Full detailUse Smoke Pod 10 times. Pin the entry and use its live Journal tracker. Confirm the Journal mark appears before changing to another checkpoint.
Flash Mine Expertise
Mission challenge
HintPin this Journal entry and give it a focused attempt instead of combining incompatible routes.
WhereStart from checkpoint 3; open the Journal and track this entry.
Full detailUse Flash Mine 10 times. Pin the entry and use its live Journal tracker. Confirm the Journal mark appears before changing to another checkpoint.
Shockwave Camera Expertise
Mission challenge
HintPin this Journal entry and give it a focused attempt instead of combining incompatible routes.
WhereStart from checkpoint 3; open the Journal and track this entry.
Full detailUse Shockwave Camera 10 times. Pin the entry and use its live Journal tracker. Confirm the Journal mark appears before changing to another checkpoint.
Missile Pen Expertise
Mission challenge
HintPin this Journal entry and give it a focused attempt instead of combining incompatible routes.
WhereStart from checkpoint 3; open the Journal and track this entry.
Full detailUse Missile Pen 10 times. Pin the entry and use its live Journal tracker. Confirm the Journal mark appears before changing to another checkpoint.
Always have an exit plan
Combat interaction
HintPractice this interaction during a replay with a convenient checkpoint and forgiving difficulty.
WhereUse the Journal and a combat-heavy checkpoint containing the required enemy or environmental setup.
Full detailEnter a restricted public space and deliberately let security begin a confrontation. While the bluff-or-comply dialogue is active, trigger a distracting Q-Watch function and leave during the diversion. Wait for the completion notice before restarting the checkpoint.
Disarming personality
Combat interaction
HintPractice this interaction during a replay with a convenient checkpoint and forgiving difficulty.
WhereUse the Journal and a combat-heavy checkpoint containing the required enemy or environmental setup.
Full detailEquip the Laser Strap in the gadget lab (unlocked in ) and fire it at an equipped enemy while they are targeting at you. Keep it charged with colored batteries. Wait for the completion notice before restarting or leaving the checkpoint.
Firestarter
Combat interaction
HintPractice this interaction during a replay with a convenient checkpoint and forgiving difficulty.
WhereUse the Journal and a combat-heavy checkpoint containing the required enemy or environmental setup.
Full detailCheckpoint 05: The Laundry. Lure a hostile to the fire extinguisher in the rear corner and shove them into it. Wait for the completion notice before restarting or leaving the checkpoint.
He'll live
Combat interaction
HintPractice this interaction during a replay with a convenient checkpoint and forgiving difficulty.
WhereUse the Journal and a combat-heavy checkpoint containing the required enemy or environmental setup.
Full detailFire repeatedly at one hostile's lower body; the final damaging round must strike a leg and incapacitate the target. Wait for the completion notice before restarting or leaving the checkpoint.
Positively shocking
Combat interaction
HintPractice this interaction during a replay with a convenient checkpoint and forgiving difficulty.
WhereUse the Journal and a combat-heavy checkpoint containing the required enemy or environmental setup.
Full detailCheckpoint 05: The Laundry. Use a grabbed hostile as a human shield and drive them into a taser's blue targeting line. Wait for the completion notice before restarting or leaving the checkpoint.
Short fuse
Combat interaction
HintPractice this interaction during a replay with a convenient checkpoint and forgiving difficulty.
WhereUse the Journal and a combat-heavy checkpoint containing the required enemy or environmental setup.
Full detailCheckpoint 11: Ambush (or Checkpoint 11: Webb Exhibition). Pause for an enemy to hurl a grenade and fire at them within the throwing animation. Slow-motion makes pickup much easier. Wait for the completion notice before restarting or leaving the checkpoint.
Damp squib
Combat interaction
HintPractice this interaction during a replay with a convenient checkpoint and forgiving difficulty.
WhereUse the Journal and a combat-heavy checkpoint containing the required enemy or environmental setup.
Full detailCheckpoint 11: Ambush (or Checkpoint 11: Webb Exhibition). Let an enemy hurl a grenade, then override it with the watch scanner before it explodes. Wait for the completion notice before restarting or leaving the checkpoint.
Sleight of hand
Combat interaction
HintPractice this interaction during a replay with a convenient checkpoint and forgiving difficulty.
WhereUse the Journal and a combat-heavy checkpoint containing the required enemy or environmental setup.
Full detailAutomatically taught during The Needle's Eye. Fire at an enemy's weapon hand to disarm them. Wait for the completion notice before restarting or leaving the checkpoint.
Soft landing
Combat interaction
HintPractice this interaction during a replay with a convenient checkpoint and forgiving difficulty.
WhereUse the Journal and a combat-heavy checkpoint containing the required enemy or environmental setup.
Full detailCheckpoint 10: Search the grounds. Hold the grab control and push an enemy backward over a sill, such as the ladder platform. Wait for the completion notice before restarting or leaving the checkpoint.
Campaign Gadget Set
Gadget set
HintReturn to each gadget bench and test every automatic field tool.
WhereFinish the campaign and verify every campaign gadget is available in the loadout screen.
Full detailProgress through every gadget-lab instruction, then inspect the loadout before checkpoint cleanup. Make one valid use of the watch scanner, Dart Phone, Laser Strap, Smoke Pod, Flash Mine, and Shockwave Camera while completing their related global Journal counters.
All Mission Challenge Outfits
Wardrobe unlock set
HintEach challenge-bearing area has a completion reward in the wardrobe.
WhereClear every mission-specific Journal entry and all global Pacifist, Ghost, and Assault records.
Full detailFinish every challenge item listed in the reached mission areas. The per-area Completionist checks and the three global playstyle checks should fill automatically; then open the wardrobe and verify every challenge-earned outfit, including the final Agent Outfit, is unlocked.
Challenges
You are here when: The online Tactical Simulations menu and its briefing/loadout room.
TacSim requires an online connection. Clear every listed tier and optional check, then claim its progression and shop rewards.
Classified Papers
Mission challenge
HintPin this Journal entry and give it a focused attempt instead of combining incompatible routes.
WhereOpen this simulation's challenge list and track the entry before starting.
Full detailThe available tracker does not expose a verified condition for this hidden record. Check its live in-game description after it unlocks and follow that wording; this entry is patch-sensitive and intentionally does not invent a solution.
Full Pockets
Mission challenge
HintPin this Journal entry and give it a focused attempt instead of combining incompatible routes.
WhereOpen this simulation's challenge list and track the entry before starting.
Full detailActivate four distinct gadgets during one completed simulation. Choose a low-pressure route, rotate through four equipped tools in valid interactions, and verify the result-screen record.
The Driver
Mission challenge
HintPin this Journal entry and give it a focused attempt instead of combining incompatible routes.
WhereOpen this simulation's challenge list and track the entry before starting.
Full detailComplete any simulation while the Chauffeur outfit is equipped. Select it before launch, use a short replayable scenario, and keep it on through the result screen.
TacSim Hub Introduction
Mission challenge
HintPin this Journal entry and give it a focused attempt instead of combining incompatible routes.
WhereOpen this simulation's challenge list and track the entry before starting.
Full detailFinish every step of the guided Tactical Simulations hub tutorial. Continue until the Journal records completion; there is no alternate route required.
Shotgun Specialist
Mission challenge
HintPin this Journal entry and give it a focused attempt instead of combining incompatible routes.
WhereOpen this simulation's challenge list and track the entry before starting.
Full detailFinish a simulation after using only a shotgun for every elimination. Pick a combat-heavy simulation, avoid takedowns and environmental eliminations, and confirm the tracker before exiting.
Pistol Specialist
Mission challenge
HintPin this Journal entry and give it a focused attempt instead of combining incompatible routes.
WhereOpen this simulation's challenge list and track the entry before starting.
Full detailFinish a simulation after using only a pistol for every elimination. Choose a route with isolated guards, avoid other damage sources, and confirm the tracker before exiting.
Dropping In
Mission challenge
HintPin this Journal entry and give it a focused attempt instead of combining incompatible routes.
WhereOpen this simulation's challenge list and track the entry before starting.
Full detailPerform three aerial takedowns during one simulation. Pick a map with stacked walkways, approach three separate patrols from above, and confirm the counter before extraction.
The Chemist
Mission challenge
HintPin this Journal entry and give it a focused attempt instead of combining incompatible routes.
WhereOpen this simulation's challenge list and track the entry before starting.
Full detailFinish a simulation with at least three chemical gadgets equipped and no battery-powered gadget in the loadout. Configure the kit before launch and verify the restriction on the result screen.
The Technologist
Mission challenge
HintPin this Journal entry and give it a focused attempt instead of combining incompatible routes.
WhereOpen this simulation's challenge list and track the entry before starting.
Full detailComplete a simulation with at least three battery-powered gadgets equipped and no chemical gadget in the loadout. Configure the kit before launch and verify it on the result screen.
All In
Mission challenge
HintPin this Journal entry and give it a focused attempt instead of combining incompatible routes.
WhereOpen this simulation's challenge list and track the entry before starting.
Full detailGrab rush two hostiles over a ledge. A reliable place is in Advanced Tactical Training Tier 2 where hostiles are positioned near edges. Confirm the Journal mark appears before changing to another checkpoint.
Mix It Up
Mission challenge
HintPin this Journal entry and give it a focused attempt instead of combining incompatible routes.
WhereOpen this simulation's challenge list and track the entry before starting.
Full detailEliminate opponents with three different weapon categories during one simulation. Collect alternate firearms along a longer route, score at least one qualifying elimination with each, and inspect the tracker before extraction.
It Wasn't Me
Mission challenge
HintPin this Journal entry and give it a focused attempt instead of combining incompatible routes.
WhereOpen this simulation's challenge list and track the entry before starting.
Full detailPerform a takedown and successfully bluff within the same ten-second window. Use a guarded public area where both actions are available, then confirm the tracker.
TacSim Clearance Progression
TacSim progression
HintEvery simulation result contributes experience and Intel.
WhereRaise Clearance by completing Escalations, Operations, and their challenges.
Full detailStay online, clear every finite simulation entry, and repeat a short tier only when additional experience or Intel is still required. Continue until every shop item's level gate is open; do not stop at the smaller platform-linked clearance threshold.
TacSim Intel Shop
TacSim unlock set
HintClearance reveals stock, while Intel pays for it.
WherePurchase every normally obtainable weapon, gadget, upgrade, skin, and outfit in the Intel Shop.
Full detailFirst open all level gates through simulation experience, then replay efficient completed tiers and optional checks for Intel. Buy every permanent shop entry until no standard item remains locked by level or price. Promotional, edition, regional, and expired-event cosmetics are external entitlements and are not part of save-file 100%.
Advanced Tactical Training
You are here when: The online Tactical Simulations menu and its briefing/loadout room.
TacSim requires an online connection. Clear every listed tier and optional check, then claim its progression and shop rewards.
Advanced Tactical Training 1
Mission challenge
HintPin this Journal entry and give it a focused attempt instead of combining incompatible routes.
WhereOpen this simulation's challenge list and track the entry before starting.
Full detailFinish Tier 1. Use the built-in tutorial tier of this area. Confirm the Journal mark appears before changing to another checkpoint.
Advanced Tactical Training 2
Mission challenge
HintPin this Journal entry and give it a focused attempt instead of combining incompatible routes.
WhereOpen this simulation's challenge list and track the entry before starting.
Full detailComplete Tier 2's marked objective and reach the result screen. Stay online until its clear appears in the Tactical Simulations tracker.
Advanced Tactical Training 3
Mission challenge
HintPin this Journal entry and give it a focused attempt instead of combining incompatible routes.
WhereOpen this simulation's challenge list and track the entry before starting.
Full detailComplete Tier 3's marked objective and reach the result screen. Practice the earlier tiers first, then remain online until this clear registers.
Graduated
Mission challenge
HintPin this Journal entry and give it a focused attempt instead of combining incompatible routes.
WhereOpen this simulation's challenge list and track the entry before starting.
Full detailClear all three Advanced Tactical Training tiers. Verify each separate result record, then reopen the tracker to ensure the combined completion entry fills.
Four Your Eyes Only
Mission challenge
HintPin this Journal entry and give it a focused attempt instead of combining incompatible routes.
WhereOpen this simulation's challenge list and track the entry before starting.
Full detailFinish Tier 2 with no more than four eliminations. Bypass optional patrols and verify the tracker on the result screen.
A Lesson in Chemistry
Mission challenge
HintPin this Journal entry and give it a focused attempt instead of combining incompatible routes.
WhereOpen this simulation's challenge list and track the entry before starting.
Full detailDuring Tier 3, eliminate one opponent with an environmental explosion. Lure a guard beside an explosive object, trigger it, and confirm the tracker before ending the tier.
Mind the Gap
Mission challenge
HintPin this Journal entry and give it a focused attempt instead of combining incompatible routes.
WhereOpen this simulation's challenge list and track the entry before starting.
Full detailEliminate one opponent by throwing them from a ledge. Tier 3 provides several elevated positions; verify the tracker after the fall registers.
No Gadgets: Advanced Tactical Training
Mission challenge
HintPin this Journal entry and give it a focused attempt instead of combining incompatible routes.
WhereOpen this simulation's challenge list and track the entry before starting.
Full detailFinish Tier 3 with every gadget slot empty. Remove the full gadget loadout before launch, use weapons and movement only, and verify the restriction on the result screen.
Fast Learner
Mission challenge
HintPin this Journal entry and give it a focused attempt instead of combining incompatible routes.
WhereOpen this simulation's challenge list and track the entry before starting.
Full detailReach the Tier 1 result screen in less than sixty seconds. Memorize the direct objective path, ignore optional engagements, and restart immediately after a slow section.
Slow Learner
Mission challenge
HintPin this Journal entry and give it a focused attempt instead of combining incompatible routes.
WhereOpen this simulation's challenge list and track the entry before starting.
Full detailFinish Tier 2 with Focus active for every shot you fire. Do not discharge a weapon outside Focus, and confirm the tracker before leaving the result screen.
Hoplophobia
Mission challenge
HintPin this Journal entry and give it a focused attempt instead of combining incompatible routes.
WhereOpen this simulation's challenge list and track the entry before starting.
Full detailFinish Tier 3 without firing any weapon. Use stealth, takedowns, and environmental interactions, then verify the restriction on the result screen.
Advanced Close Combat Training
You are here when: The online Tactical Simulations menu and its briefing/loadout room.
TacSim requires an online connection. Clear every listed tier and optional check, then claim its progression and shop rewards.
Advanced Close Combat 1
Mission challenge
HintPin this Journal entry and give it a focused attempt instead of combining incompatible routes.
WhereOpen this simulation's challenge list and track the entry before starting.
Full detailFinish Tier 1. Use the first close combat tutorial tier. Confirm the Journal mark appears before changing to another checkpoint.
Advanced Close Combat 2
Mission challenge
HintPin this Journal entry and give it a focused attempt instead of combining incompatible routes.
WhereOpen this simulation's challenge list and track the entry before starting.
Full detailComplete Tier 2's marked objective and reach its result screen. Remain online until the tracker records the clear.
Advanced Close Combat 3
Mission challenge
HintPin this Journal entry and give it a focused attempt instead of combining incompatible routes.
WhereOpen this simulation's challenge list and track the entry before starting.
Full detailComplete Tier 3's marked objective and reach its result screen. Repeat the tier while learning its attack patterns, then remain online until the clear records.
Close Combat Adept
Mission challenge
HintPin this Journal entry and give it a focused attempt instead of combining incompatible routes.
WhereOpen this simulation's challenge list and track the entry before starting.
Full detailClear every tiers. A reliable place is after finishing all individual tiers in sequence. Confirm the Journal mark appears before changing to another checkpoint.
The Crusher
Mission challenge
HintPin this Journal entry and give it a focused attempt instead of combining incompatible routes.
WhereOpen this simulation's challenge list and track the entry before starting.
Full detailEliminate one opponent by dropping or driving an environmental object onto them. Tier 3 offers several suitable objects; confirm the tracker after impact.
Buzzin'
Mission challenge
HintPin this Journal entry and give it a focused attempt instead of combining incompatible routes.
WhereOpen this simulation's challenge list and track the entry before starting.
Full detailEliminate one opponent with electrical environmental damage. Lure a guard beside a powered hazard, trigger it, and confirm the tracker.
Fly Like a Butterfly
Mission challenge
HintPin this Journal entry and give it a focused attempt instead of combining incompatible routes.
WhereOpen this simulation's challenge list and track the entry before starting.
Full detailClear both Tier 2 and Tier 3 without taking damage. Learn each attack tell, dodge instead of trading hits, and verify the no-damage record after both clears.
Sting Like a Bee
Mission challenge
HintPin this Journal entry and give it a focused attempt instead of combining incompatible routes.
WhereOpen this simulation's challenge list and track the entry before starting.
Full detailStagger ten opponents during one run. Tier 3 supplies enough targets; use repeated non-finishing impacts and confirm the tracker before exiting.
Distant Impact
Mission challenge
HintPin this Journal entry and give it a focused attempt instead of combining incompatible routes.
WhereOpen this simulation's challenge list and track the entry before starting.
Full detailIncapacitate three opponents with thrown objects. Use Tier 2 or Tier 3, collect props before engaging, and verify each qualifying impact in the tracker.
The Runner
Mission challenge
HintPin this Journal entry and give it a focused attempt instead of combining incompatible routes.
WhereOpen this simulation's challenge list and track the entry before starting.
Full detailReach the Tier 3 result screen within three minutes. Rehearse the shortest objective route, skip unnecessary engagements, and retry whenever the pace falls behind.
Lords of Rust
You are here when: The online Tactical Simulations menu and its briefing/loadout room.
TacSim requires an online connection. Clear every listed tier and optional check, then claim its progression and shop rewards.
Lords of Rust 1
Mission challenge
HintPin this Journal entry and give it a focused attempt instead of combining incompatible routes.
WhereOpen this simulation's challenge list and track the entry before starting.
Full detailComplete Tier 1's marked objective and reach its result screen. Stay online until the tracker records the clear.
Lords of Rust 2
Mission challenge
HintPin this Journal entry and give it a focused attempt instead of combining incompatible routes.
WhereOpen this simulation's challenge list and track the entry before starting.
Full detailFinish Tier 2. A reliable place is after Tier 1 familiarity. Confirm the Journal mark appears before changing to another checkpoint.
Lords of Rust 3
Mission challenge
HintPin this Journal entry and give it a focused attempt instead of combining incompatible routes.
WhereOpen this simulation's challenge list and track the entry before starting.
Full detailFinish Tier 3. Learn the patrols and environmental hazards on earlier attempts, then complete the full objective and confirm its result screen.
Lord of Lords
Mission challenge
HintPin this Journal entry and give it a focused attempt instead of combining incompatible routes.
WhereOpen this simulation's challenge list and track the entry before starting.
Full detailClear every tiers. Finish sequentially for best efficiency. Confirm the Journal mark appears before changing to another checkpoint.
Loose Cargo
Mission challenge
HintPin this Journal entry and give it a focused attempt instead of combining incompatible routes.
WhereOpen this simulation's challenge list and track the entry before starting.
Full detailEliminate two opponents by crushing them with cargo or another heavy environmental object. Confirm both qualifying impacts before ending the run.
Dead in the Water
Mission challenge
HintPin this Journal entry and give it a focused attempt instead of combining incompatible routes.
WhereOpen this simulation's challenge list and track the entry before starting.
Full detailHurl five hostiles into the ocean. Use coastal missions with frequent ledges. Confirm the Journal mark appears before changing to another checkpoint.
Silent Running
Mission challenge
HintPin this Journal entry and give it a focused attempt instead of combining incompatible routes.
WhereOpen this simulation's challenge list and track the entry before starting.
Full detailUse silent takedowns for every required incapacitation. Isolate each patrol, avoid alarms and other damage sources, then verify the result screen.
Grillardin
Mission challenge
HintPin this Journal entry and give it a focused attempt instead of combining incompatible routes.
WhereOpen this simulation's challenge list and track the entry before starting.
Full detailTrigger the propane tank beside the chef target so its explosion causes the elimination. Confirm the challenge registers before ending the simulation.
The Assault
You are here when: The online Tactical Simulations menu and its briefing/loadout room.
TacSim requires an online connection. Clear every listed tier and optional check, then claim its progression and shop rewards.
The Assault 1
Mission challenge
HintPin this Journal entry and give it a focused attempt instead of combining incompatible routes.
WhereOpen this simulation's challenge list and track the entry before starting.
Full detailFinish Tier 1 by completing its marked objective and reaching the result screen. Remain online until the completion record appears.
The Assault 2
Mission challenge
HintPin this Journal entry and give it a focused attempt instead of combining incompatible routes.
WhereOpen this simulation's challenge list and track the entry before starting.
Full detailComplete Tier 2's marked objective and reach the result screen. Test complementary gadgets during the run and remain online until its clear appears in the tracker.
The Assault 3
Mission challenge
HintPin this Journal entry and give it a focused attempt instead of combining incompatible routes.
WhereOpen this simulation's challenge list and track the entry before starting.
Full detailFinish Tier 3. Hardest tier, requires full combat mastery. Confirm the Journal mark appears before changing to another checkpoint.
Gadget Master
Mission challenge
HintPin this Journal entry and give it a focused attempt instead of combining incompatible routes.
WhereOpen this simulation's challenge list and track the entry before starting.
Full detailFinish this area. Best completed after finishing all tiers. Confirm the Journal mark appears before changing to another checkpoint.
Eye Surgery
Mission challenge
HintPin this Journal entry and give it a focused attempt instead of combining incompatible routes.
WhereOpen this simulation's challenge list and track the entry before starting.
Full detailStrike five different opponents with the laser gadget during one run. Use clustered patrols to preserve charges and confirm the tracker before exiting.
Blown Aparte
Mission challenge
HintPin this Journal entry and give it a focused attempt instead of combining incompatible routes.
WhereOpen this simulation's challenge list and track the entry before starting.
Full detailTake out 3 hostiles in one explosion. Use Assault Tier 3 where hostiles cluster frequently. Confirm the Journal mark appears before changing to another checkpoint.
Cratered
Mission challenge
HintPin this Journal entry and give it a focused attempt instead of combining incompatible routes.
WhereOpen this simulation's challenge list and track the entry before starting.
Full detailEliminate two opponents with the same falling crate. Gather them beneath its drop path, release it once both are inside the impact zone, and verify the tracker.
Defenestration
Mission challenge
HintPin this Journal entry and give it a focused attempt instead of combining incompatible routes.
WhereOpen this simulation's challenge list and track the entry before starting.
Full detailHurl 3 hostiles over a railing. Use Assault missions with tight corridors and railings. Confirm the Journal mark appears before changing to another checkpoint.
Arctic Skies
You are here when: The online Tactical Simulations menu and its briefing/loadout room.
TacSim requires an online connection. Clear every listed tier and optional check, then claim its progression and shop rewards.
Arctic Skies 1
Mission challenge
HintPin this Journal entry and give it a focused attempt instead of combining incompatible routes.
WhereOpen this simulation's challenge list and track the entry before starting.
Full detailComplete Tier 1's marked objective and reach its result screen. Stay online until the Arctic Skies clear appears in the tracker.
Arctic Skies 2
Mission challenge
HintPin this Journal entry and give it a focused attempt instead of combining incompatible routes.
WhereOpen this simulation's challenge list and track the entry before starting.
Full detailFinish Tier 2. A reliable place is after learning wind and edge mechanics. Confirm the Journal mark appears before changing to another checkpoint.
Arctic Skies 3
Mission challenge
HintPin this Journal entry and give it a focused attempt instead of combining incompatible routes.
WhereOpen this simulation's challenge list and track the entry before starting.
Full detailFinish Tier 3. Hardest tier with complex enemy placement. Confirm the Journal mark appears before changing to another checkpoint.
Arctic Skies
Mission challenge
HintPin this Journal entry and give it a focused attempt instead of combining incompatible routes.
WhereOpen this simulation's challenge list and track the entry before starting.
Full detailClear every tiers of the simulation run. Finish sequentially for best efficiency. Confirm the Journal mark appears before changing to another checkpoint.
Gone With the Wind
Mission challenge
HintPin this Journal entry and give it a focused attempt instead of combining incompatible routes.
WhereOpen this simulation's challenge list and track the entry before starting.
Full detailPush 2 hostiles over the edge with a wind fan. Use this area Tier 3 where wind mechanics are active. Confirm the Journal mark appears before changing to another checkpoint.
Say Cheese (Arctic Skies)
Mission challenge
HintPin this Journal entry and give it a focused attempt instead of combining incompatible routes.
WhereOpen this simulation's challenge list and track the entry before starting.
Full detailUse the Shockwave Camera to push five opponents over edges. Line up each target near a drop and confirm the tracker before ending the run.
What A Rush
Mission challenge
HintPin this Journal entry and give it a focused attempt instead of combining incompatible routes.
WhereOpen this simulation's challenge list and track the entry before starting.
Full detailCharge 5 hostiles over the edge. Use edge-heavy sections of Arctic maps. Confirm the Journal mark appears before changing to another checkpoint.
This Is Antarctica
Mission challenge
HintPin this Journal entry and give it a focused attempt instead of combining incompatible routes.
WhereOpen this simulation's challenge list and track the entry before starting.
Full detailKick five opponents from ledges. Use the exposed walkways, position each guard between you and the edge, and verify the tracker before exiting.
No Mistakes
Mission challenge
HintPin this Journal entry and give it a focused attempt instead of combining incompatible routes.
WhereOpen this simulation's challenge list and track the entry before starting.
Full detailUse ledge pushes or throws for every elimination; no weapon, gadget, or standard takedown may finish a guard. Verify the tracker before ending the tier.
Arctic Skies Mastery
Mission challenge
HintPin this Journal entry and give it a focused attempt instead of combining incompatible routes.
WhereOpen this simulation's challenge list and track the entry before starting.
Full detailComplete every individual Arctic Skies challenge. Reopen its tracker after the last entry registers and verify that the mastery record also fills.
Clean Infiltrations
You are here when: The online Tactical Simulations menu and its briefing/loadout room.
TacSim requires an online connection. Clear every listed tier and optional check, then claim its progression and shop rewards.
Clean Infiltrations
Mission challenge
HintPin this Journal entry and give it a focused attempt instead of combining incompatible routes.
WhereOpen this simulation's challenge list and track the entry before starting.
Full detailComplete the Clean Infiltrations operation from briefing to result screen. Remain online until its clear is visible in the tracker.
Takedown Marathon
Mission challenge
HintPin this Journal entry and give it a focused attempt instead of combining incompatible routes.
WhereOpen this simulation's challenge list and track the entry before starting.
Full detailPerform at least one silent takedown during every thirty-second interval until the operation ends. Keep moving between isolated patrols and verify the tracker on completion.
No Setpieces
Mission challenge
HintPin this Journal entry and give it a focused attempt instead of combining incompatible routes.
WhereOpen this simulation's challenge list and track the entry before starting.
Full detailKeep clear of interacting with setpieces or gadgets. Do this by avoiding all optional interactions entirely. Confirm the Journal mark appears before changing to another checkpoint.
Iron It Out
Mission challenge
HintPin this Journal entry and give it a focused attempt instead of combining incompatible routes.
WhereOpen this simulation's challenge list and track the entry before starting.
Full detailIncapacitate the required target using only a thrown iron. Line up a clear throw, avoid prior damage from another source, and confirm the tracker after impact.
Quick Cleaner
Mission challenge
HintPin this Journal entry and give it a focused attempt instead of combining incompatible routes.
WhereOpen this simulation's challenge list and track the entry before starting.
Full detailReach the Clean Infiltrations result screen in under two minutes. Memorize the direct objective route, ignore optional interactions, and restart immediately after a slow split.
Clean Infiltrations Mastery
Mission challenge
HintPin this Journal entry and give it a focused attempt instead of combining incompatible routes.
WhereOpen this simulation's challenge list and track the entry before starting.
Full detailComplete every individual Clean Infiltrations challenge. Reopen the tracker after the last one registers and verify the mastery record.
No Bullets
Mission challenge
HintPin this Journal entry and give it a focused attempt instead of combining incompatible routes.
WhereOpen this simulation's challenge list and track the entry before starting.
Full detailFinish without firing a bullet. Use stealth-focused simulation run path. Confirm the Journal mark appears before changing to another checkpoint.
No Gadgets: Clean Infiltration
Mission challenge
HintPin this Journal entry and give it a focused attempt instead of combining incompatible routes.
WhereOpen this simulation's challenge list and track the entry before starting.
Full detailFinish without gadgets equipped. Do this by unequipping all gadgets before starting. Confirm the Journal mark appears before changing to another checkpoint.
The Garden Party
You are here when: The online Tactical Simulations menu and its briefing/loadout room.
TacSim requires an online connection. Clear every listed tier and optional check, then claim its progression and shop rewards.
Garden Party
Mission challenge
HintPin this Journal entry and give it a focused attempt instead of combining incompatible routes.
WhereOpen this simulation's challenge list and track the entry before starting.
Full detailComplete the Garden Party operation from briefing to result screen. Stay online until its completion record is visible in the tracker.
Never Spotted
Mission challenge
HintPin this Journal entry and give it a focused attempt instead of combining incompatible routes.
WhereOpen this simulation's challenge list and track the entry before starting.
Full detailComplete the operation without any detection state. Stay outside sightlines, avoid noisy interactions, and verify the restriction on the result screen.
Pacifist (The Garden Party)
Mission challenge
HintPin this Journal entry and give it a focused attempt instead of combining incompatible routes.
WhereOpen this simulation's challenge list and track the entry before starting.
Full detailComplete the operation without damaging or incapacitating anyone. Use the stealth route, bypass every patrol, and verify the result screen.
Watch This
Mission challenge
HintPin this Journal entry and give it a focused attempt instead of combining incompatible routes.
WhereOpen this simulation's challenge list and track the entry before starting.
Full detailStart with only the watch scanner equipped and finish the entire operation without adding another gadget. Confirm the restriction remains valid on the result screen.
The Garden Party Mastery
Mission challenge
HintPin this Journal entry and give it a focused attempt instead of combining incompatible routes.
WhereOpen this simulation's challenge list and track the entry before starting.
Full detailComplete every individual Garden Party challenge. Reopen its tracker after the last entry registers and verify that the mastery record fills.
Secret Data
Mission challenge
HintPin this Journal entry and give it a focused attempt instead of combining incompatible routes.
WhereOpen this simulation's challenge list and track the entry before starting.
Full detailOverride the courtyard laptop and complete its data extraction. Secure a path to the device, remain through the full interaction, and confirm the tracker.
No Gadgets: The Garden Party
Mission challenge
HintPin this Journal entry and give it a focused attempt instead of combining incompatible routes.
WhereOpen this simulation's challenge list and track the entry before starting.
Full detailStart with no gadgets equipped and complete the operation without acquiring or using one. Verify the empty-loadout restriction on the result screen.
Work Hazard
Mission challenge
HintPin this Journal entry and give it a focused attempt instead of combining incompatible routes.
WhereOpen this simulation's challenge list and track the entry before starting.
Full detailEliminate five opponents with falling or moving environmental objects. Use scaffolding and suspended props, then confirm all five qualifying impacts in the tracker.
Completed-Save Audit
You are here when: The Chapter Select, Journal, collection library, wardrobe, and Tactical Simulations menus on the completed profile.
Use the completed profile's replay and simulation menus for every remaining cleanup system.
Campaign Completion
Campaign completion
HintContinue the marked route without opening future area details.
WhereFinish the campaign on any difficulty and return to the completed profile.
Full detailComplete each reached area and allow its area-complete transition to save. After campaign completion, use Chapter Select for offline cleanup and the Tactical Simulations menu for its online-only completion systems.
Final Save Audit
Completion audit
HintUse the game's separate menus instead of relying on a single percentage.
WhereCheck every collectible family, Journal tab, wardrobe reward, and TacSim catalogue.
Full detailConfirm every collectible-family library entry is filled, every mission and global Journal check is marked, all challenge outfits are present, every campaign gadget counter is complete, all Escalation tiers and Operations are cleared, every TacSim challenge is registered, and all normally obtainable Intel Shop stock is purchased.
Earnable Outfit Catalog
You are here when: Rewards and Bonuses, the campaign challenge screen, and the TacSim shop.
Only outfits earnable on a current ordinary save are checklist entries; paid, expired, regional, hardware, and cross-title entitlements are separated in the audit report.
Agent Outfit
Outfit
HintCheck the rewards menu after challenge sweeps, TacSim milestones, and account synchronization.
WhereClear every campaign challenge and every Global Challenge.
Full detailUse Chapter Select to finish each incomplete campaign challenge, then clear every entry in the Global Challenges panel. Return to Rewards and Bonuses after both panels show complete and claim the outfit.
Chauffeur Uniform
Outfit
HintCheck the rewards menu after challenge sweeps, TacSim milestones, and account synchronization.
WhereClear every challenge listed for All the Time in the World.
Full detailReplay All the Time in the World from Chapter Select, combine compatible challenge conditions, and finish the chapter after each successful attempt so progress saves. When its challenge panel has no incomplete entry, open Rewards and Bonuses and claim the outfit.
Funeral Operative Outfit
Outfit
HintCheck the rewards menu after challenge sweeps, TacSim milestones, and account synchronization.
WhereClear every challenge listed for Uninvited.
Full detailReplay Uninvited from Chapter Select, combine compatible challenge conditions, and finish the chapter after each successful attempt so progress saves. When its challenge panel has no incomplete entry, open Rewards and Bonuses and claim the outfit.
Iceland Outfit
Outfit
HintCheck the rewards menu after challenge sweeps, TacSim milestones, and account synchronization.
WhereClear every challenge listed for Against the Odds.
Full detailReplay Against the Odds from Chapter Select, combine compatible challenge conditions, and finish the chapter after each successful attempt so progress saves. When its challenge panel has no incomplete entry, open Rewards and Bonuses and claim the outfit.
Kensington Outfit
Outfit
HintCheck the rewards menu after challenge sweeps, TacSim milestones, and account synchronization.
WhereContinue the campaign until this outfit appears in Rewards and Bonuses.
Full detailComplete the available campaign objective, return to the main menu after the autosave, and open Rewards and Bonuses. Claim the outfit once its story-progress gate is marked complete.
Malta Training Outfit
Outfit
HintCheck the rewards menu after challenge sweeps, TacSim milestones, and account synchronization.
WhereClear every challenge listed for A New Home.
Full detailReplay A New Home from Chapter Select, combine compatible challenge conditions, and finish the chapter after each successful attempt so progress saves. When its challenge panel has no incomplete entry, open Rewards and Bonuses and claim the outfit.
Mauritania Outfit
Outfit
HintCheck the rewards menu after challenge sweeps, TacSim milestones, and account synchronization.
WhereClear every challenge listed for The Past Never Dies.
Full detailReplay The Past Never Dies from Chapter Select, combine compatible challenge conditions, and finish the chapter after each successful attempt so progress saves. When its challenge panel has no incomplete entry, open Rewards and Bonuses and claim the outfit.
Polar Outfit
Outfit
HintCheck the rewards menu after challenge sweeps, TacSim milestones, and account synchronization.
WhereClear every challenge listed for Wave of the Future.
Full detailReplay Wave of the Future from Chapter Select, combine compatible challenge conditions, and finish the chapter after each successful attempt so progress saves. When its challenge panel has no incomplete entry, open Rewards and Bonuses and claim the outfit.
Resort Casual Outfit
Outfit
HintCheck the rewards menu after challenge sweeps, TacSim milestones, and account synchronization.
WhereClear every challenge listed for Time to Die.
Full detailReplay Time to Die from Chapter Select, combine compatible challenge conditions, and finish the chapter after each successful attempt so progress saves. When its challenge panel has no incomplete entry, open Rewards and Bonuses and claim the outfit.
Track Suit
Outfit
HintCheck the rewards menu after challenge sweeps, TacSim milestones, and account synchronization.
WhereClear every challenge listed for For England.
Full detailReplay For England from Chapter Select, combine compatible challenge conditions, and finish the chapter after each successful attempt so progress saves. When its challenge panel has no incomplete entry, open Rewards and Bonuses and claim the outfit.
White Tux
Outfit
HintCheck the rewards menu after challenge sweeps, TacSim milestones, and account synchronization.
WhereClear every challenge listed for Knightfall.
Full detailReplay Knightfall from Chapter Select, combine compatible challenge conditions, and finish the chapter after each successful attempt so progress saves. When its challenge panel has no incomplete entry, open Rewards and Bonuses and claim the outfit.
Chessmaster Suit
Outfit
HintCheck the rewards menu after challenge sweeps, TacSim milestones, and account synchronization.
WhereIn TacSim, reach TacSim Clearance 12 and save 3,000 Intel.
Full detailReplay scored TacSim operations and escalations until the required Clearance is met, collect challenge Intel without spending below the listed price, then buy Chessmaster Suit from the TacSim shop and verify it in Rewards and Bonuses.
Event Staff Uniform
Outfit
HintCheck the rewards menu after challenge sweeps, TacSim milestones, and account synchronization.
WhereIn TacSim, reach TacSim Clearance 6 and save 2,000 Intel.
Full detailReplay scored TacSim operations and escalations until the required Clearance is met, collect challenge Intel without spending below the listed price, then buy Event Staff Uniform from the TacSim shop and verify it in Rewards and Bonuses.
TacSim Outfit
Outfit
HintCheck the rewards menu after challenge sweeps, TacSim milestones, and account synchronization.
WhereIn TacSim, save 1,000 Intel.
Full detailReplay scored TacSim operations and escalations until the required Clearance is met, collect challenge Intel without spending below the listed price, then buy TacSim Outfit from the TacSim shop and verify it in Rewards and Bonuses.
Gilded Tuxedo
Outfit
HintCheck the rewards menu after challenge sweeps, TacSim milestones, and account synchronization.
WhereLink a free IO Interactive account and check Rewards and Bonuses.
Full detailCreate or sign in to an IO Interactive account, link the platform profile used for this save, restart the game online, and open Rewards and Bonuses. Claim Gilded Tuxedo from the account-reward section; no campaign replay is required.
On Duty
Outfit
HintCheck the rewards menu after challenge sweeps, TacSim milestones, and account synchronization.
WhereLink a free IO Interactive account and check Rewards and Bonuses.
Full detailCreate or sign in to an IO Interactive account, link the platform profile used for this save, restart the game online, and open Rewards and Bonuses. Claim On Duty from the account-reward section; no campaign replay is required.
Operation Riviera
Outfit
HintCheck the rewards menu after challenge sweeps, TacSim milestones, and account synchronization.
WhereLink a free IO Interactive account and check Rewards and Bonuses.
Full detailCreate or sign in to an IO Interactive account, link the platform profile used for this save, restart the game online, and open Rewards and Bonuses. Claim Operation Riviera from the account-reward section; no campaign replay is required.
Savanna Bloom
Outfit
HintCheck the rewards menu after challenge sweeps, TacSim milestones, and account synchronization.
WhereLink a free IO Interactive account and check Rewards and Bonuses.
Full detailCreate or sign in to an IO Interactive account, link the platform profile used for this save, restart the game online, and open Rewards and Bonuses. Claim Savanna Bloom from the account-reward section; no campaign replay is required.
Silent Line
Outfit
HintA high-clearance TacSim shop entry needs both experience and saved Intel.
WhereReach TacSim Clearance 10 and hold 4,200 Intel.
Full detailRepeat scored TacSim missions until Clearance 10, save at least 4,200 Intel, and inspect the current shop rotation. Buy the outfit if its in-game listing is present; do not substitute an external promotion code for this normal-save route.
Golden Anchor
Outfit
HintA high-clearance TacSim shop entry needs both experience and saved Intel.
WhereReach TacSim Clearance 12 and hold 5,000 Intel.
Full detailRepeat scored TacSim missions until Clearance 12, save at least 5,000 Intel, and inspect the current shop rotation. Buy the outfit if its in-game listing is present; do not substitute an external promotion code for this normal-save route.
Weapon and Gadget Catalog
You are here when: Q Branch loadout screens, campaign weapon pickups, and the TacSim shop.
Encounter each normal-save weapon and unlock every gadget; paid weapon variants are listed only in the audit report.
Q-Lens
Gadget
HintRecheck Q Branch whenever a new tool slot or resource type is introduced.
WhereObtain this mandatory tool from its Q Branch or campaign introduction: Chapter 5: A New Home.
Full detailContinue until the Q Branch loadout screen presents this tool, complete its short introduction, and equip it once. Sweep the vision overlay around a room; it tags people, pickups, usable devices, and route clues even through light obstruction or smoke.
Q-Watch
Gadget
HintRecheck Q Branch whenever a new tool slot or resource type is introduced.
WhereObtain this mandatory tool from its Q Branch or campaign introduction: Chapter 5: A New Home.
Full detailContinue until the Q Branch loadout screen presents this tool, complete its short introduction, and equip it once. Aim through the lens and choose the available electronic action. It can loop cameras, bypass powered locks, and trigger nearby machinery as a distraction.
Dart Phone
Gadget
HintRecheck Q Branch whenever a new tool slot or resource type is introduced.
WhereObtain this optional tool from its Q Branch or campaign introduction: Chapter 5: A New Home.
Full detailContinue until the Q Branch loadout screen presents this tool, complete its short introduction, and equip it once. Fire one chemical dart at an isolated guard. The target becomes disoriented and leaves the post, creating a movement or pickpocket window.
Smoke Pod
Gadget
HintRecheck Q Branch whenever a new tool slot or resource type is introduced.
WhereObtain this optional tool from its Q Branch or campaign introduction: Chapter 8: All the Time in the World.
Full detailContinue until the Q Branch loadout screen presents this tool, complete its short introduction, and equip it once. Throw the pod between hostile sightlines. Its cloud blocks vision long enough to relocate, hide a takedown, or end active detection.
Shockwave Camera
Gadget
HintRecheck Q Branch whenever a new tool slot or resource type is introduced.
WhereObtain this optional tool from its Q Branch or campaign introduction: Chapter 8: All the Time in the World.
Full detailContinue until the Q Branch loadout screen presents this tool, complete its short introduction, and equip it once. Release the camera burst at close range to stagger a group, strip armor, break cover, or force a weak door open.
Laser Strap
Gadget
HintRecheck Q Branch whenever a new tool slot or resource type is introduced.
WhereObtain this optional tool from its Q Branch or campaign introduction: Chapter 10: The Past Never Dies.
Full detailContinue until the Q Branch loadout screen presents this tool, complete its short introduction, and equip it once. Aim the wrist beam at locks, cables, barrels, eyes, or electronics; hold it on the marked point until the cut or overload completes.
Flash Mine
Gadget
HintRecheck Q Branch whenever a new tool slot or resource type is introduced.
WhereObtain this optional tool from its Q Branch or campaign introduction: Chapter 10: The Past Never Dies.
Full detailContinue until the Q Branch loadout screen presents this tool, complete its short introduction, and equip it once. Place or throw the mine on a patrol route. Proximity triggers a flash that incapacitates nearby guards for a short follow-up window.
Missile Pen
Gadget
HintRecheck Q Branch whenever a new tool slot or resource type is introduced.
WhereObtain this optional tool from its Q Branch or campaign introduction: Chapter 12: Knightfall.
Full detailContinue until the Q Branch loadout screen presents this tool, complete its short introduction, and equip it once. Fire the miniature rocket at reinforced obstacles or armored threats, keeping clear of its blast radius and accepting that the action is loud. Also reach TacSim Clearance 15 if the shop version remains locked.
K&S Burst Pistol
Handgun weapon
HintScan weapon racks and dropped enemy gear before leaving combat spaces.
WherePick up or use this weapon during its available campaign encounter.
Full detailScan armed enemies, weapon racks, and forced-combat staging areas until K&S Burst Pistol appears, pick it up, and fire or operate it once before the next autosave. If it is a mounted or set-piece weapon, completing that interaction is the catalog requirement; it is not expected to remain in the normal loadout.
PDR-9 Pistol
Handgun weapon
HintScan weapon racks and dropped enemy gear before leaving combat spaces.
WherePick up or use this weapon during its available campaign encounter.
Full detailScan armed enemies, weapon racks, and forced-combat staging areas until PDR-9 Pistol appears, pick it up, and fire or operate it once before the next autosave. If it is a mounted or set-piece weapon, completing that interaction is the catalog requirement; it is not expected to remain in the normal loadout.
Stormberg 50'CAL
Handgun weapon
HintScan weapon racks and dropped enemy gear before leaving combat spaces.
WherePick up or use this weapon during its available campaign encounter.
Full detailScan armed enemies, weapon racks, and forced-combat staging areas until Stormberg 50'CAL appears, pick it up, and fire or operate it once before the next autosave. If it is a mounted or set-piece weapon, completing that interaction is the catalog requirement; it is not expected to remain in the normal loadout.
Stormer-99 Pistol
Handgun weapon
HintScan weapon racks and dropped enemy gear before leaving combat spaces.
WherePick up or use this weapon during its available campaign encounter.
Full detailScan armed enemies, weapon racks, and forced-combat staging areas until Stormer-99 Pistol appears, pick it up, and fire or operate it once before the next autosave. If it is a mounted or set-piece weapon, completing that interaction is the catalog requirement; it is not expected to remain in the normal loadout.
Walther PPK / Service Pistol
Handgun weapon
HintScan weapon racks and dropped enemy gear before leaving combat spaces.
WherePick up or use this weapon during its available campaign encounter.
Full detailScan armed enemies, weapon racks, and forced-combat staging areas until Walther PPK / Service Pistol appears, pick it up, and fire or operate it once before the next autosave. If it is a mounted or set-piece weapon, completing that interaction is the catalog requirement; it is not expected to remain in the normal loadout.
DRS-7 Silent SMG
Smg weapon
HintScan weapon racks and dropped enemy gear before leaving combat spaces.
WherePick up or use this weapon during its available campaign encounter.
Full detailScan armed enemies, weapon racks, and forced-combat staging areas until DRS-7 Silent SMG appears, pick it up, and fire or operate it once before the next autosave. If it is a mounted or set-piece weapon, completing that interaction is the catalog requirement; it is not expected to remain in the normal loadout.
DRX-2 Machine Pistol
Smg weapon
HintScan weapon racks and dropped enemy gear before leaving combat spaces.
WherePick up or use this weapon during its available campaign encounter.
Full detailScan armed enemies, weapon racks, and forced-combat staging areas until DRX-2 Machine Pistol appears, pick it up, and fire or operate it once before the next autosave. If it is a mounted or set-piece weapon, completing that interaction is the catalog requirement; it is not expected to remain in the normal loadout.
Osato 8 SMG
Smg weapon
HintScan weapon racks and dropped enemy gear before leaving combat spaces.
WhereMeet its post-campaign TacSim clearance gate and inspect the reward shop.
Full detailFinish the campaign, raise TacSim Clearance through scored missions, save the Intel shown on the current shop card, and purchase Osato 8 SMG. Equip it for one TacSim run and finish the mission so the unlock remains recorded.
SB-10 SMG
Smg weapon
HintScan weapon racks and dropped enemy gear before leaving combat spaces.
WherePick up or use this weapon during its available campaign encounter.
Full detailScan armed enemies, weapon racks, and forced-combat staging areas until SB-10 SMG appears, pick it up, and fire or operate it once before the next autosave. If it is a mounted or set-piece weapon, completing that interaction is the catalog requirement; it is not expected to remain in the normal loadout.
Airstrip Rifle
Assault Rifle weapon
HintScan weapon racks and dropped enemy gear before leaving combat spaces.
WherePick up or use this weapon during its available campaign encounter.
Full detailScan armed enemies, weapon racks, and forced-combat staging areas until Airstrip Rifle appears, pick it up, and fire or operate it once before the next autosave. If it is a mounted or set-piece weapon, completing that interaction is the catalog requirement; it is not expected to remain in the normal loadout.
Knight 1 AR
Assault Rifle weapon
HintScan weapon racks and dropped enemy gear before leaving combat spaces.
WherePick up or use this weapon during its available campaign encounter.
Full detailScan armed enemies, weapon racks, and forced-combat staging areas until Knight 1 AR appears, pick it up, and fire or operate it once before the next autosave. If it is a mounted or set-piece weapon, completing that interaction is the catalog requirement; it is not expected to remain in the normal loadout.
Osato 7 AR
Assault Rifle weapon
HintScan weapon racks and dropped enemy gear before leaving combat spaces.
WherePick up or use this weapon during its available campaign encounter.
Full detailScan armed enemies, weapon racks, and forced-combat staging areas until Osato 7 AR appears, pick it up, and fire or operate it once before the next autosave. If it is a mounted or set-piece weapon, completing that interaction is the catalog requirement; it is not expected to remain in the normal loadout.
Storm Burst AR
Assault Rifle weapon
HintScan weapon racks and dropped enemy gear before leaving combat spaces.
WherePick up or use this weapon during its available campaign encounter.
Full detailScan armed enemies, weapon racks, and forced-combat staging areas until Storm Burst AR appears, pick it up, and fire or operate it once before the next autosave. If it is a mounted or set-piece weapon, completing that interaction is the catalog requirement; it is not expected to remain in the normal loadout.
Zukovsky-95 AR
Assault Rifle weapon
HintScan weapon racks and dropped enemy gear before leaving combat spaces.
WherePick up or use this weapon during its available campaign encounter.
Full detailScan armed enemies, weapon racks, and forced-combat staging areas until Zukovsky-95 AR appears, pick it up, and fire or operate it once before the next autosave. If it is a mounted or set-piece weapon, completing that interaction is the catalog requirement; it is not expected to remain in the normal loadout.
DRX 12 Gauge
Shotgun weapon
HintScan weapon racks and dropped enemy gear before leaving combat spaces.
WherePick up or use this weapon during its available campaign encounter.
Full detailScan armed enemies, weapon racks, and forced-combat staging areas until DRX 12 Gauge appears, pick it up, and fire or operate it once before the next autosave. If it is a mounted or set-piece weapon, completing that interaction is the catalog requirement; it is not expected to remain in the normal loadout.
Storm 12 Gauge
Shotgun weapon
HintScan weapon racks and dropped enemy gear before leaving combat spaces.
WherePick up or use this weapon during its available campaign encounter.
Full detailScan armed enemies, weapon racks, and forced-combat staging areas until Storm 12 Gauge appears, pick it up, and fire or operate it once before the next autosave. If it is a mounted or set-piece weapon, completing that interaction is the catalog requirement; it is not expected to remain in the normal loadout.
T&M Compact Shotgun
Shotgun weapon
HintScan weapon racks and dropped enemy gear before leaving combat spaces.
WhereMeet its post-campaign TacSim clearance gate and inspect the reward shop.
Full detailFinish the campaign, raise TacSim Clearance through scored missions, save the Intel shown on the current shop card, and purchase T&M Compact Shotgun. Equip it for one TacSim run and finish the mission so the unlock remains recorded.
Jaeger 7 / K&S Bolt Action
Sniper Rifle weapon
HintScan weapon racks and dropped enemy gear before leaving combat spaces.
WherePick up or use this weapon during its available campaign encounter.
Full detailScan armed enemies, weapon racks, and forced-combat staging areas until Jaeger 7 / K&S Bolt Action appears, pick it up, and fire or operate it once before the next autosave. If it is a mounted or set-piece weapon, completing that interaction is the catalog requirement; it is not expected to remain in the normal loadout.
Squire Marksman Rifle
Sniper Rifle weapon
HintScan weapon racks and dropped enemy gear before leaving combat spaces.
WherePick up or use this weapon during its available campaign encounter.
Full detailScan armed enemies, weapon racks, and forced-combat staging areas until Squire Marksman Rifle appears, pick it up, and fire or operate it once before the next autosave. If it is a mounted or set-piece weapon, completing that interaction is the catalog requirement; it is not expected to remain in the normal loadout.
RPG-7
Launcher weapon
HintScan weapon racks and dropped enemy gear before leaving combat spaces.
WherePick up or use this weapon during its available campaign encounter.
Full detailScan armed enemies, weapon racks, and forced-combat staging areas until RPG-7 appears, pick it up, and fire or operate it once before the next autosave. If it is a mounted or set-piece weapon, completing that interaction is the catalog requirement; it is not expected to remain in the normal loadout.
Browning M2HB
Mounted weapon
HintScan weapon racks and dropped enemy gear before leaving combat spaces.
WhereMeet its post-campaign TacSim clearance gate and inspect the reward shop.
Full detailFinish the campaign, raise TacSim Clearance through scored missions, save the Intel shown on the current shop card, and purchase Browning M2HB. Equip it for one TacSim run and finish the mission so the unlock remains recorded.
PT boat autocannon
Mounted weapon
HintScan weapon racks and dropped enemy gear before leaving combat spaces.
WhereMeet its post-campaign TacSim clearance gate and inspect the reward shop.
Full detailFinish the campaign, raise TacSim Clearance through scored missions, save the Intel shown on the current shop card, and purchase PT boat autocannon. Equip it for one TacSim run and finish the mission so the unlock remains recorded.
Total weapon count
Weapon
HintScan weapon racks and dropped enemy gear before leaving combat spaces.
WhereMeet its post-campaign TacSim clearance gate and inspect the reward shop.
Full detailFinish the campaign, raise TacSim Clearance through scored missions, save the Intel shown on the current shop card, and purchase Total weapon count. Equip it for one TacSim run and finish the mission so the unlock remains recorded.
Stealth versus loud weapon choice
Weapon
HintScan weapon racks and dropped enemy gear before leaving combat spaces.
WhereMeet its post-campaign TacSim clearance gate and inspect the reward shop.
Full detailFinish the campaign, raise TacSim Clearance through scored missions, save the Intel shown on the current shop card, and purchase Stealth versus loud weapon choice. Equip it for one TacSim run and finish the mission so the unlock remains recorded.
Open the spoiler-free interactive guide
Part of the 100% guide collection at
samimirash.com/guides.