← samimirash.com
Romeo Is a Dead Man
PC current release, including the June 2026 free update · 16 areas · 153 tracked items
This page shows everything, including exact locations.
It exists so you can search for one specific collectible and find it.
If you are playing blind, use the
interactive spoiler-free version instead, it hides
locations until you ask for them, one item at a time.
Open the spoiler-free interactive guide
First Deployment
You are here when: The opening combat route before the ship becomes a freely usable hub.
Use the most demanding standard difficulty now if you want its clear record without another full run.
Orange Chocolate Clear
Run condition
HintA first run can satisfy the demanding standard setting.
WhereChoose Orange Chocolate before beginning and leave it selected through the campaign clear.
Full detailStart a fresh campaign on Orange Chocolate and do not lower the setting before the clear data is created. The harder Couverture Chocolate setting is a separate New Game Plus task.
Mercury
Pin
HintThis one joins you through normal progress.
WhereContinue through the required opening route; no side search is needed.
Full detailIt is awarded automatically after the opening route's required encounter. Finish the sequence and check the collectible list once control returns.
Last Night
You are here when: The multi-deck ship hub with a Hangar, Storage room, Training Room, and exterior Balcony.
Search the hub before departing; its rooms remain recognisable by their door labels.
Venus
Pin
HintNormal progress handles this pin.
WhereFinish the required briefing aboard the ship.
Full detailNo pickup prompt is involved. Complete the ship briefing that opens the new rooms, then verify Venus after normal control returns.
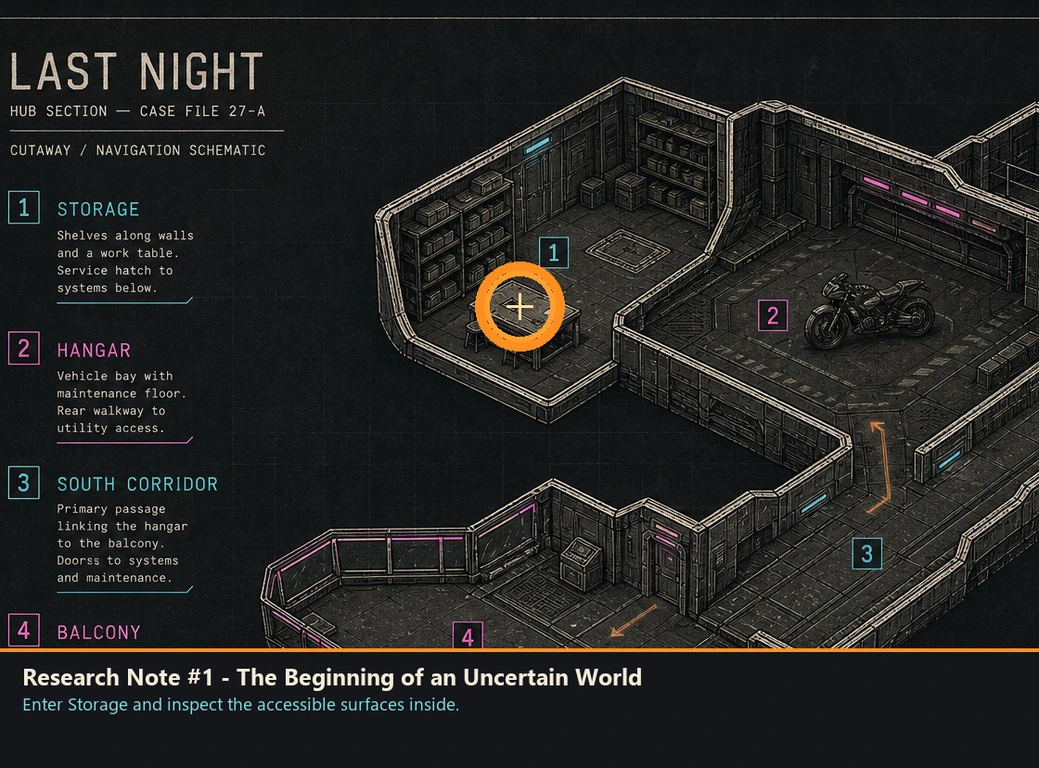
Research Note #1 - The Beginning of an Uncertain World
Research note
HintBegin with the ship's storage spaces.
WhereEnter Storage and inspect the accessible surfaces inside.
Full detailIn the ship hub, open the door marked Storage and collect the note from the room's interior surface before leaving the deck.
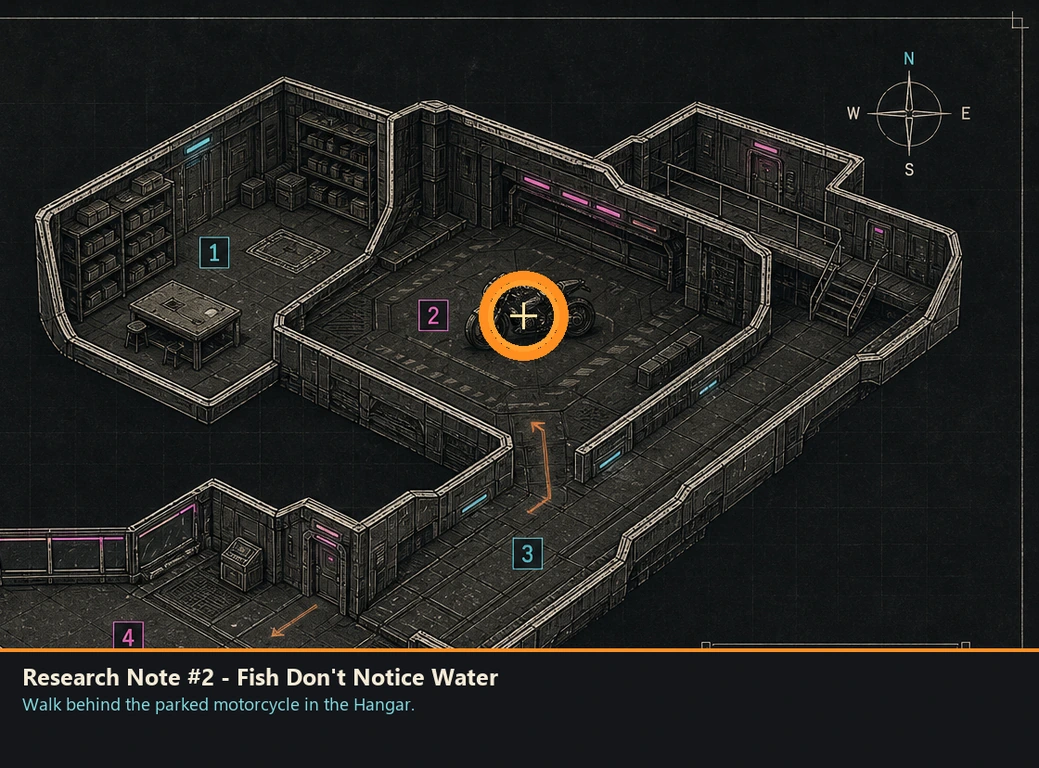
Research Note #2 - Fish Don't Notice Water
Research note
HintThe Hangar has more than its central floor.
WhereWalk behind the parked motorcycle in the Hangar.
Full detailEnter the Hangar, pass the motorcycle, and check the rear edge of the room. The note is behind the bike rather than beside the main exit.
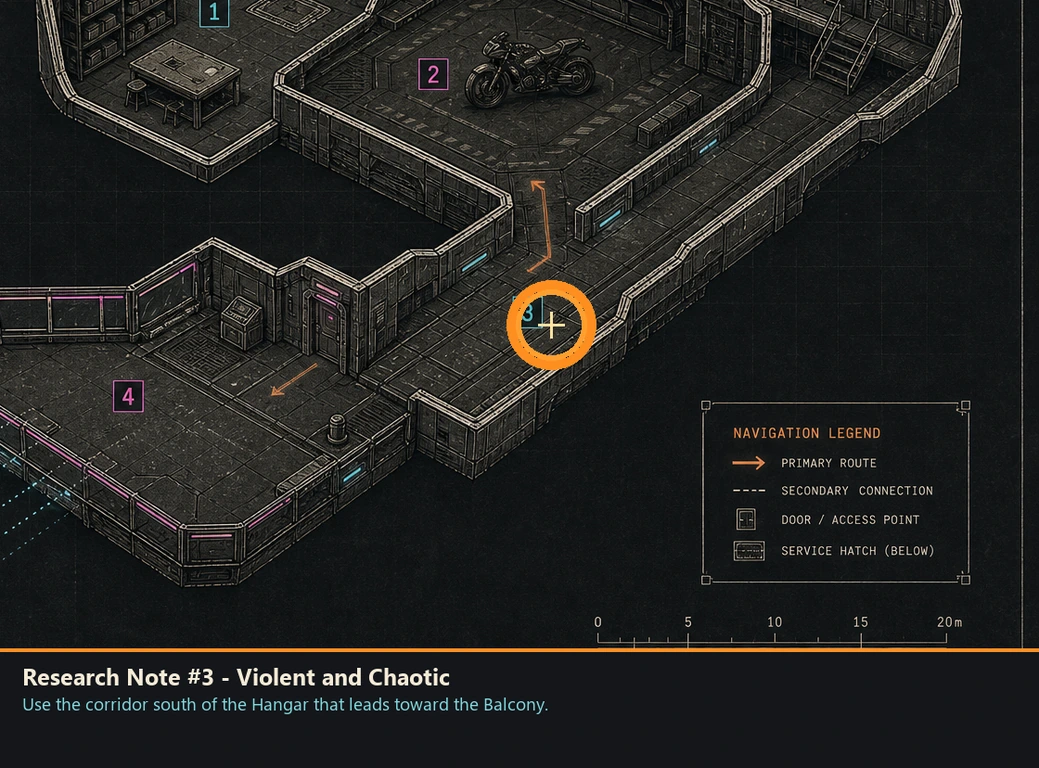
Research Note #3 - Violent and Chaotic
Research note
HintCheck the passage linking two named ship spaces.
WhereUse the corridor south of the Hangar that leads toward the Balcony.
Full detailLeave the Hangar through its southern corridor, pass the Balcony door, and continue to the end of the passage. The note is on the floor at the dead end.
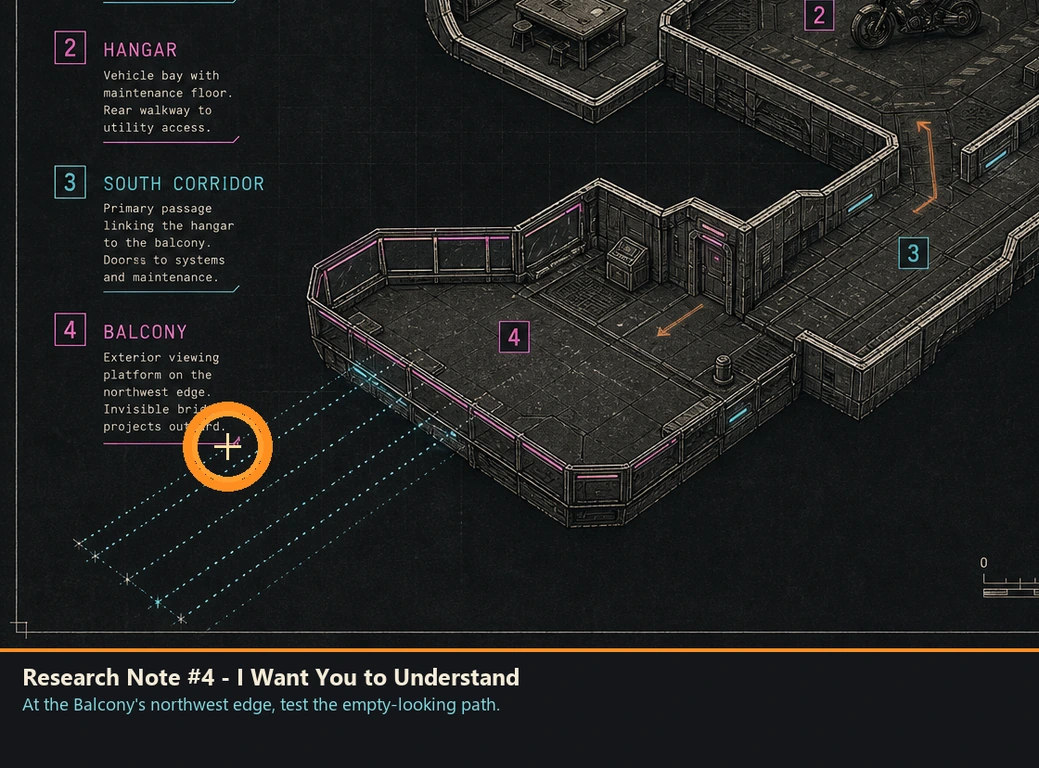
Research Note #4 - I Want You to Understand
Research note
HintThe outer deck hides a route that looks unsafe.
WhereAt the Balcony's northwest edge, test the empty-looking path.
Full detailGo to the northwest corner of the Balcony and walk onto the invisible bridge. Follow its solid path carefully to the note; stepping outside the hidden span causes a fall and reset.
Deadford Shopping Mall, 1983
You are here when: The abandoned indoor shopping complex with Babylon, Nirvana, Hardware Tools, a food court, and broad stairways.
Several finds sit beyond counters or at the end of apparently unimportant side paths.
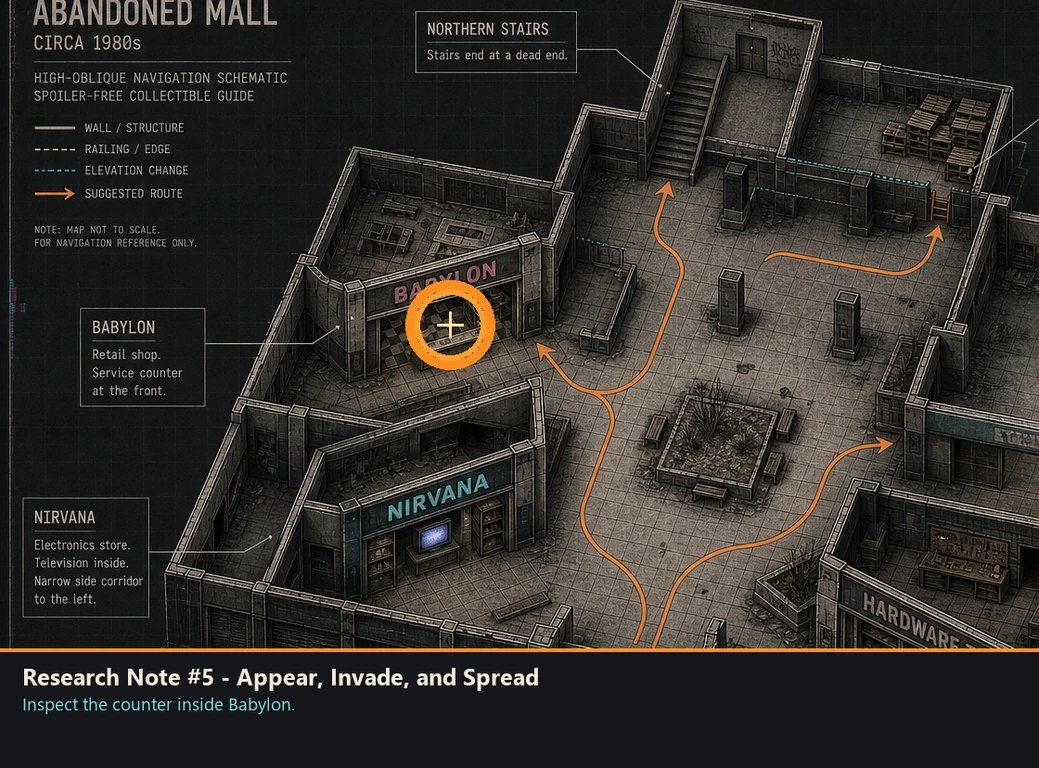
Research Note #5 - Appear, Invade, and Spread
Research note
HintStart with a named shop counter.
WhereInspect the counter inside Babylon.
Full detailEnter Babylon and circle to the service side of its counter. The note rests on the countertop where the interaction prompt appears.
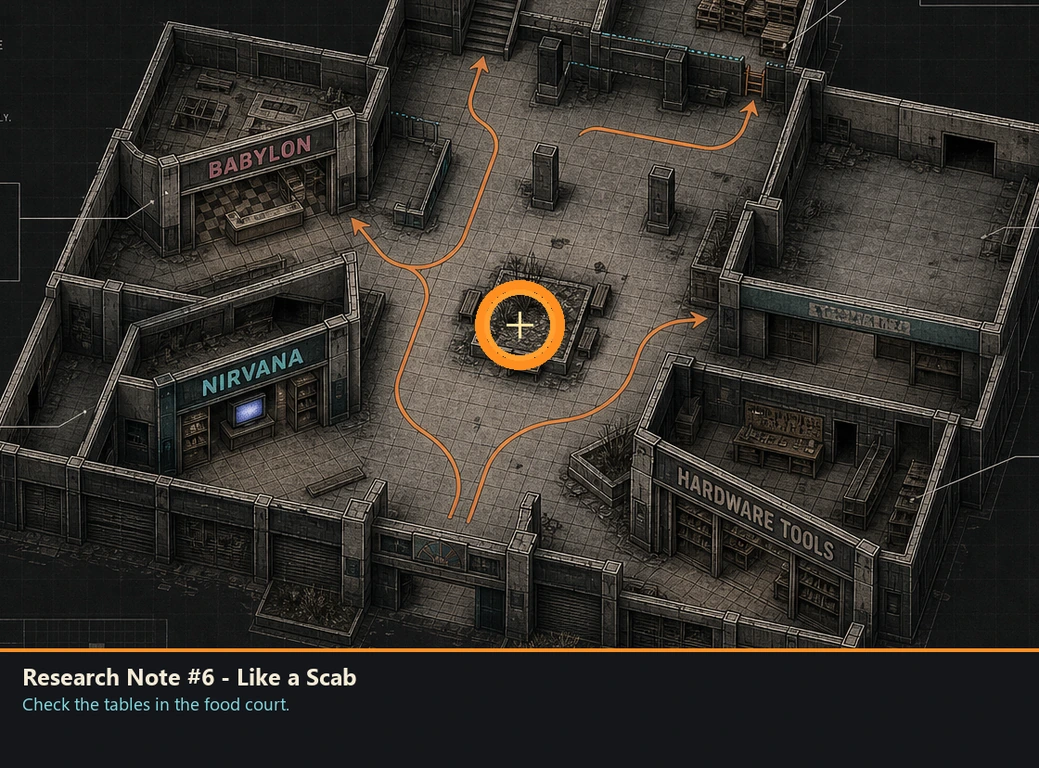
Research Note #6 - Like a Scab
Research note
HintThe dining space deserves a slow pass.
WhereCheck the tables in the food court.
Full detailWalk through the food court and inspect its tables rather than the vendor counters. The note lies on one of the dining surfaces.
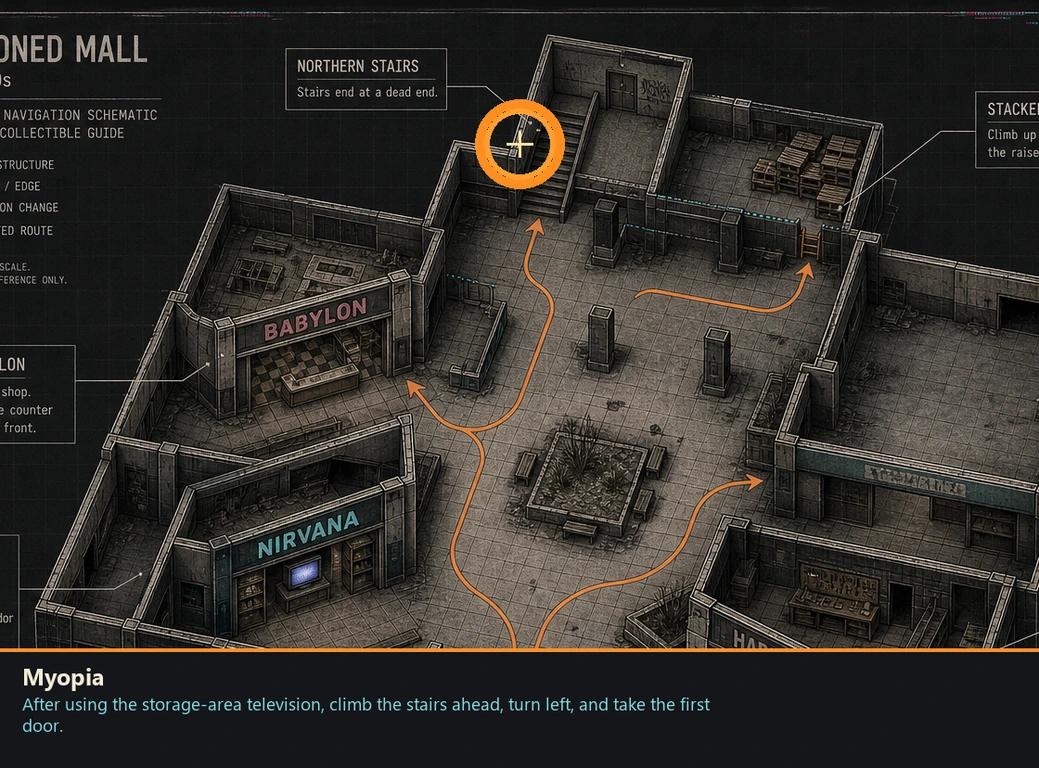
Myopia
Badge
HintA television route opens an upper corridor.
WhereAfter using the storage-area television, climb the stairs ahead, turn left, and take the first door.
Full detailUse the Nirvana television that leads from the storage area, climb the stairs directly ahead, turn left, and enter the first door. Follow that corridor to the purple tesseract.
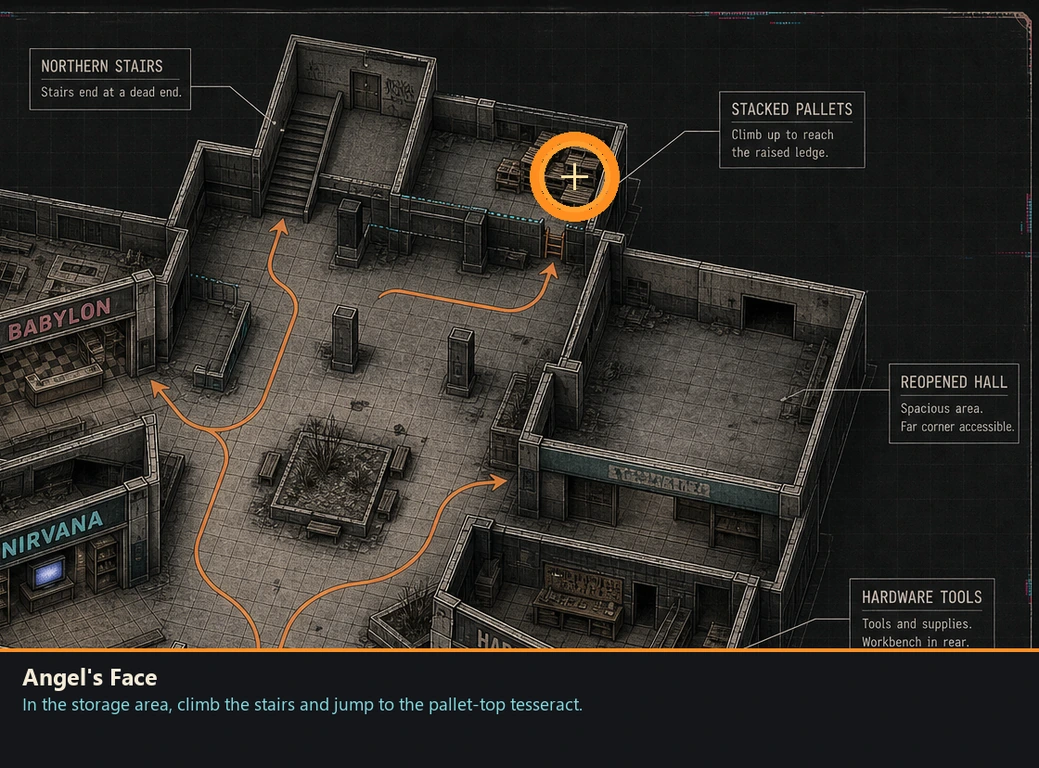
Angel's Face
Badge
HintA raised pallet becomes reachable from nearby stairs.
WhereIn the storage area, climb the stairs and jump to the pallet-top tesseract.
Full detailAfter arriving in storage through the Nirvana television, locate the purple tesseract on top of a pallet. Use the nearby stairs for height, then jump across to the pallet.
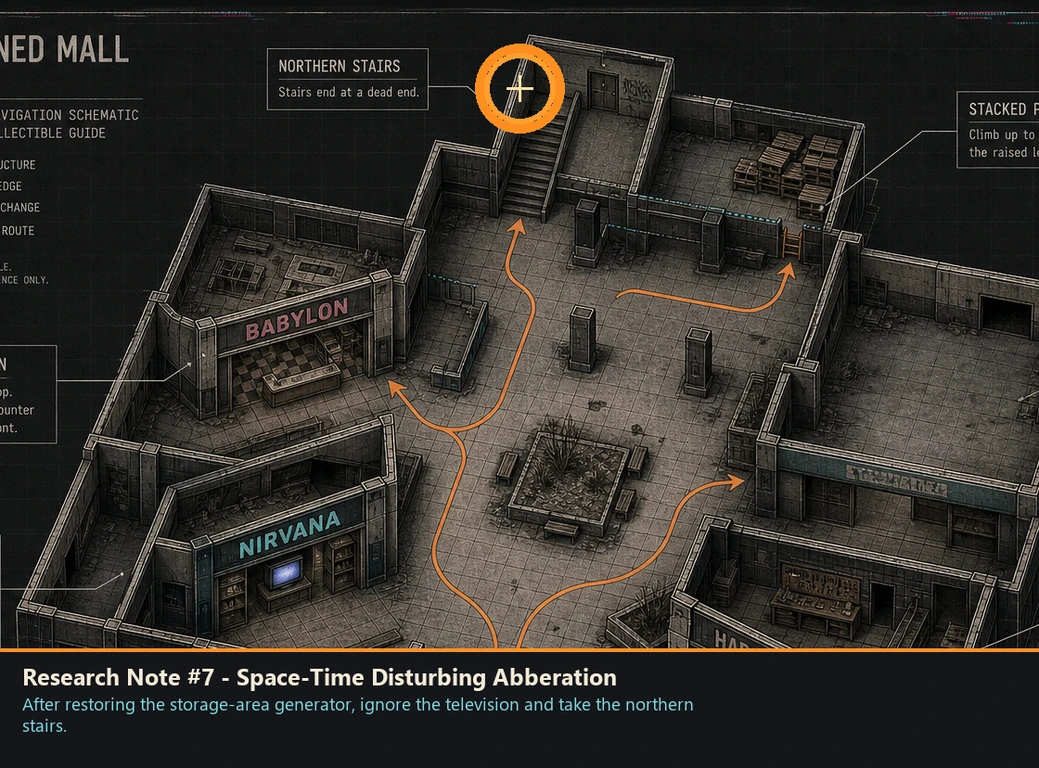
Research Note #7 - Space-Time Disturbing Abberation
Research note
HintA northern stair route ends quietly.
WhereAfter restoring the storage-area generator, ignore the television and take the northern stairs.
Full detailOnce the storage generator is complete, do not enter the Nirvana television. Climb the stairs to the north and follow the upper route to its end, where the note lies on the ground.
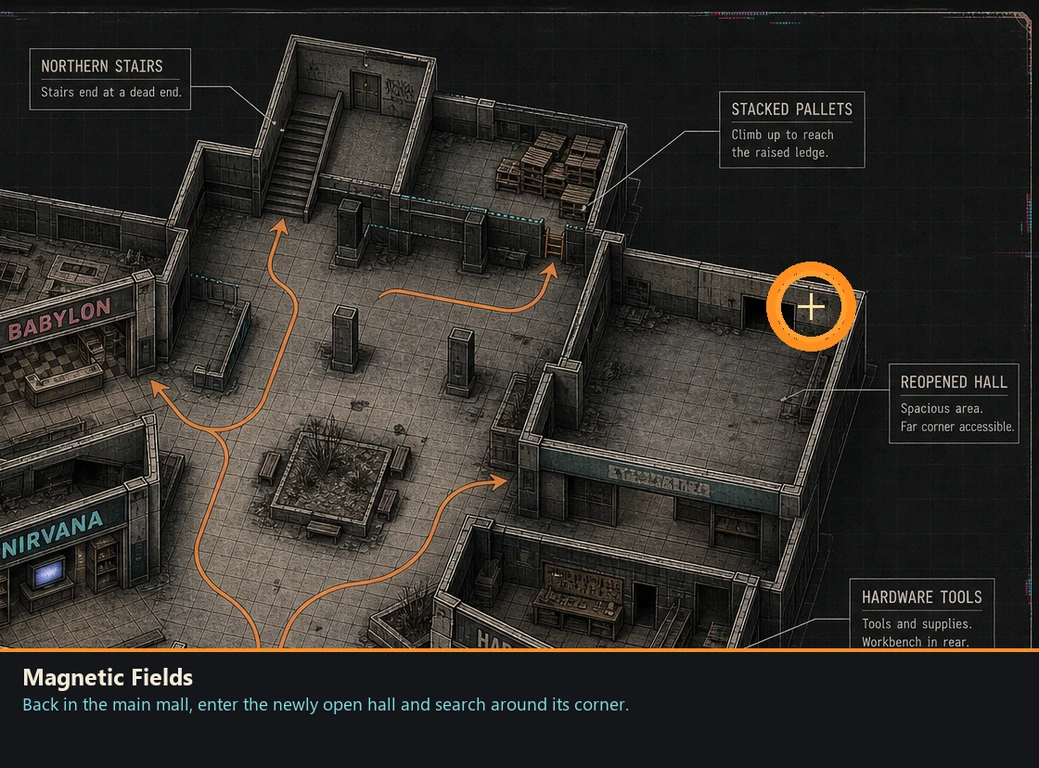
Magnetic Fields
Badge
HintRecheck a hall after its obstruction disappears.
WhereBack in the main mall, enter the newly open hall and search around its corner.
Full detailReturn to the main mall through the Nirvana television. Enter the hall that was previously blocked by the liminal wall and follow it around the corner to the purple tesseract.
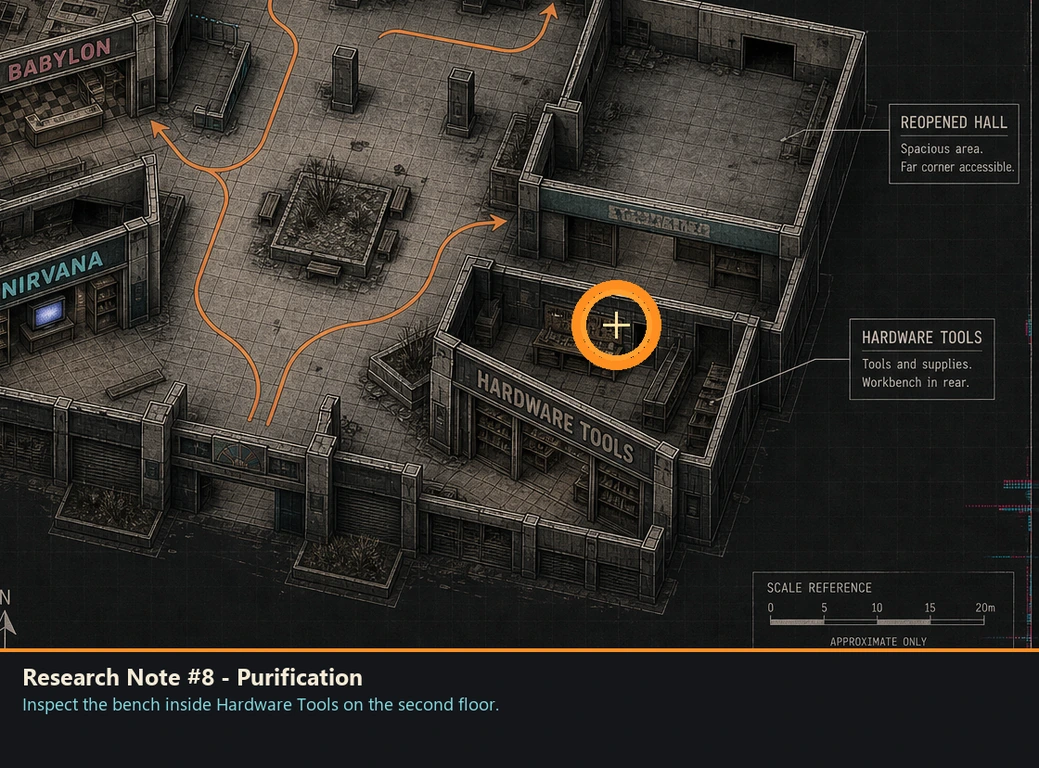
Research Note #8 - Purification
Research note
HintA second-floor tool shop has a bench.
WhereInspect the bench inside Hardware Tools on the second floor.
Full detailReach the mall's second floor, enter Hardware Tools, and collect the note from the bench inside.
Mars
Pin
HintThis pin does not require a mall search.
WhereFinish the shopping complex's required encounter.
Full detailThe pin is granted automatically after the required encounter in this location. Continue until control returns, then verify it in the collection menu.
Training Room and Palace Athene
You are here when: The ship's replay terminal and the separate combat arena selected from the hub.
Clear the ordinary trial before its Z variant; Palace Athene records four danger settings separately.
Ghost O Rama
Badge
HintA replay challenge holds this badge.
WhereOpen Room of Trials and select Everyday Is Like Monday Z.
Full detailFirst clear the ordinary counterpart if Everyday Is Like Monday Z is locked. Then complete Everyday Is Like Monday Z within its displayed par time; the badge is awarded on the results screen. Boss Rush becomes available only after campaign clear.
Guilty Pleasure
Badge
HintA replay challenge holds this badge.
WhereOpen Room of Trials and select Enhanced Phantasm Z.
Full detailFirst clear the ordinary counterpart if Enhanced Phantasm Z is locked. Then complete Enhanced Phantasm Z within its displayed par time; the badge is awarded on the results screen. Boss Rush becomes available only after campaign clear.
1%er
Badge
HintA replay challenge holds this badge.
WhereOpen Room of Trials and select Death Changeling Z.
Full detailFirst clear the ordinary counterpart if Death Changeling Z is locked. Then complete Death Changeling Z within its displayed par time; the badge is awarded on the results screen. Boss Rush becomes available only after campaign clear.
Heartbreaker
Badge
HintA replay challenge holds this badge.
WhereOpen Room of Trials and select Fused Reanimated Z.
Full detailFirst clear the ordinary counterpart if Fused Reanimated Z is locked. Then complete Fused Reanimated Z within its displayed par time; the badge is awarded on the results screen. Boss Rush becomes available only after campaign clear.
Finger On The Trigger
Badge
HintA replay challenge holds this badge.
WhereOpen Room of Trials and select Enhanced Magrus Z.
Full detailFirst clear the ordinary counterpart if Enhanced Magrus Z is locked. Then complete Enhanced Magrus Z within its displayed par time; the badge is awarded on the results screen. Boss Rush becomes available only after campaign clear.
H(d)P
Badge
HintA replay challenge holds this badge.
WhereOpen Room of Trials and select Death Changeling Parabellum Z.
Full detailFirst clear the ordinary counterpart if Death Changeling Parabellum Z is locked. Then complete Death Changeling Parabellum Z within its displayed par time; the badge is awarded on the results screen. Boss Rush becomes available only after campaign clear.
Tungsten Revolution
Badge
HintA replay challenge holds this badge.
WhereOpen Room of Trials and select the final named Z replay.
Full detailFirst clear the ordinary counterpart if the final named Z replay is locked. Then complete the final named Z replay within its displayed par time; the badge is awarded on the results screen. Boss Rush becomes available only after campaign clear.
People Of Earth
Badge
HintA replay challenge holds this badge.
WhereOpen Room of Trials and select Boss Rush Z.
Full detailFirst clear the ordinary counterpart if Boss Rush Z is locked. Then complete Boss Rush Z within its displayed par time; the badge is awarded on the results screen. Boss Rush becomes available only after campaign clear.
Lost and Found
Badge
HintPalace Athene tracks a separate danger setting.
WhereClear Palace Athene on Easy.
Full detailSelect Easy at the Palace Athene terminal and finish the entire arena run. The clear record awards this badge; lower-setting clears do not substitute for it.
Standing
Badge
HintPalace Athene tracks a separate danger setting.
WhereClear Palace Athene on Normal.
Full detailSelect Normal at the Palace Athene terminal and finish the entire arena run. The clear record awards this badge; lower-setting clears do not substitute for it.
Hilltop Castle
Badge
HintPalace Athene tracks a separate danger setting.
WhereClear Palace Athene on Hard.
Full detailSelect Hard at the Palace Athene terminal and finish the entire arena run. The clear record awards this badge; lower-setting clears do not substitute for it.
Bastardization
Badge
HintPalace Athene tracks a separate danger setting.
WhereClear Palace Athene on Very Hard.
Full detailSelect Very Hard at the Palace Athene terminal and finish the entire arena run. The clear record awards this badge; lower-setting clears do not substitute for it.
Deadford City Hall, 1968
You are here when: The civic building facing a fountain, with County Clerk, Child Support Services, pharmacy access, and basement rooms.
The exterior and underground level count as part of the same search.
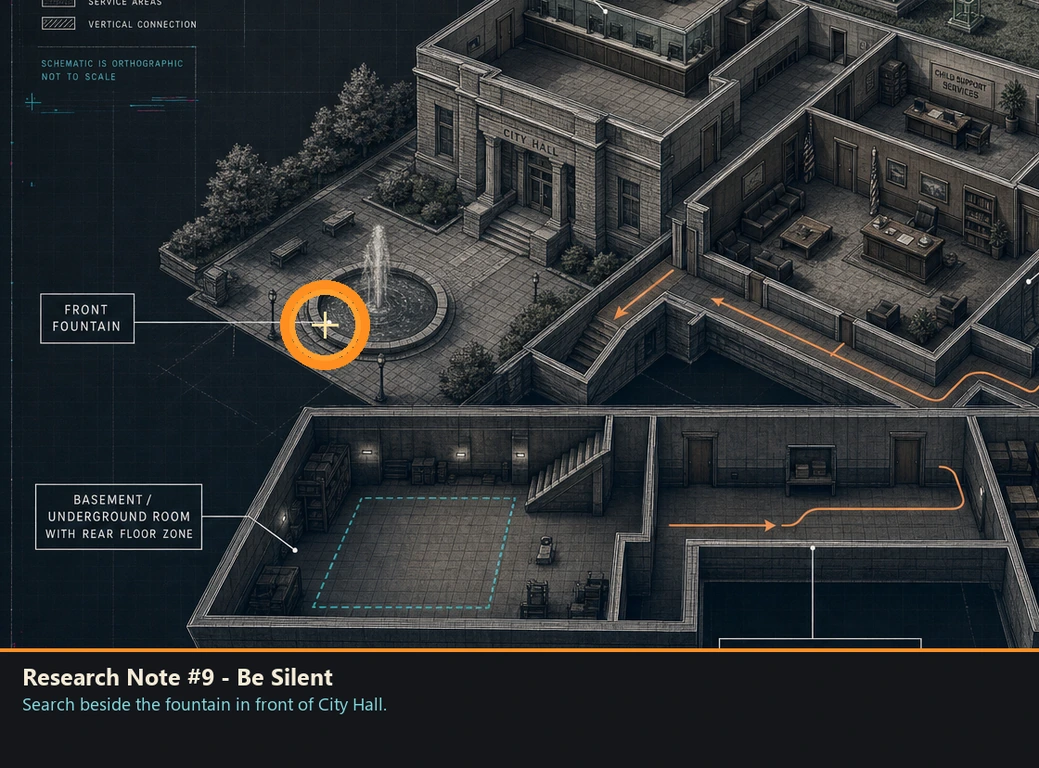
Research Note #9 - Be Silent
Research note
HintStart outside near the water feature.
WhereSearch beside the fountain in front of City Hall.
Full detailBefore entering City Hall, circle the fountain and collect the note from its side closest to the building.
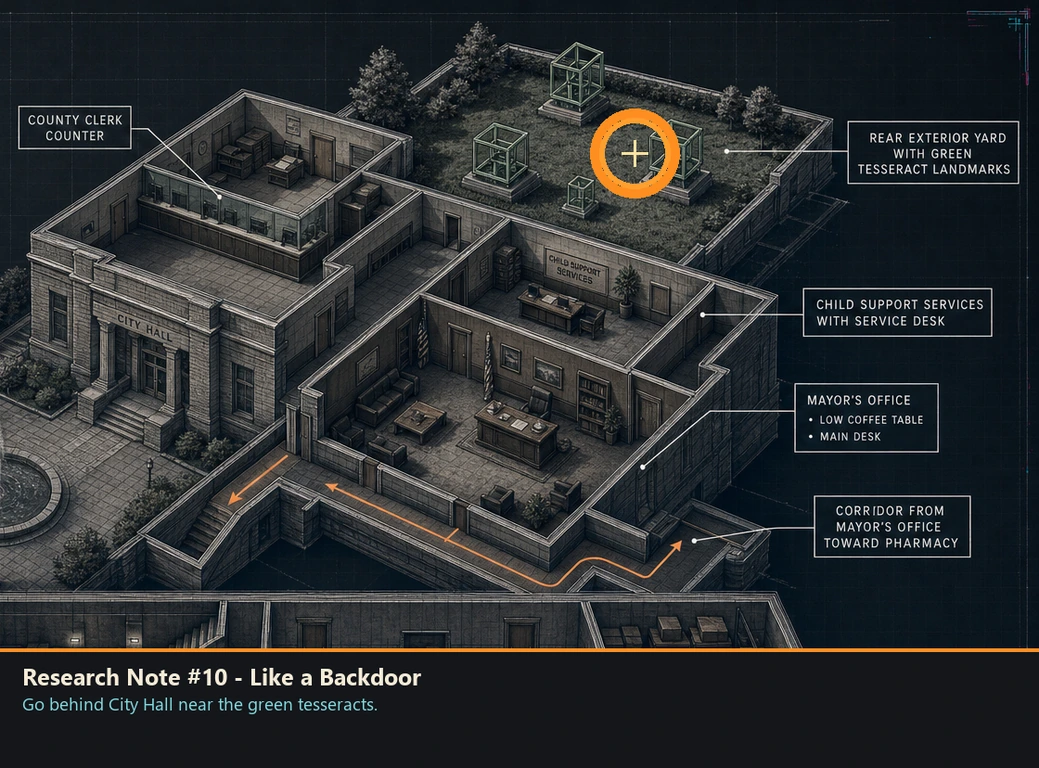
Research Note #10 - Like a Backdoor
Research note
HintThe rear grounds contain colored geometry.
WhereGo behind City Hall near the green tesseracts.
Full detailCircle around the exterior to the back of the building. The note is on the ground near the cluster of green tesseracts.
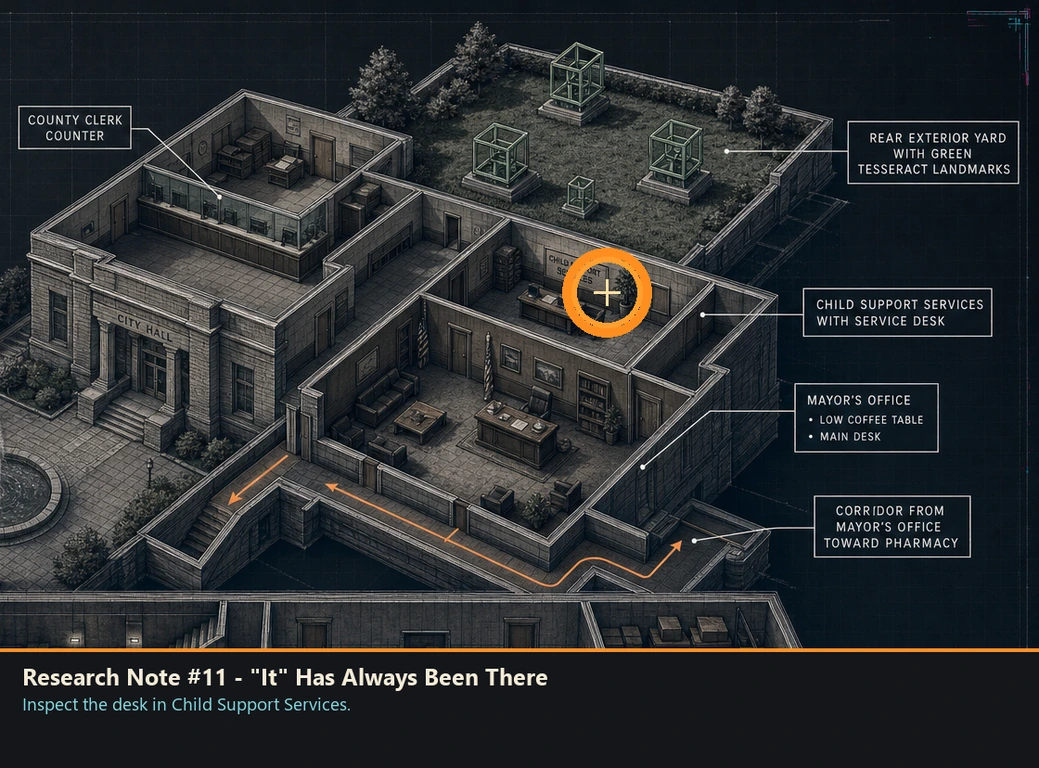
Research Note #11 - "It" Has Always Been There
Research note
HintA public-service desk holds one.
WhereInspect the desk in Child Support Services.
Full detailEnter Child Support Services and move around to the working side of its desk. The note is on the desktop.
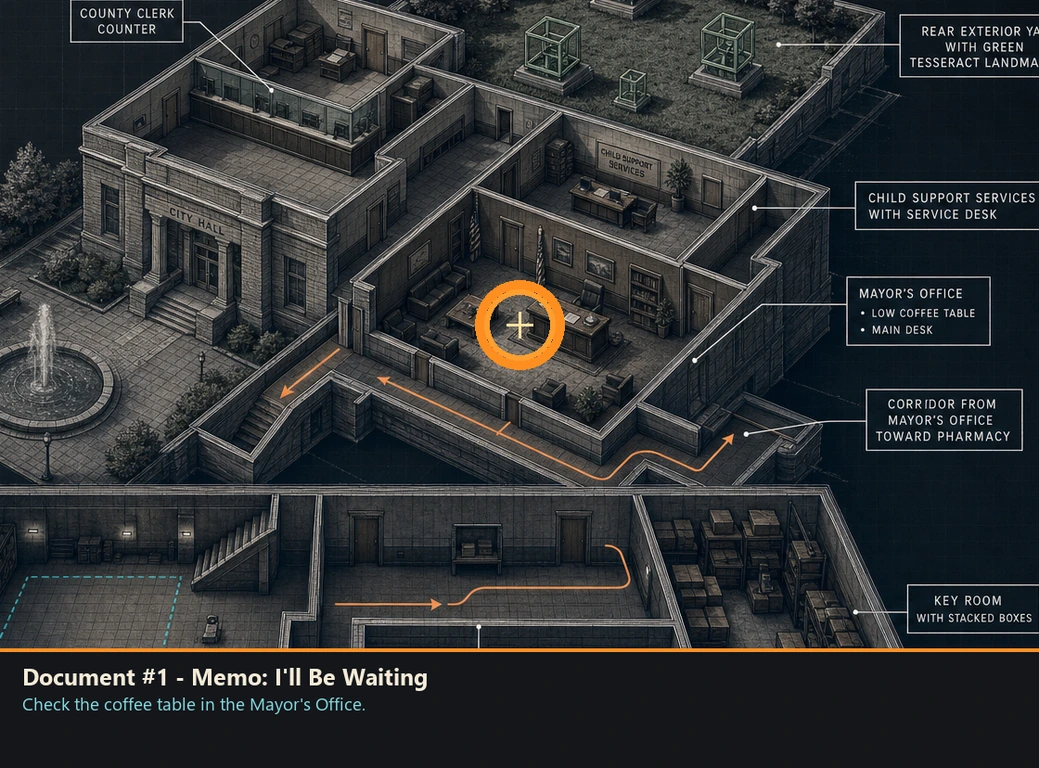
Document #1 - Memo: I'll Be Waiting
Document
HintThe mayoral suite has two useful surfaces.
WhereCheck the coffee table in the Mayor's Office.
Full detailAfter arriving in the Mayor's Office through the second Nirvana television, collect the document from the nearby low coffee table.
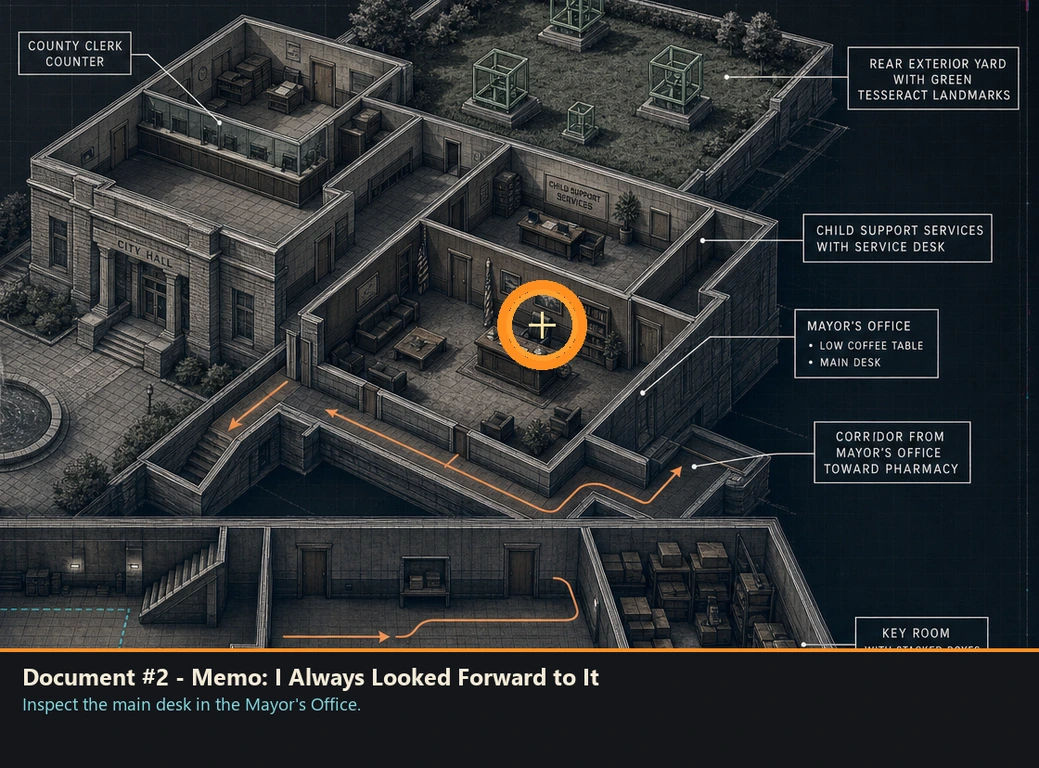
Document #2 - Memo: I Always Looked Forward to It
Document
HintStay in the mayoral suite.
WhereInspect the main desk in the Mayor's Office.
Full detailIn the same office, move from the coffee table to the Mayor's main desk and collect the separate document on its work surface.
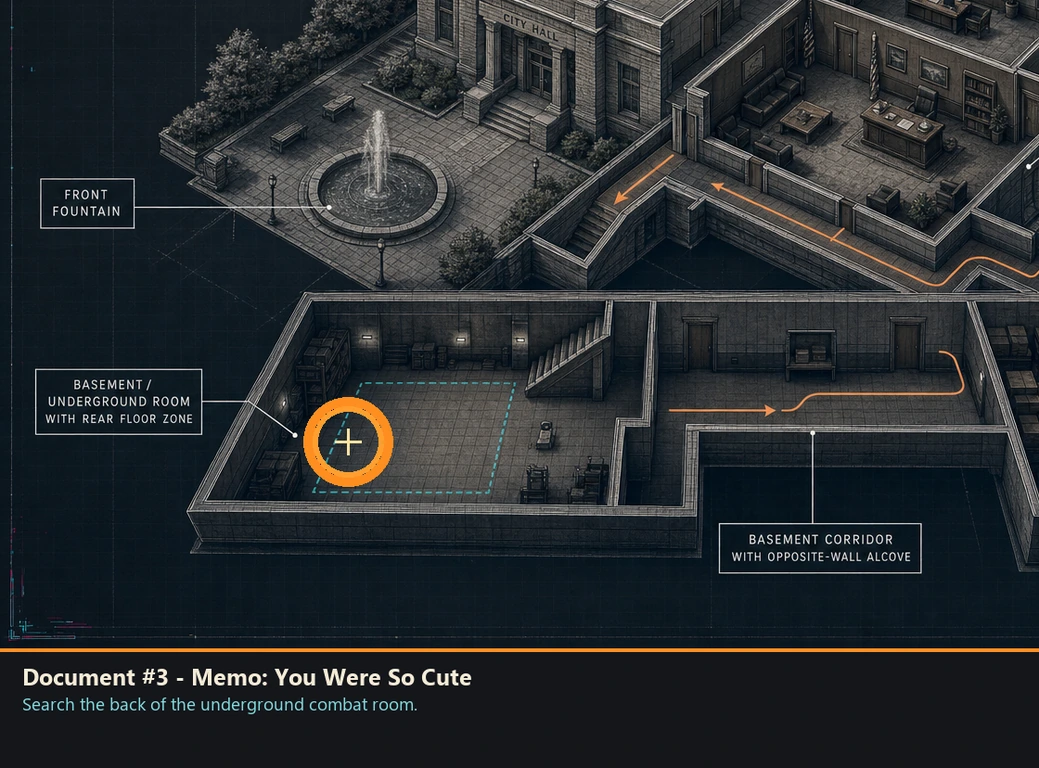
Document #3 - Memo: You Were So Cute
Document
HintThe lower level has a rear corner.
WhereSearch the back of the underground combat room.
Full detailAfter the Nirvana television sends you underground, finish the room's required combat and cross to the rear. The document is on the floor behind the main fighting space.
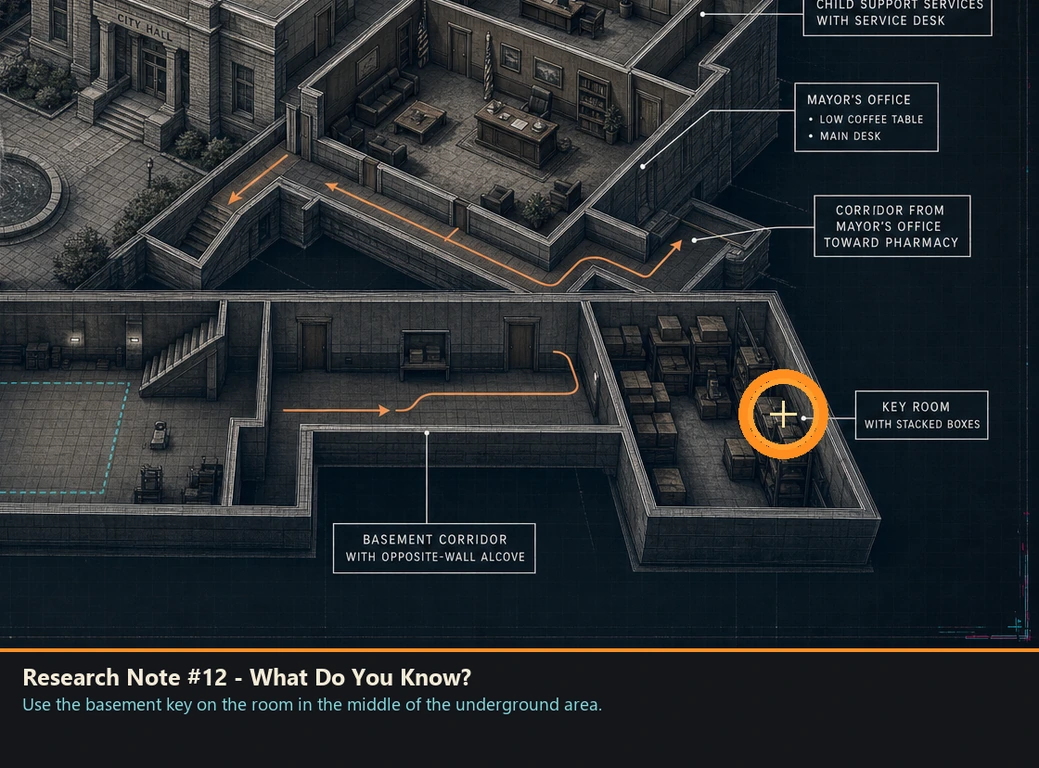
Research Note #12 - What Do You Know?
Research note
HintA basement key opens the central room.
WhereUse the basement key on the room in the middle of the underground area.
Full detailTake the basement key from the nearby purple tesseract, unlock the central room, and collect the note from the stacked boxes inside.
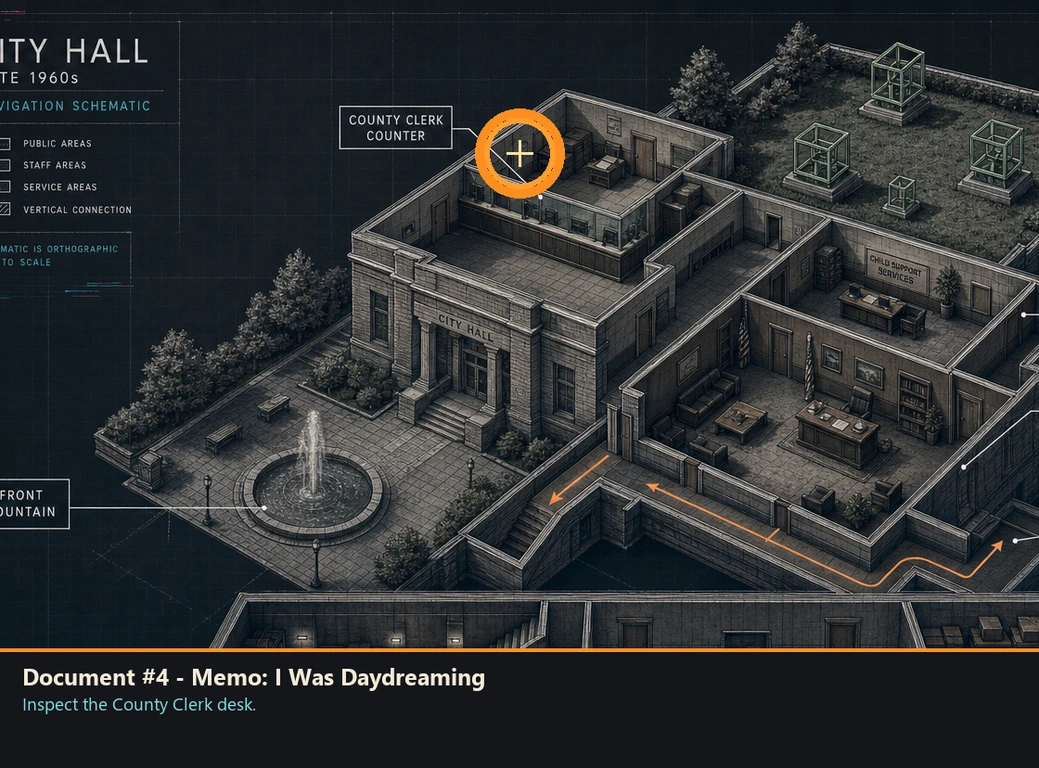
Document #4 - Memo: I Was Daydreaming
Document
HintOne municipal counter is easy to pass.
WhereInspect the County Clerk desk.
Full detailGo to the County Clerk office, step to the interior side of its counter, and collect the document from the desk surface.
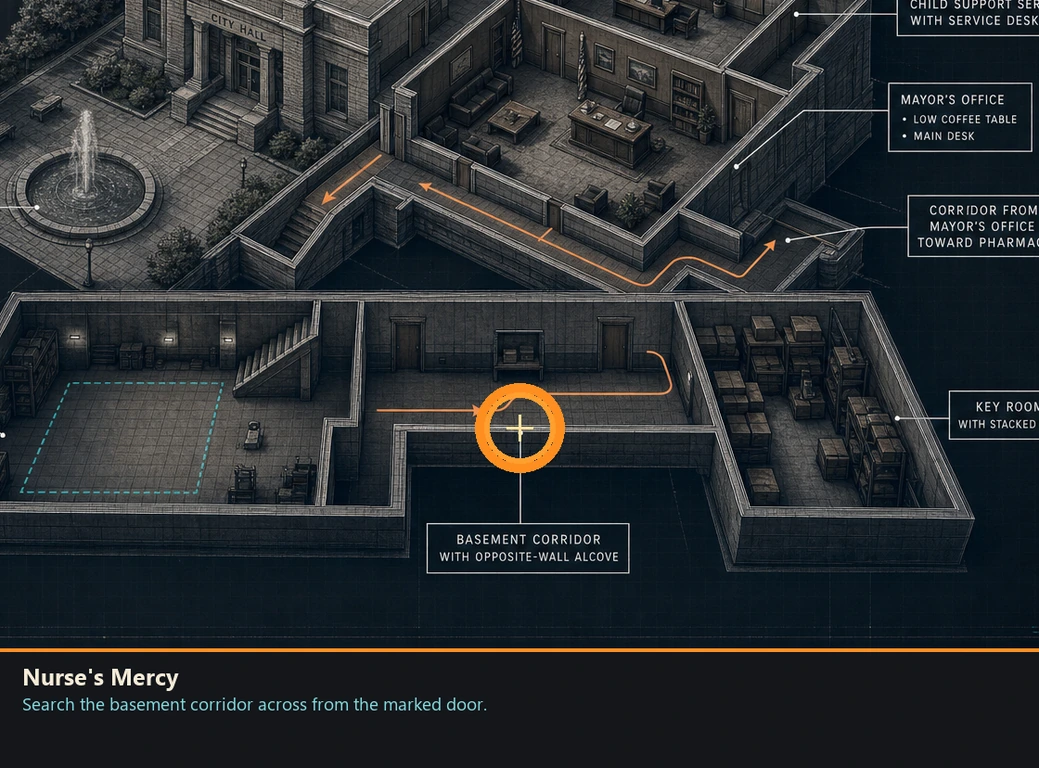
Nurse's Mercy
Badge
HintA basement doorway has something opposite it.
WhereSearch the basement corridor across from the marked door.
Full detailIn the basement corridor, face away from the relevant door and inspect the opposite wall area. Activate the tesseract there to obtain the badge.
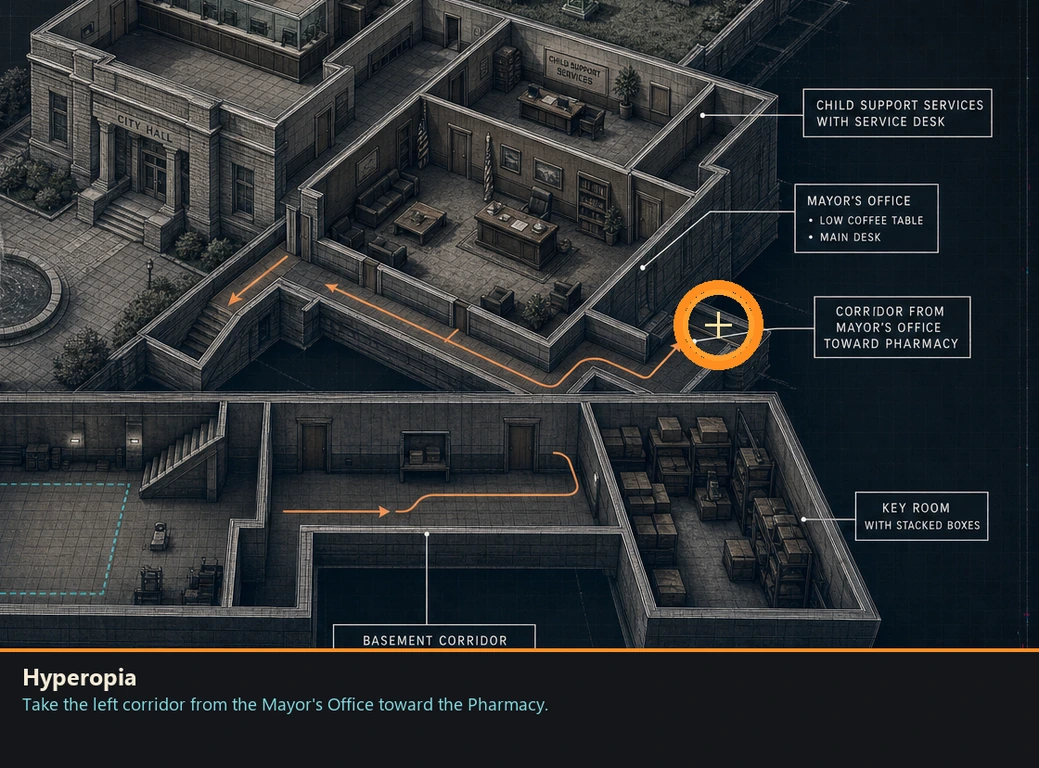
Hyperopia
Badge
HintA side hall near medical supplies hides one.
WhereTake the left corridor from the Mayor's Office toward the Pharmacy.
Full detailLeave the Mayor's Office through its left-hand corridor and proceed toward the Pharmacy. Break the tesseract along that passage to claim the badge.
Jupiter
Pin
HintNormal progress awards this pin.
WhereComplete the civic building's required encounter.
Full detailFinish the required encounter attached to this visit. The pin is added automatically, so no object or container needs to be searched.
St. Impius Asylum, 1992
You are here when: The institutional North Wing with numbered rooms, Laundry, Group Therapy, Pathology, Assisted Wash, and an advanced laboratory.
Follow room signs and treat each loop of the North Wing as a separate sweep.
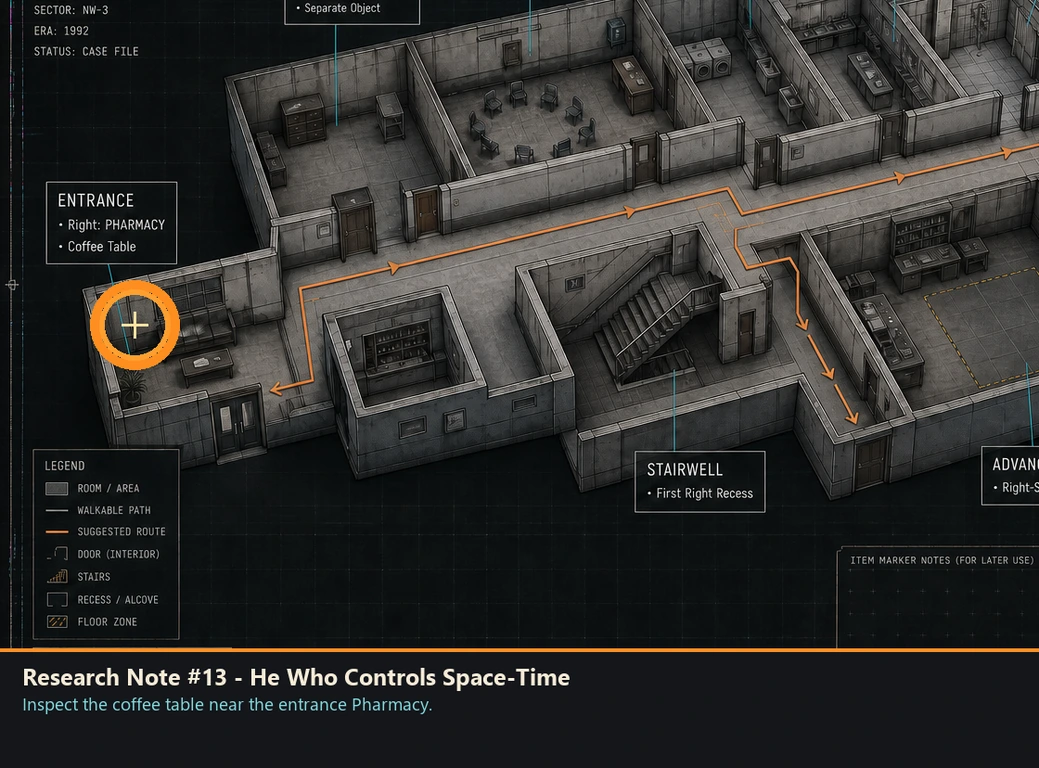
Research Note #13 - He Who Controls Space-Time
Research note
HintThe entrance furniture is worth checking.
WhereInspect the coffee table near the entrance Pharmacy.
Full detailFrom the entrance, move right toward the Pharmacy and collect the note from the nearby coffee table.
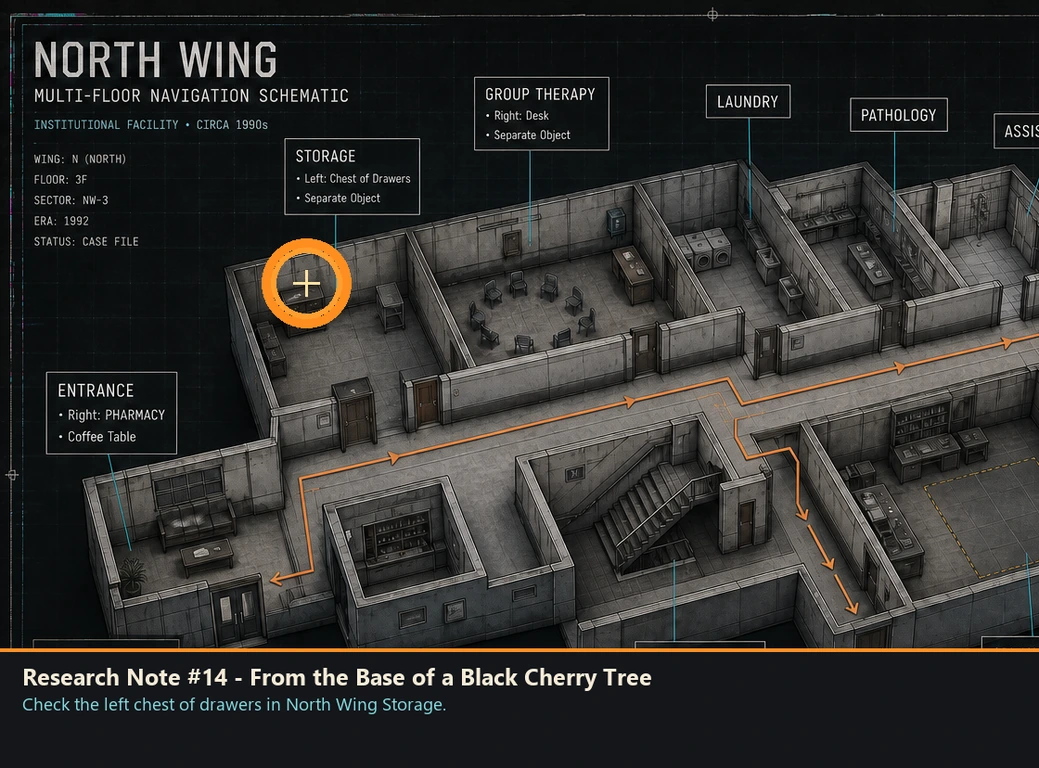
Research Note #14 - From the Base of a Black Cherry Tree
Research note
HintA storage room has drawers on one side.
WhereCheck the left chest of drawers in North Wing Storage.
Full detailEnter North Wing Storage and inspect the chest of drawers along its left side. The note rests on top.
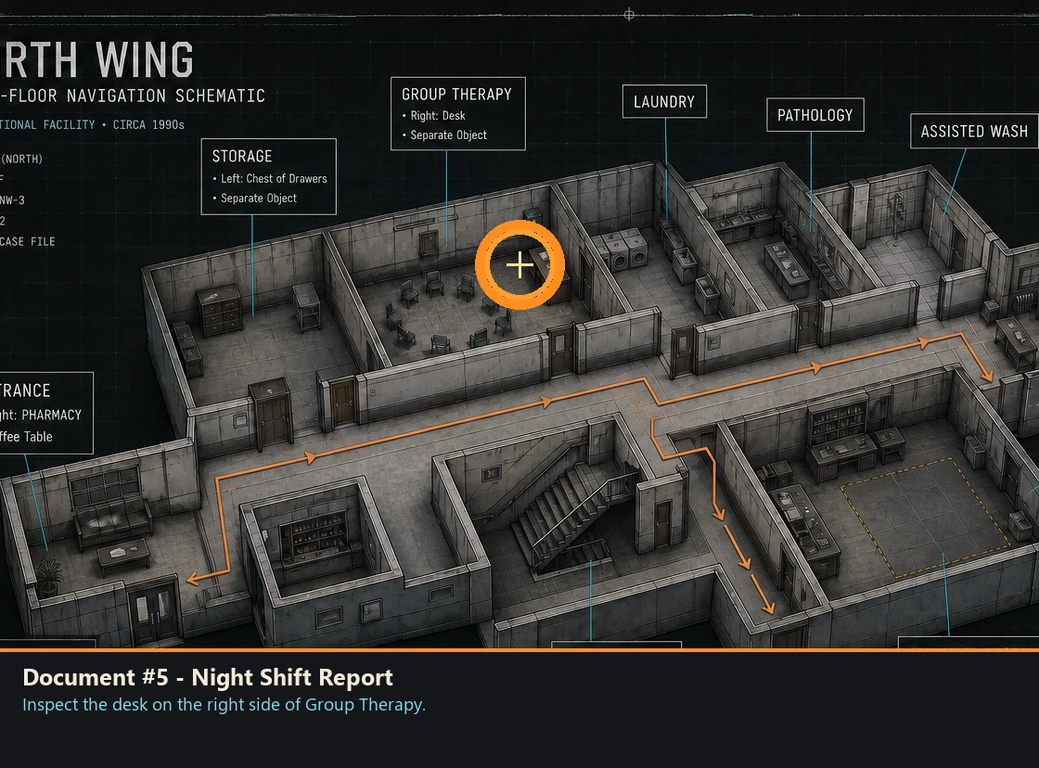
Document #5 - Night Shift Report
Document
HintGroup Therapy has a useful desk.
WhereInspect the desk on the right side of Group Therapy.
Full detailGo upstairs, enter Group Therapy, and collect the report from the desk on the room's right side.
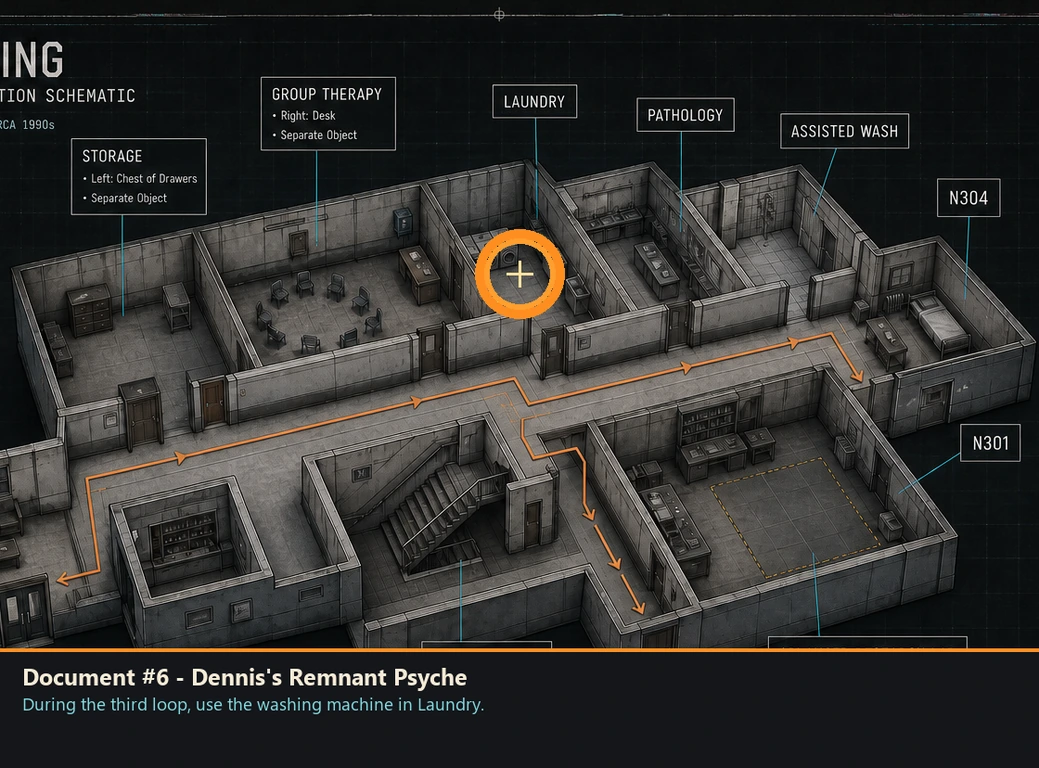
Document #6 - Dennis's Remnant Psyche
Document
HintThe third North Wing loop changes Laundry.
WhereDuring the third loop, use the washing machine in Laundry.
Full detailOn the third North Wing loop, enter Laundry, interact with the washing machine, then turn around and interact with the figure that appears to receive the document.
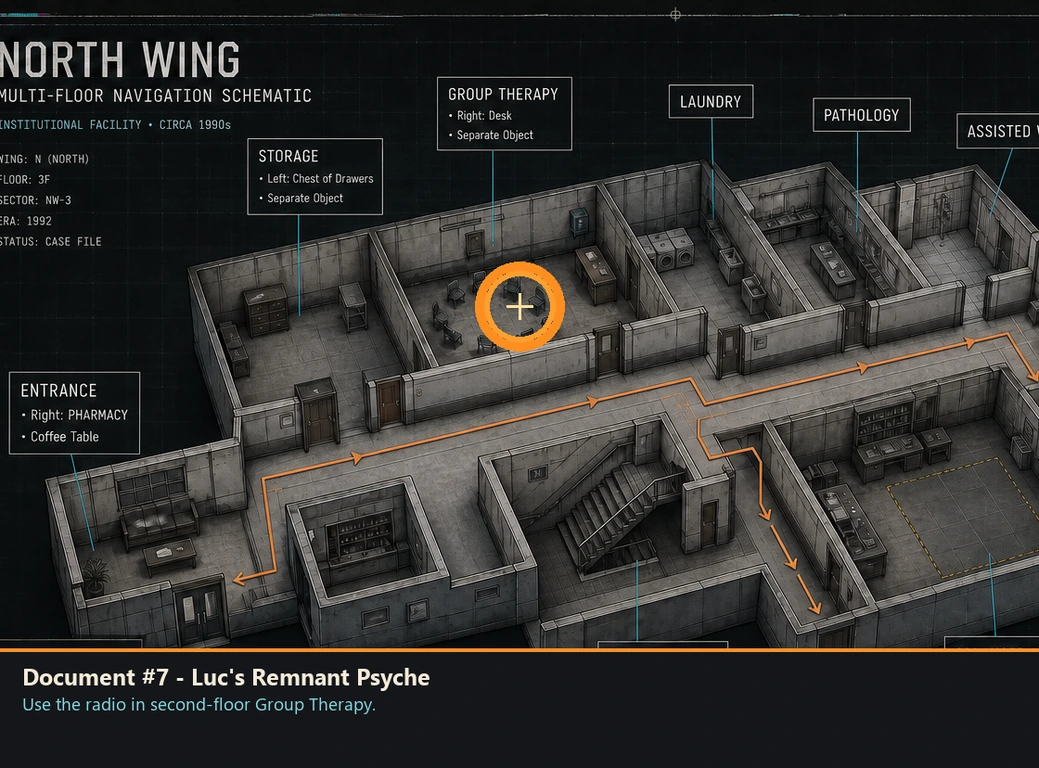
Document #7 - Luc's Remnant Psyche
Document
HintA later loop changes Group Therapy.
WhereUse the radio in second-floor Group Therapy.
Full detailContinue the North Wing loops until the radio in second-floor Group Therapy becomes interactive. Use it, then interact with the figure that appears near the door.
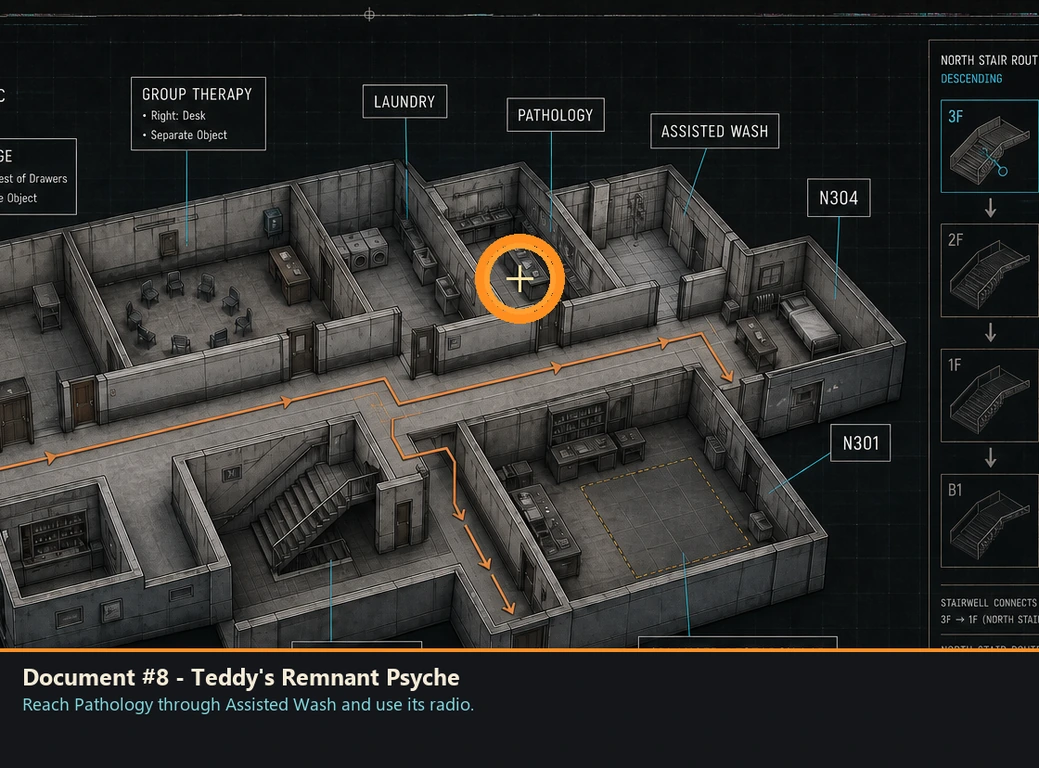
Document #8 - Teddy's Remnant Psyche
Document
HintPathology reacts to a nearby radio.
WhereReach Pathology through Assisted Wash and use its radio.
Full detailPass through Assisted Wash into Pathology, interact with the radio, then approach the exit and interact with the figure that appears there.
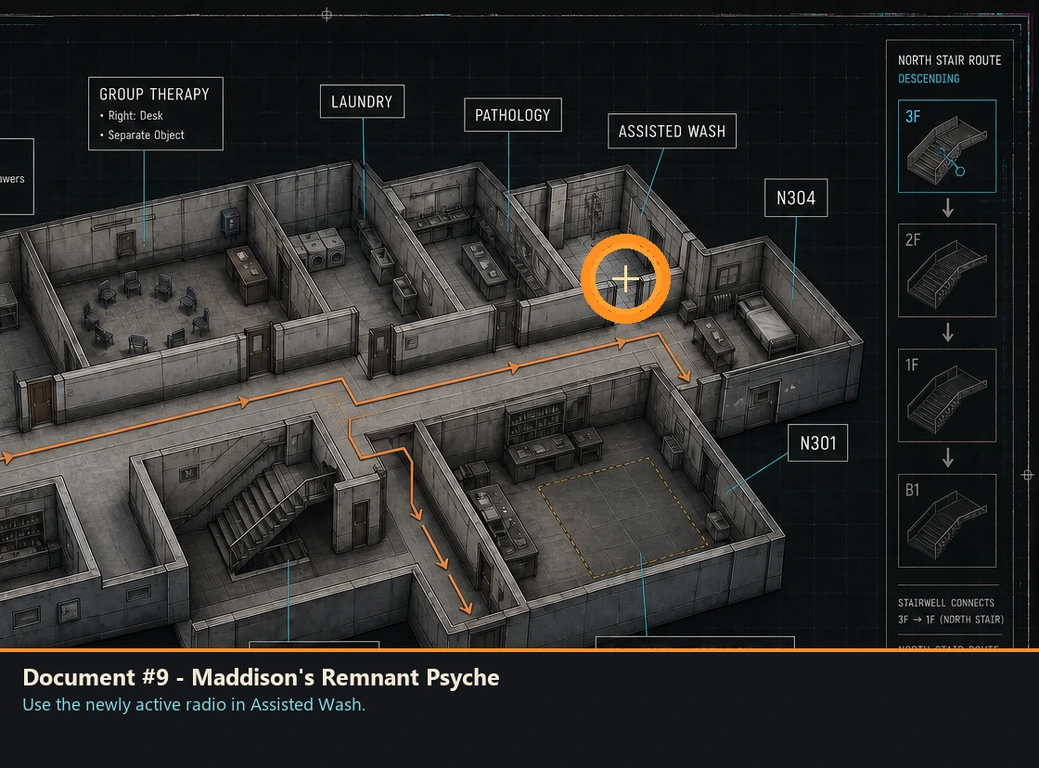
Document #9 - Maddison's Remnant Psyche
Document
HintAnother loop changes Assisted Wash.
WhereUse the newly active radio in Assisted Wash.
Full detailContinue looping until the Assisted Wash radio can be used. Interact with it, then complete the nearby figure interaction to receive the document.
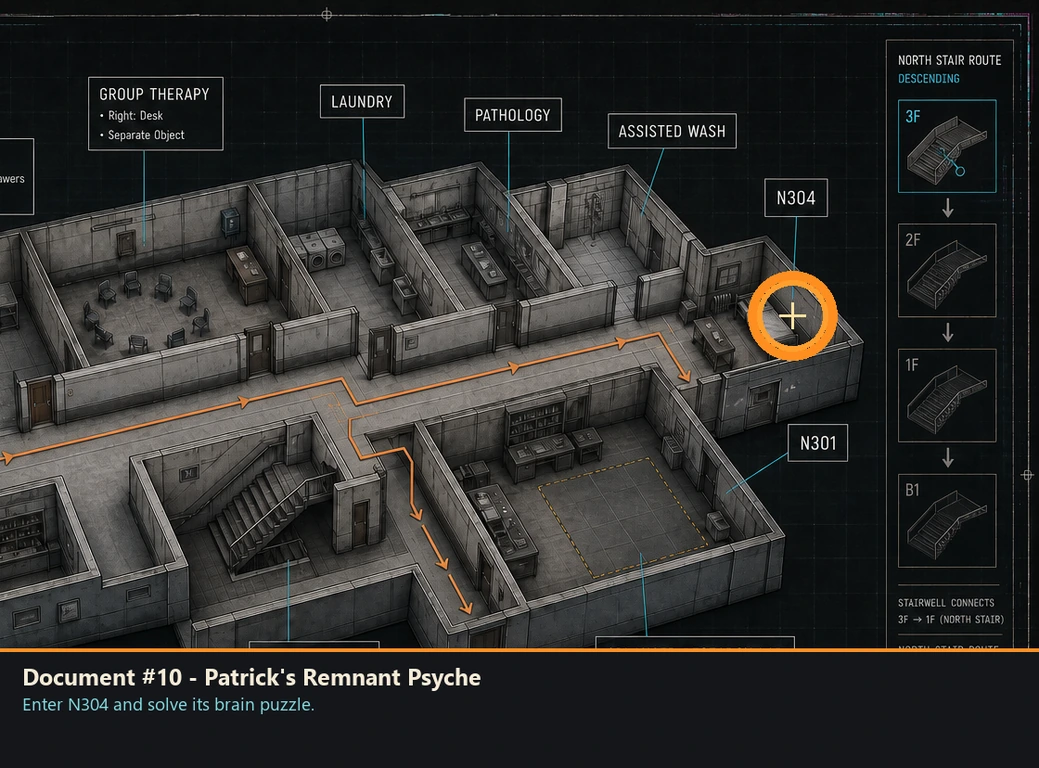
Document #10 - Patrick's Remnant Psyche
Document
HintA numbered room contains a brain puzzle.
WhereEnter N304 and solve its brain puzzle.
Full detailOn the appropriate North Wing loop, enter room N304, interact with the puzzle, and complete it. Use the resulting figure interaction to register the document.
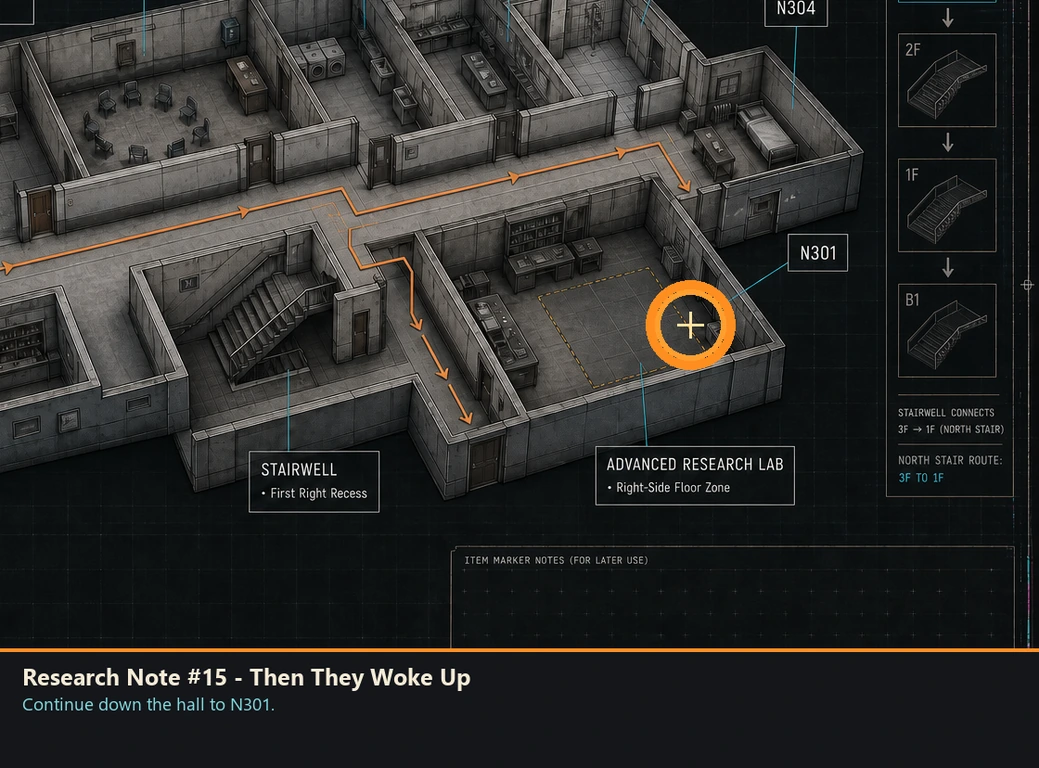
Research Note #15 - Then They Woke Up
Research note
HintA nearby numbered room has a table.
WhereContinue down the hall to N301.
Full detailEnter room N301 farther along the hall and collect the note from the table inside.
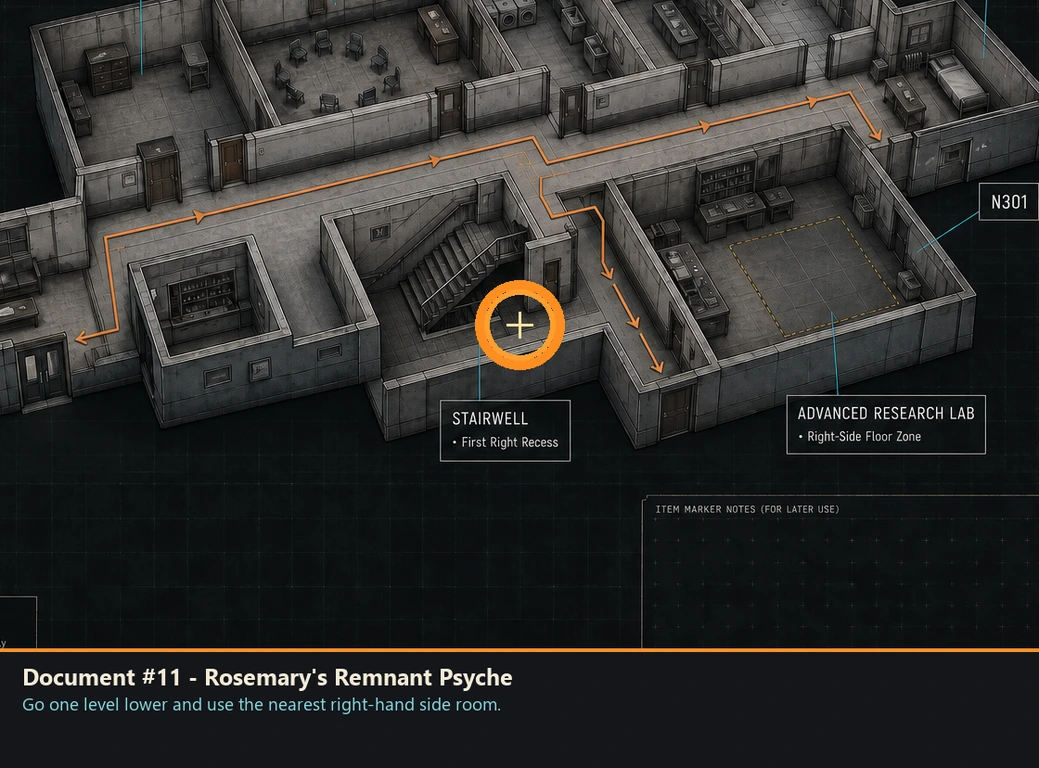
Document #11 - Rosemary's Remnant Psyche
Document
HintThe stairwell's first side room has a puzzle.
WhereGo one level lower and use the nearest right-hand side room.
Full detailTake the stairs downward, turn into the closest room on the right, and solve the brain puzzle inside. Complete the resulting interaction to receive the document.
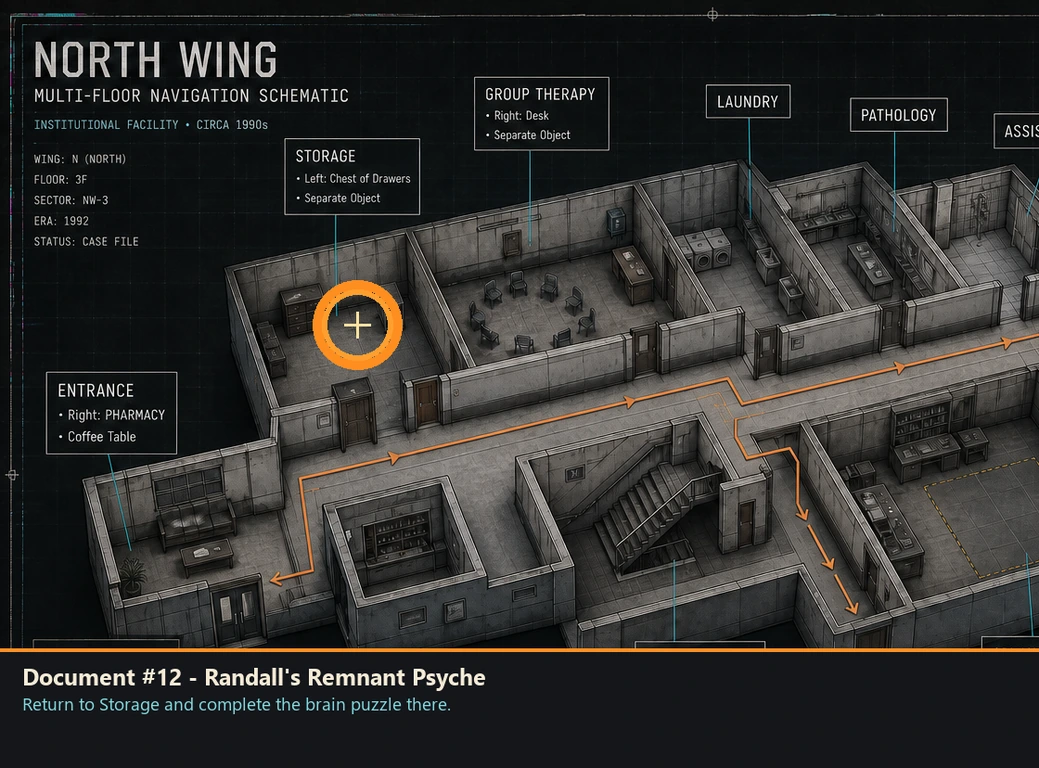
Document #12 - Randall's Remnant Psyche
Document
HintStorage gains its own puzzle.
WhereReturn to Storage and complete the brain puzzle there.
Full detailEnter the North Wing Storage room during its puzzle loop, solve the brain puzzle, and complete the resulting figure interaction to obtain the document.
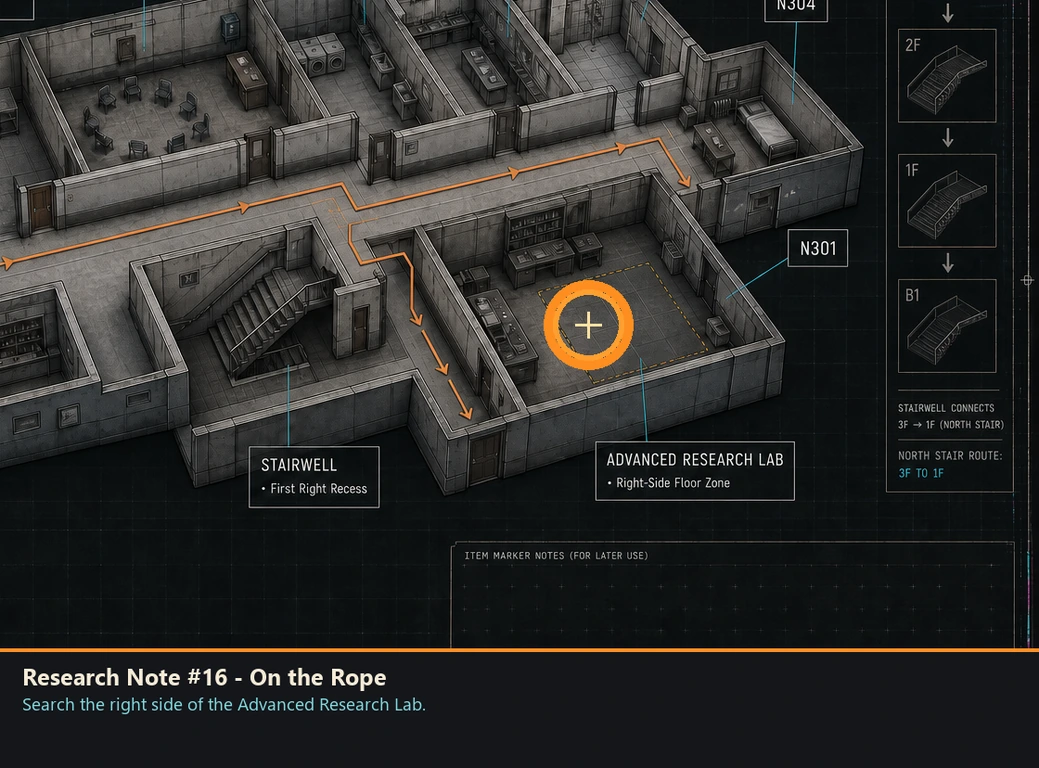
Research Note #16 - On the Rope
Research note
HintThe advanced lab's floor holds one.
WhereSearch the right side of the Advanced Research Lab.
Full detailEnter the Advanced Research Lab and move along its right side. The note is on the floor rather than a desk.
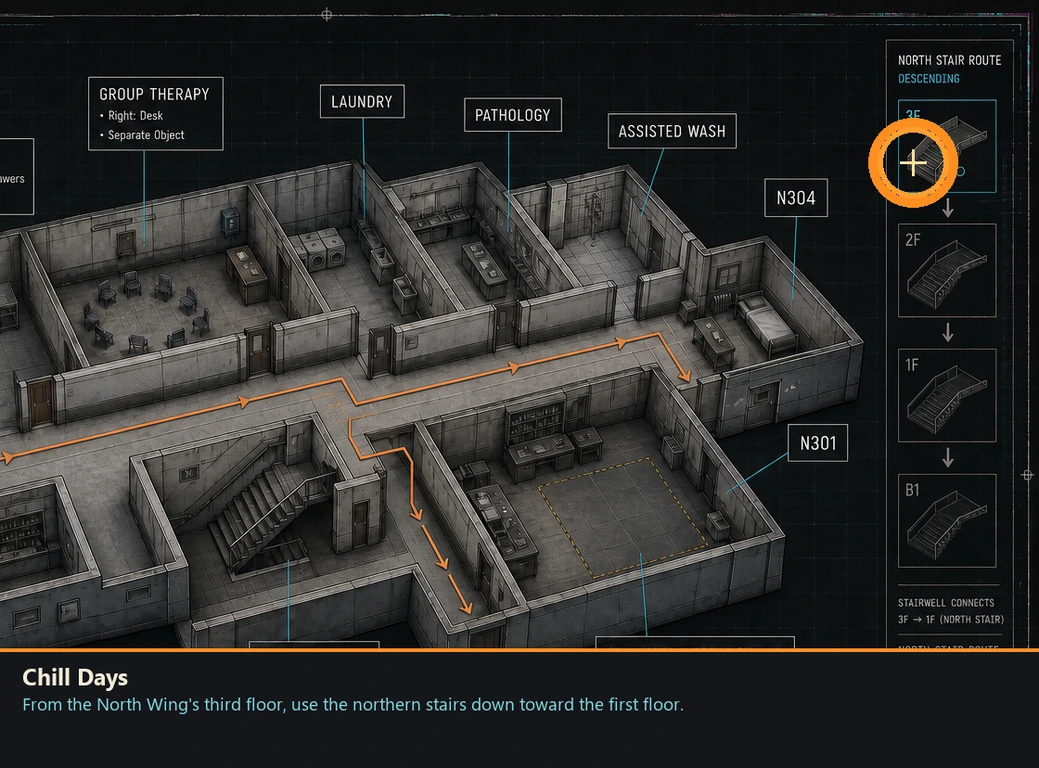
Chill Days
Badge
HintA high stair route leads downward to it.
WhereFrom the North Wing's third floor, use the northern stairs down toward the first floor.
Full detailReach the North Wing third floor, enter the northern stairwell, and descend toward the first floor. Activate the tesseract found on this stair route to obtain the badge.
Saturn
Pin
HintThis pin follows the required route.
WhereFinish the institution's required encounter.
Full detailComplete the required encounter for this visit. Saturn is granted automatically afterward and has no separate pickup prompt.
Space and Me Parish, 1978
You are here when: A rural parish route with picnic furniture, colored orb paths, a white building, headquarters, and a church.
Optional colored routes and small side buildings hold much of this area's paperwork.
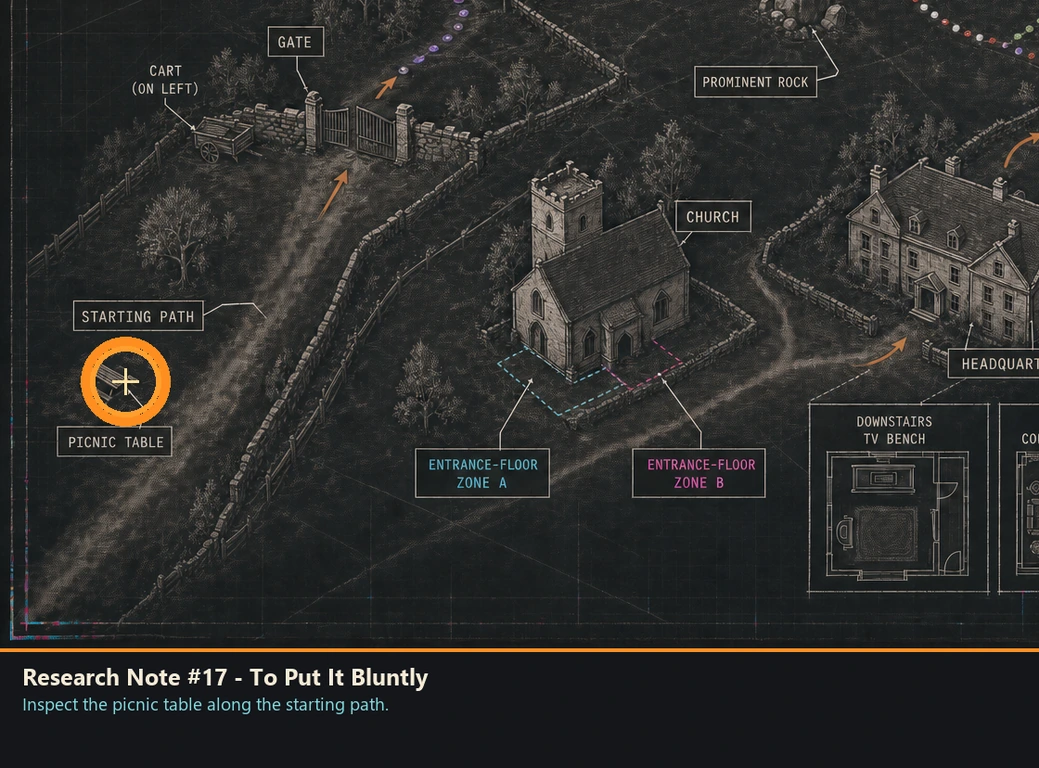
Research Note #17 - To Put It Bluntly
Research note
HintThe opening path has a place to sit.
WhereInspect the picnic table along the starting path.
Full detailFollow the opening path until you reach the picnic table. Collect the note from its tabletop before passing deeper into the parish.
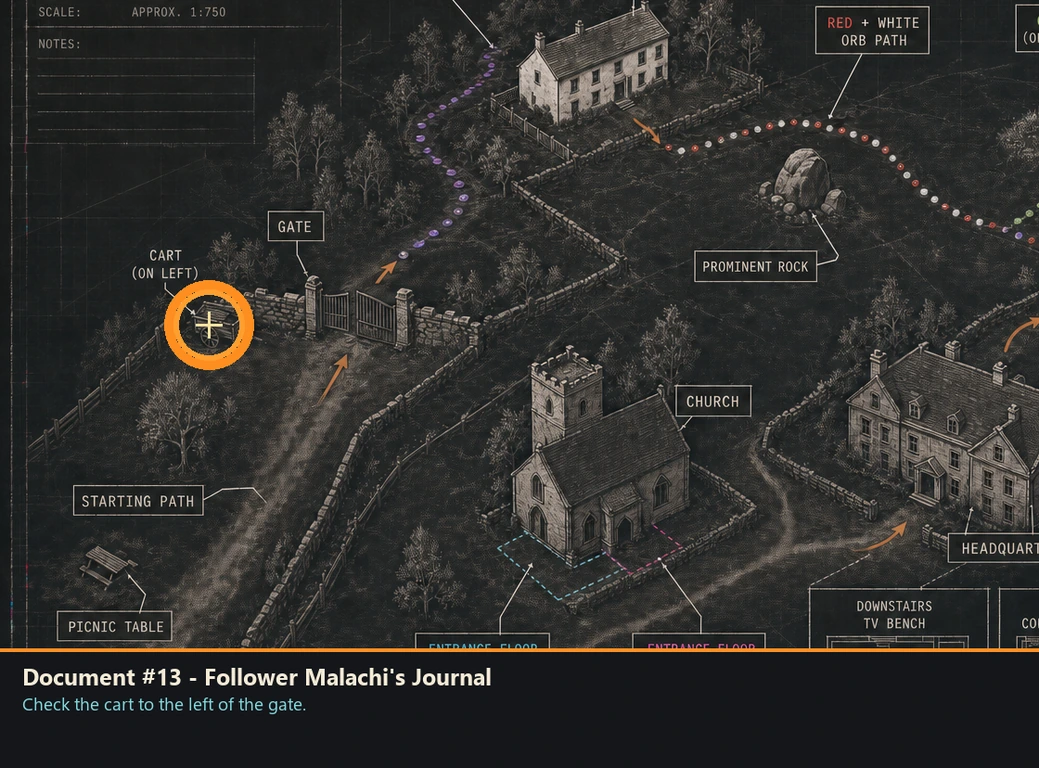
Document #13 - Follower Malachi's Journal
Document
HintLook beside the first gate.
WhereCheck the cart to the left of the gate.
Full detailAt the gate, turn left before passing through and inspect the nearby cart. The document is resting on it.
Document #14 - Follower Silas's Journal
Document
HintOne colored route has a ground pickup.
WhereFollow the purple-orb path and watch the ground.
Full detailTake the route marked by purple orbs and inspect the ground along the path. The document is not inside a structure.
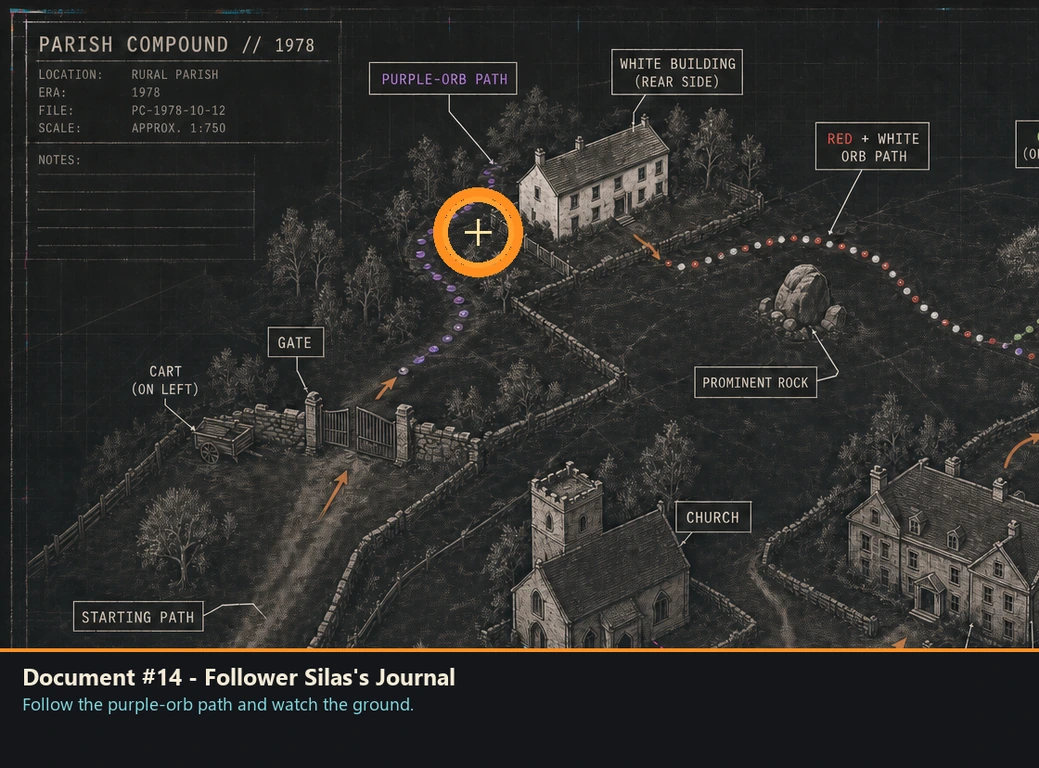
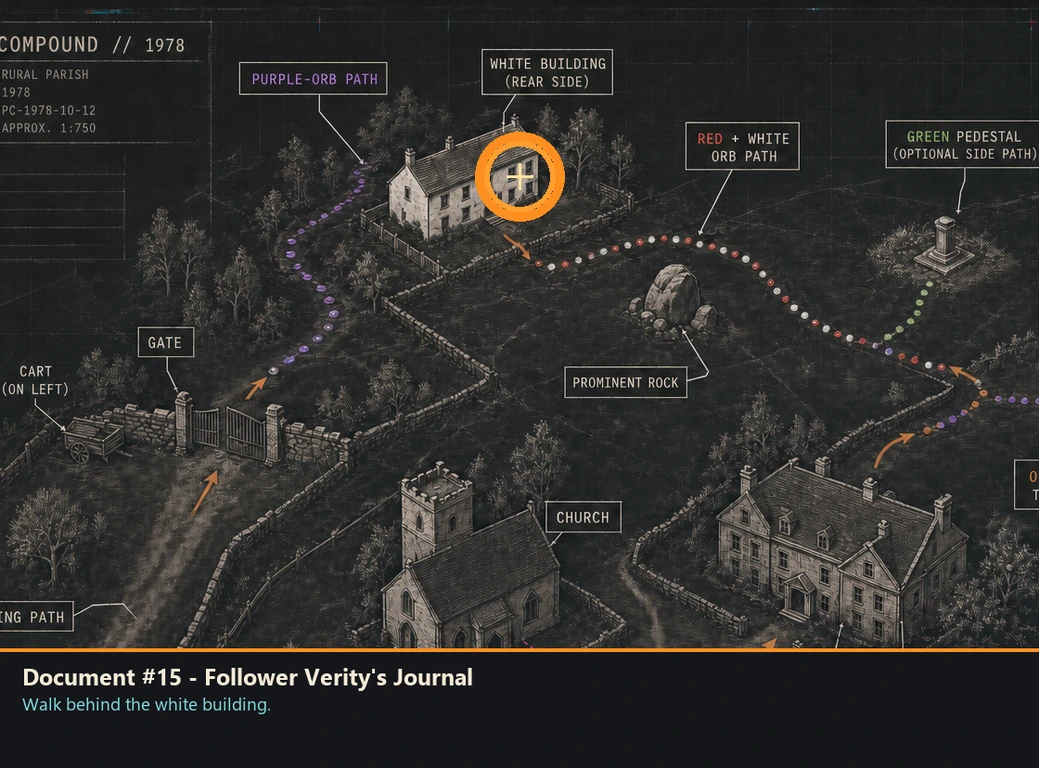
Document #15 - Follower Verity's Journal
Document
HintA white building conceals something outside.
WhereWalk behind the white building.
Full detailCircle around the white building instead of entering and collect the document from the ground at its rear.
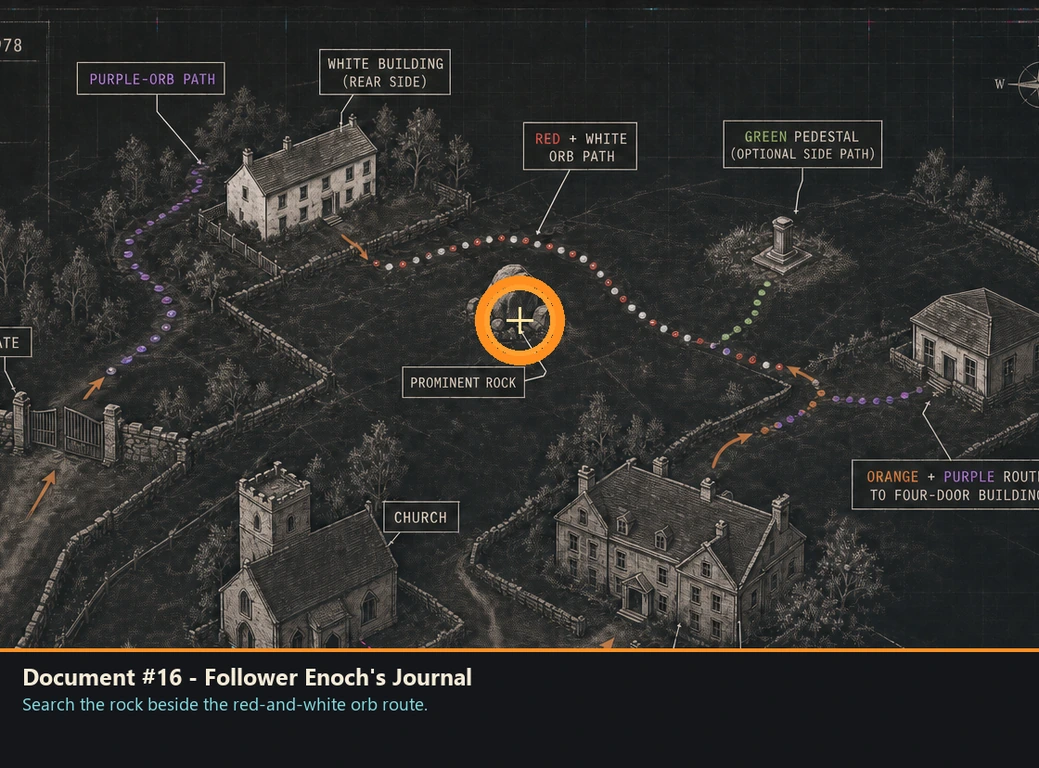
Document #16 - Follower Enoch's Journal
Document
HintTwo orb colors converge near a rock.
WhereSearch the rock beside the red-and-white orb route.
Full detailFollow the path marked by red and white orbs. At the prominent rock along it, inspect the ground for the document.
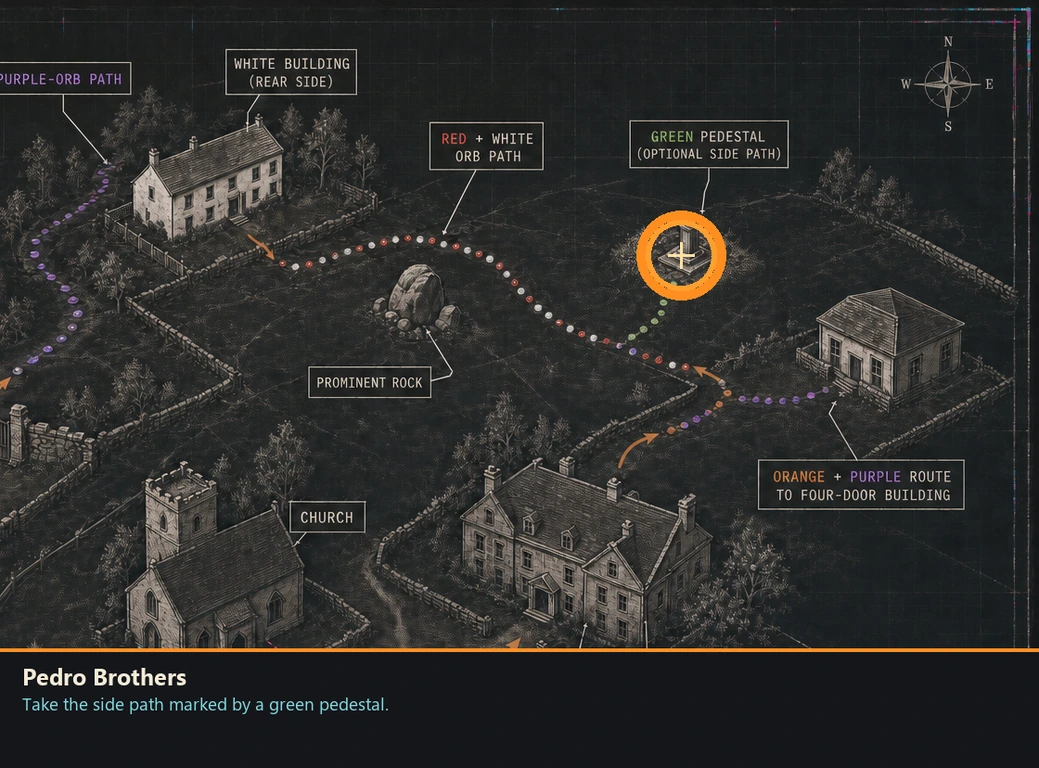
Pedro Brothers
Badge
HintAn optional pedestal route rewards exploration.
WhereTake the side path marked by a green pedestal.
Full detailLeave the main route at the green pedestal and follow that optional path to its tesseract. Activate it to obtain the badge before returning.
Testosterone
Badge
HintA small building has several entrances.
WhereEnter the four-door building on the orange-and-purple side route.
Full detailFollow the optional path marked by orange and purple cues to the building with four doors. Enter it and activate the tesseract inside for the badge.
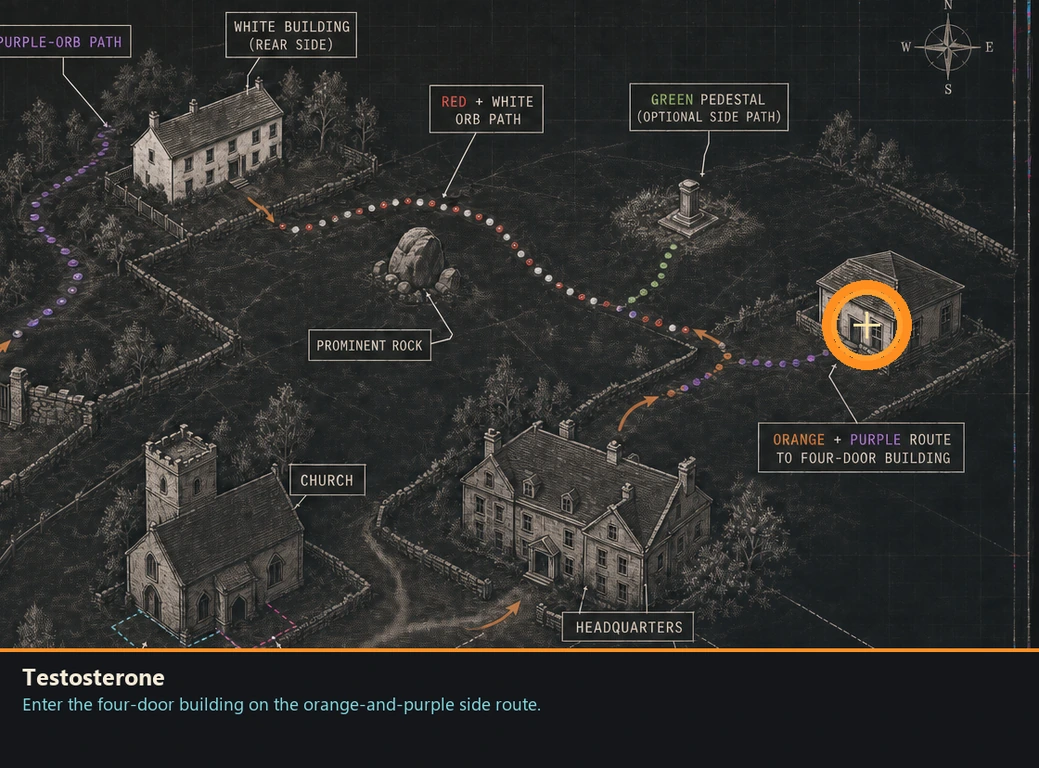
Document #17 - Follower Caleb's Journal
Document
HintThe four-door building holds more than a badge.
WhereSearch the interior of the four-door building.
Full detailInside the building reached from the orange-and-purple route, inspect the first document surface near the badge tesseract.
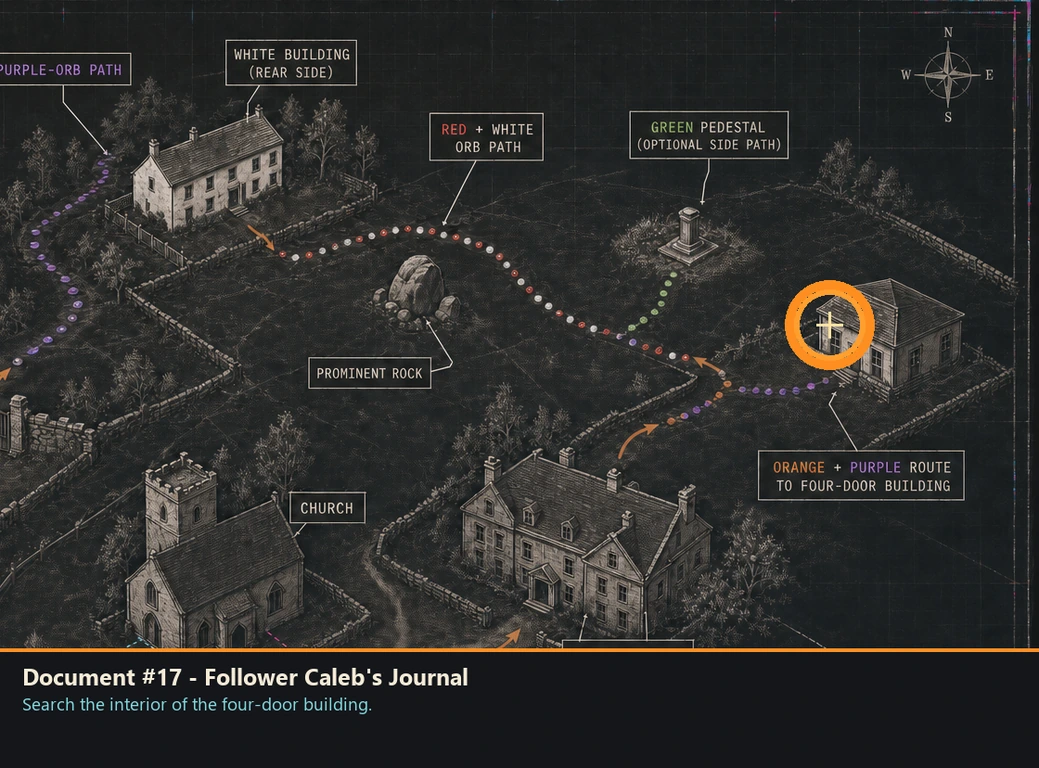
Document #18 - Follower Brice's Journal
Document
HintKeep searching the same small building.
WhereInspect the second document surface in the four-door building.
Full detailDo not leave after the badge and first document. Sweep the other interior side of the four-door building for the second paper pickup.
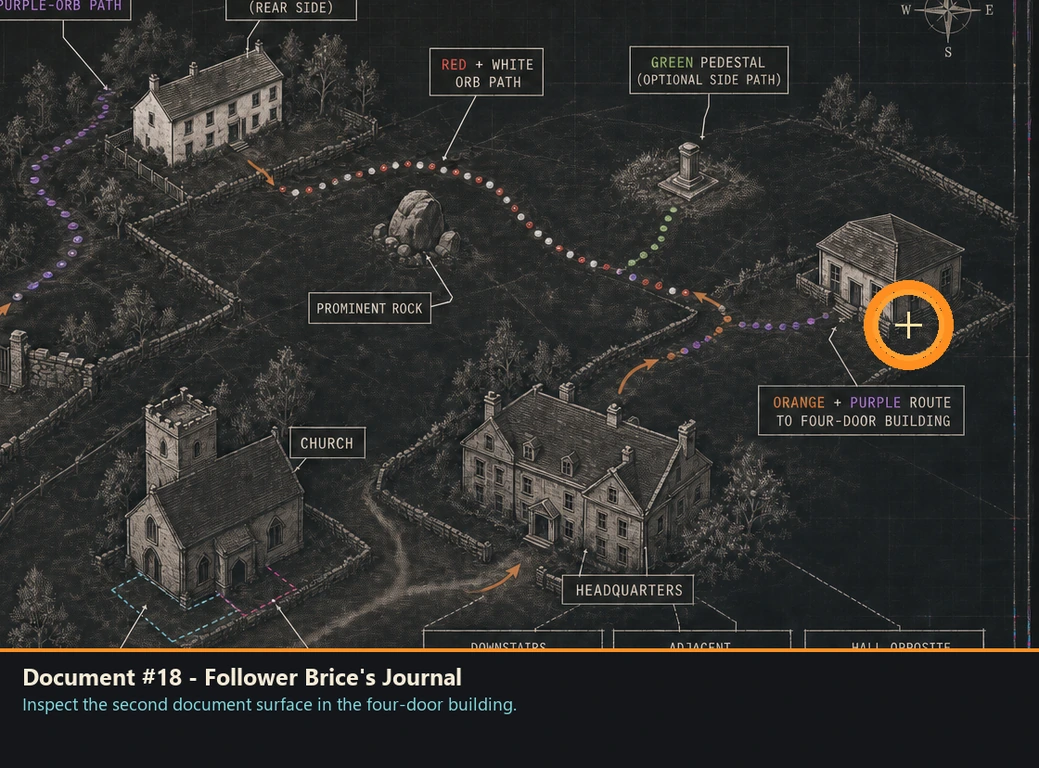
Document #19 - Follower Obadiah's Journal
Document
HintHeadquarters has a downstairs rest area.
WhereCheck the bench beside the television downstairs in headquarters.
Full detailEnter headquarters, go downstairs to the Nirvana television, and collect the document from the bench beside it.
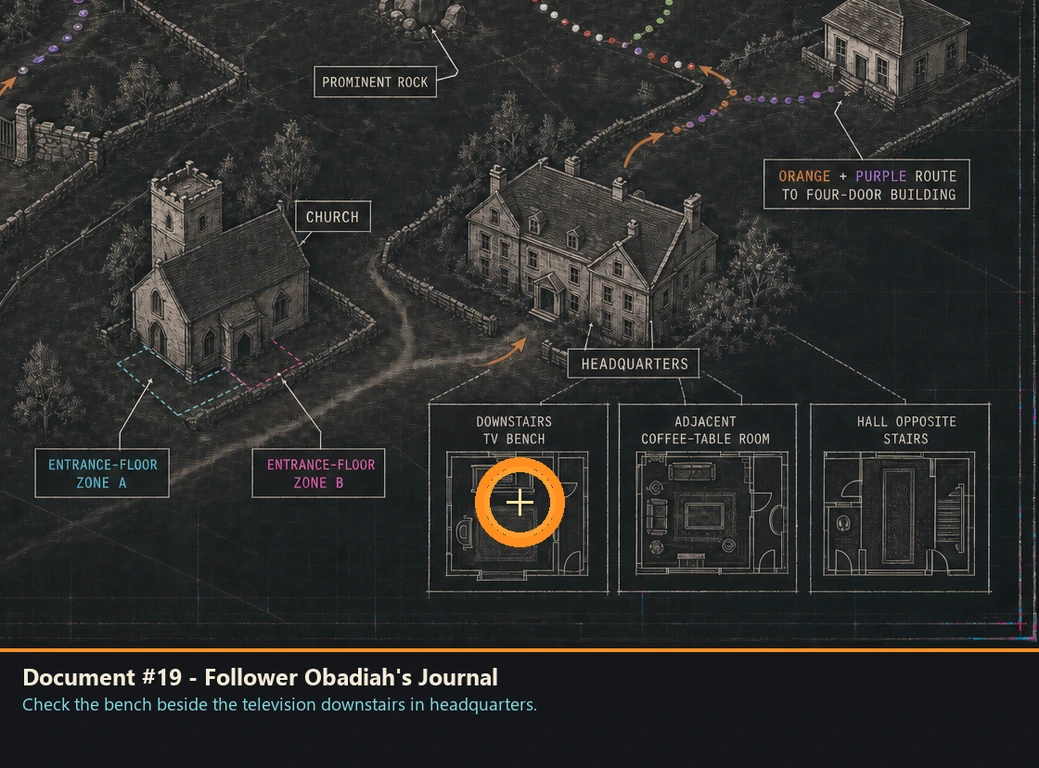
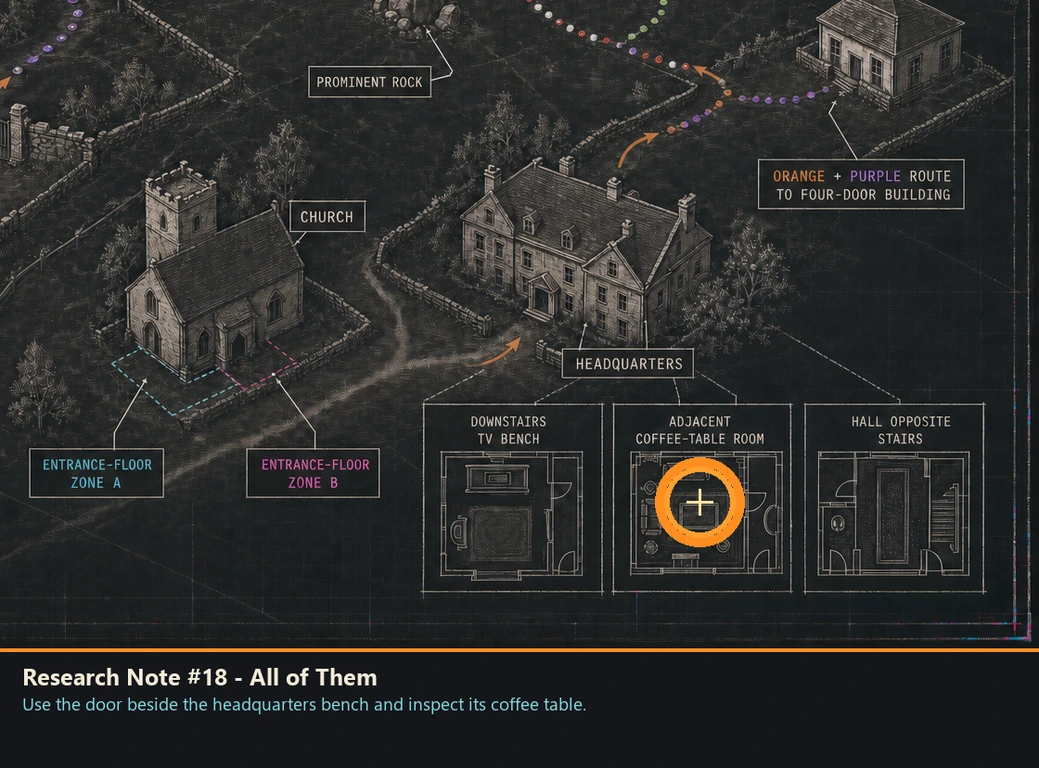
Research Note #18 - All of Them
Research note
HintA nearby room has low furniture.
WhereUse the door beside the headquarters bench and inspect its coffee table.
Full detailFrom the downstairs television bench, enter the directly adjacent door and collect the note from the coffee table inside.
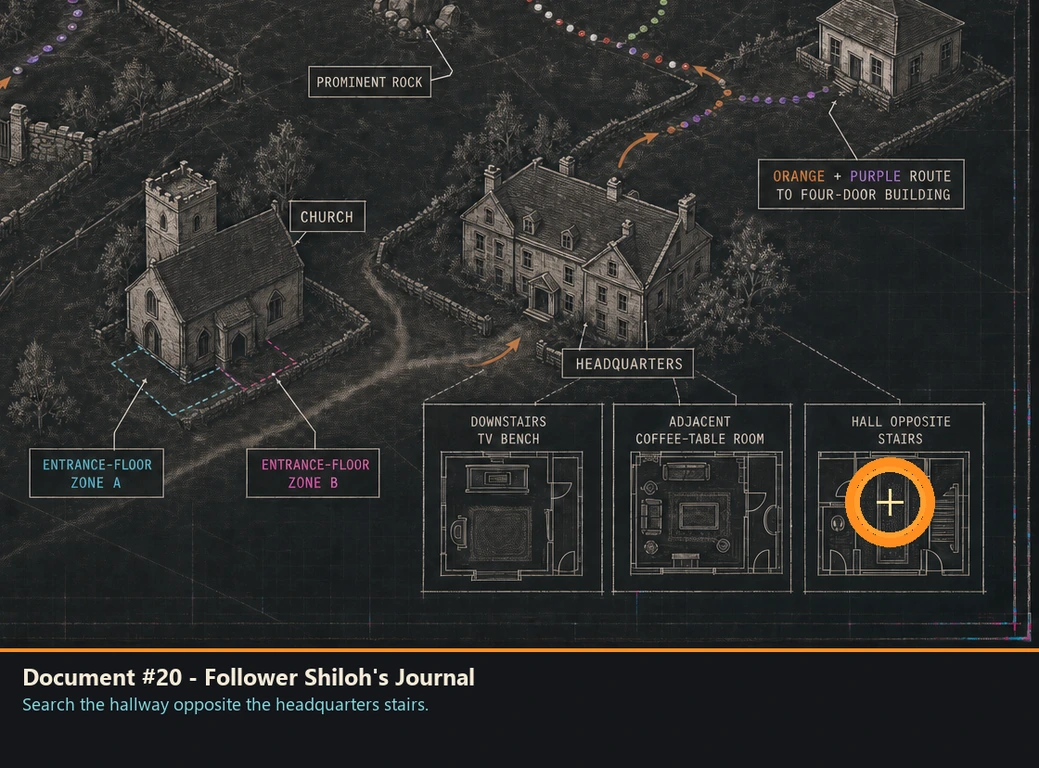
Document #20 - Follower Shiloh's Journal
Document
HintThe hall across from the stairs is useful.
WhereSearch the hallway opposite the headquarters stairs.
Full detailAt the headquarters stairs, face the opposite hall and follow it to the document. It lies along that passage rather than inside the stairwell.
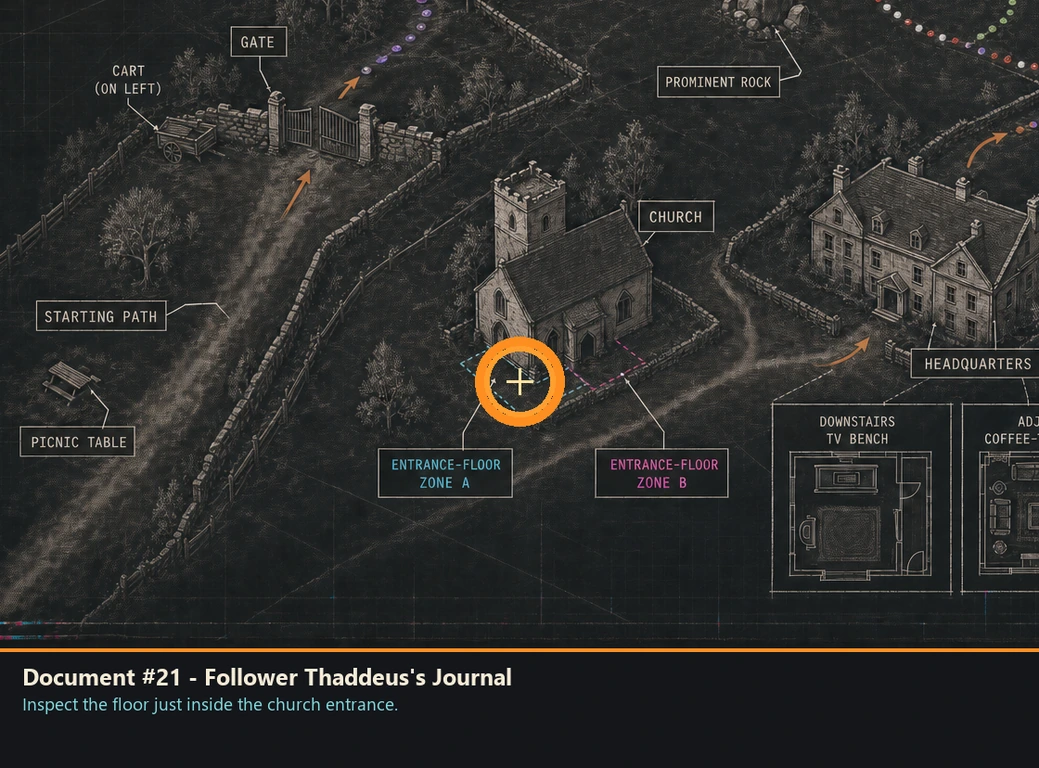
Document #21 - Follower Thaddeus's Journal
Document
HintThe church entrance has two floor pickups.
WhereInspect the floor just inside the church entrance.
Full detailEnter the church and stop near the threshold. The first document is on the floor close to the entrance.
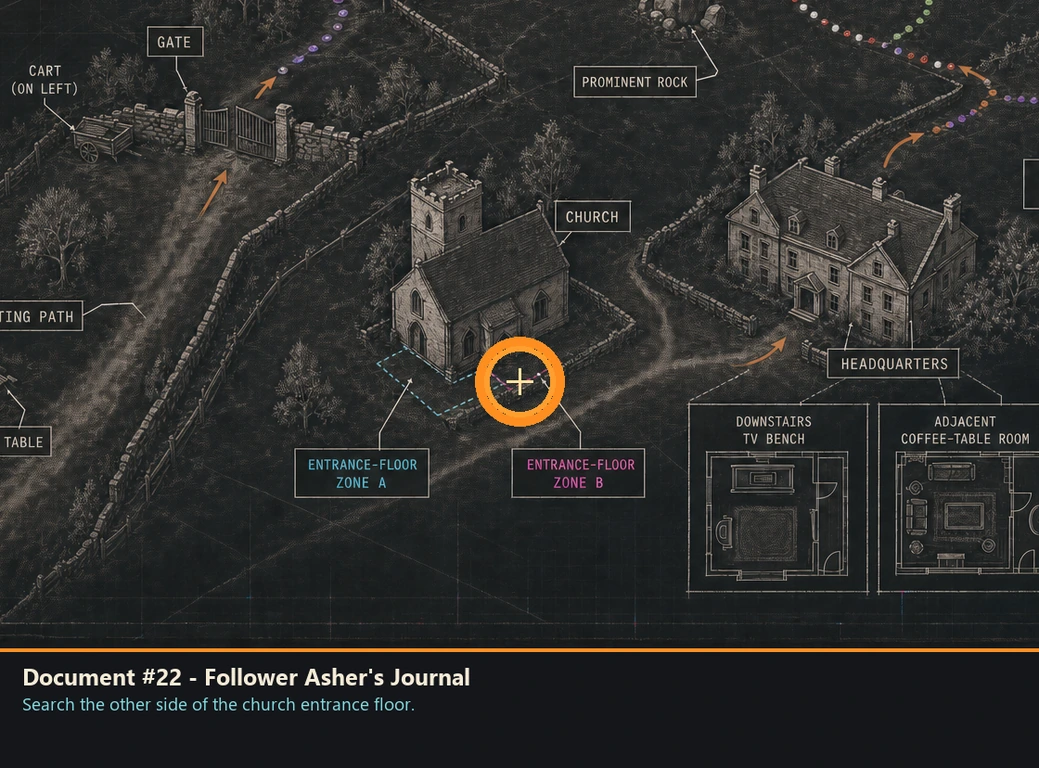
Document #22 - Follower Asher's Journal
Document
HintDo not leave the threshold after one pickup.
WhereSearch the other side of the church entrance floor.
Full detailAfter taking the first paper, scan the opposite side of the church's entrance area and collect the second document from the floor.
Underground Ruins
You are here when: The deep ruin route with numbered basement floors, lift machinery, breakable walls, snipers, and a Klista Gate.
Two badges require deliberate detours; one includes a platform mechanism and a collapsing central floor.
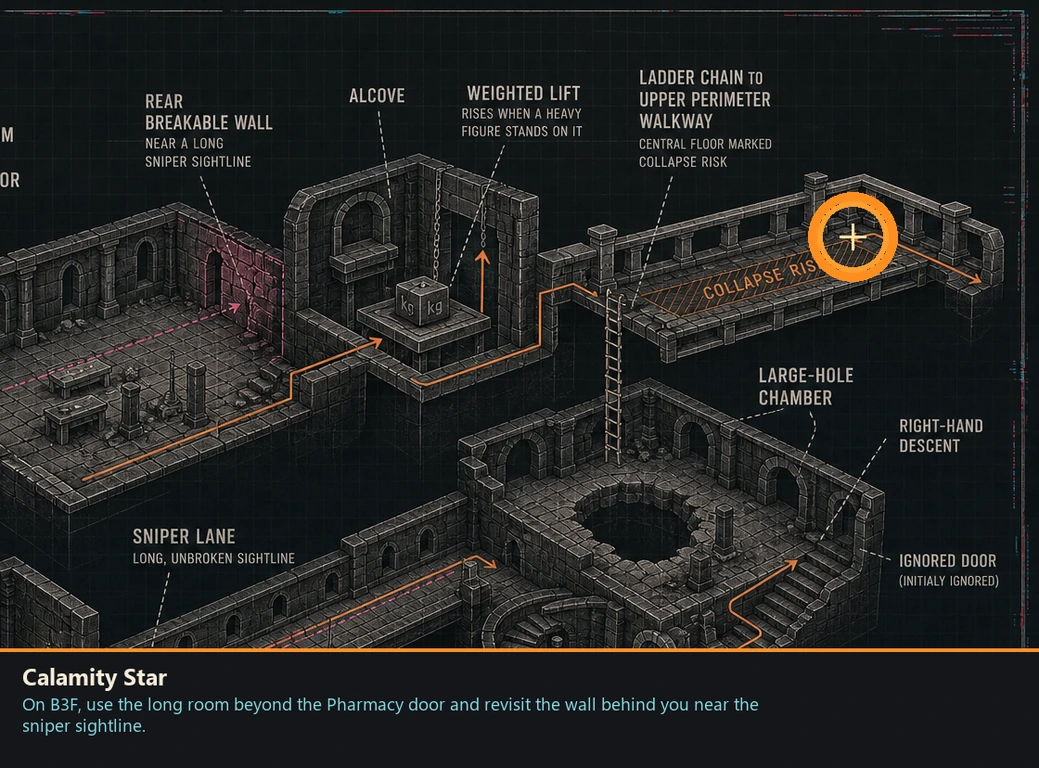
Calamity Star
Badge
HintA lift and an enemy's weight form the route.
WhereOn B3F, use the long room beyond the Pharmacy door and revisit the wall behind you near the sniper sightline.
Full detailBeyond the Pharmacy door on B3F, enter the long room. When the distant sniper appears, turn around and break the wall behind you. Lure the Flab onto the lift without killing it, step into the revealed alcove so its weight raises the platform, then climb the ladders. On the upper floor, stay around the perimeter because the middle collapses; the tesseract is beyond that unsafe center.
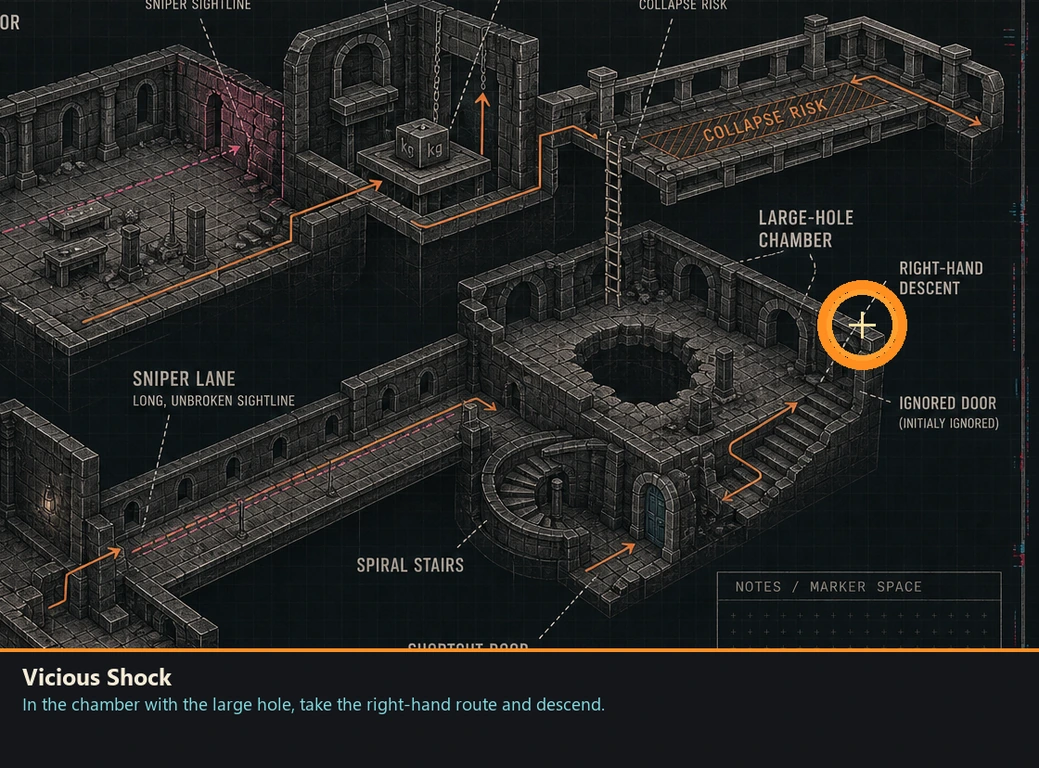
Vicious Shock
Badge
HintAt a huge drop, resist the obvious door.
WhereIn the chamber with the large hole, take the right-hand route and descend.
Full detailReach the room dominated by a large hole and face the far target. Ignore the nearby door for now, follow the path on the right, and descend along it to the tesseract containing the badge.
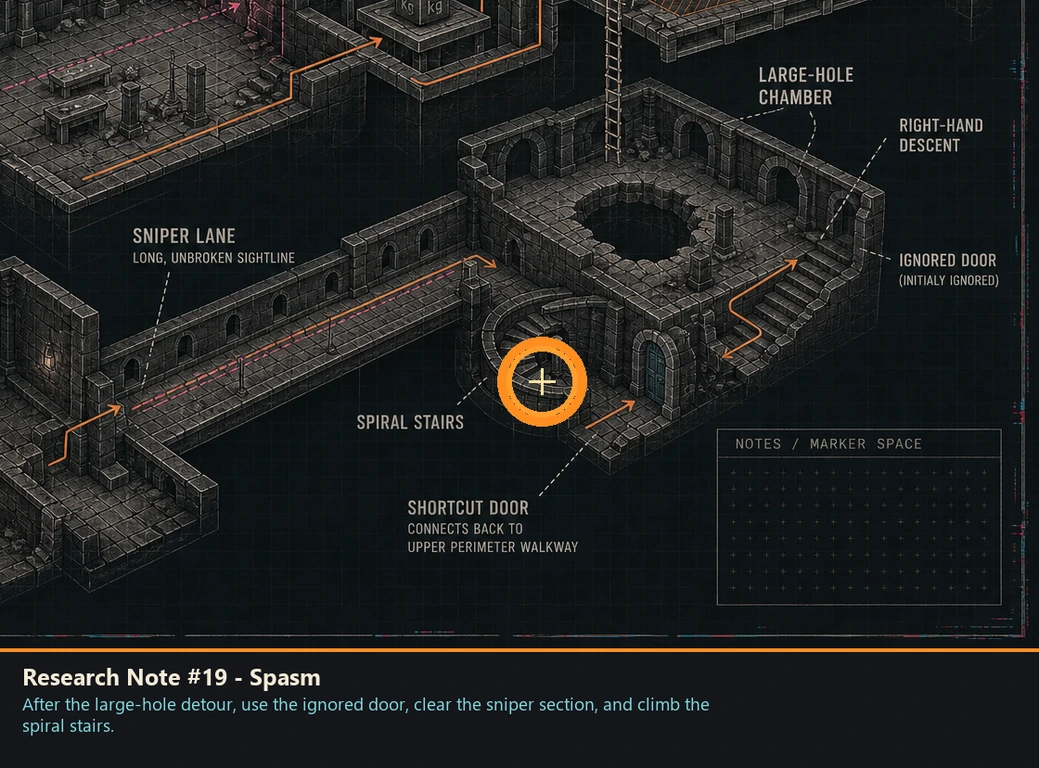
Research Note #19 - Spasm
Research note
HintReturn to a door you deliberately passed.
WhereAfter the large-hole detour, use the ignored door, clear the sniper section, and climb the spiral stairs.
Full detailGo back to the door skipped while collecting Vicious Shock. Pass through, clear every sniper, and climb the spiral staircase. The note is on the ground beside the shortcut door at the top.
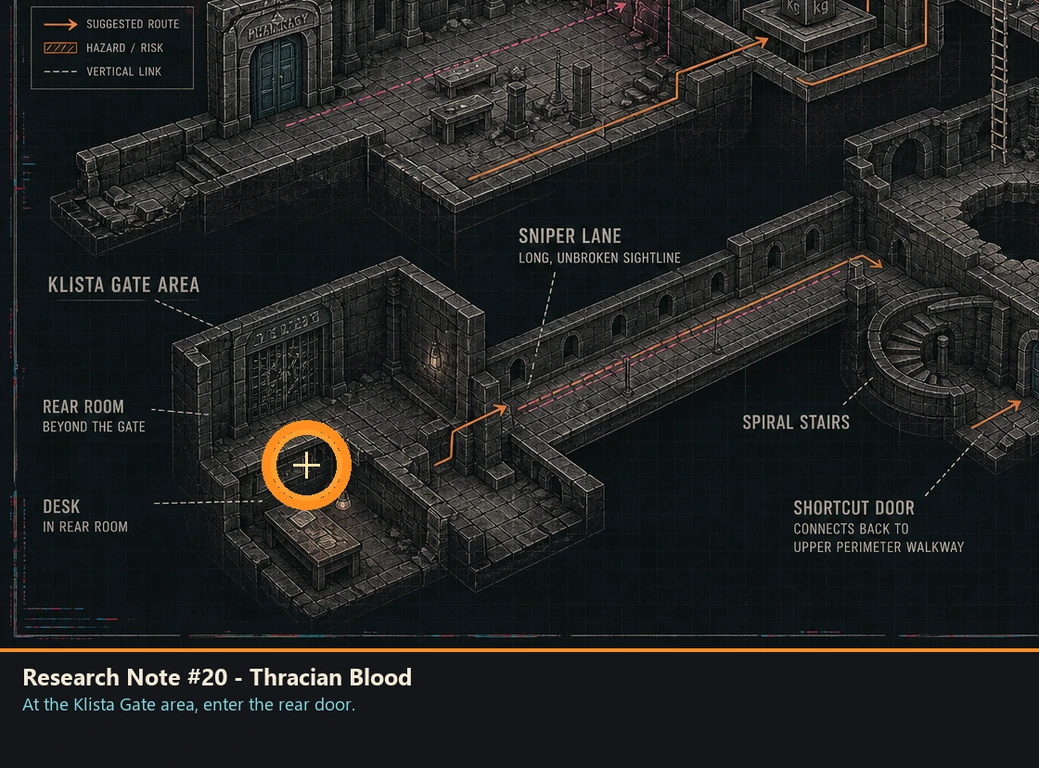
Research Note #20 - Thracian Blood
Research note
HintA gate-side room has an immediate pickup.
WhereAt the Klista Gate area, enter the rear door.
Full detailReach the Klista Gate area and take the door at its rear. The note is on the desk immediately inside, so collect it before crossing the room.
Uranus
Pin
HintThis pin follows normal completion of the ruin route.
WhereFinish the underground route's required encounter.
Full detailComplete the required encounter after the ruins and wait for control to return. Uranus is awarded automatically; there is no hidden pickup.
Deadford City Hall, 2000
You are here when: The altered civic building with a western third-floor bathroom, Mayor's Office vault, small library, televisions, resonators, and rooftop access.
Two badge routes use resonators and televisions; finish each route before moving on.
Document #23 - Invitation from Juliet
Document
HintThis document arrives without a room search.
WhereContinue through the required briefing before entering the civic building.
Full detailInvitation is registered automatically during the required briefing that precedes this visit. Check the document menu afterward; there is no physical copy to collect.
Research Note #21 - There Were Three of Them
Research note
HintA bathroom key opens an office secret.
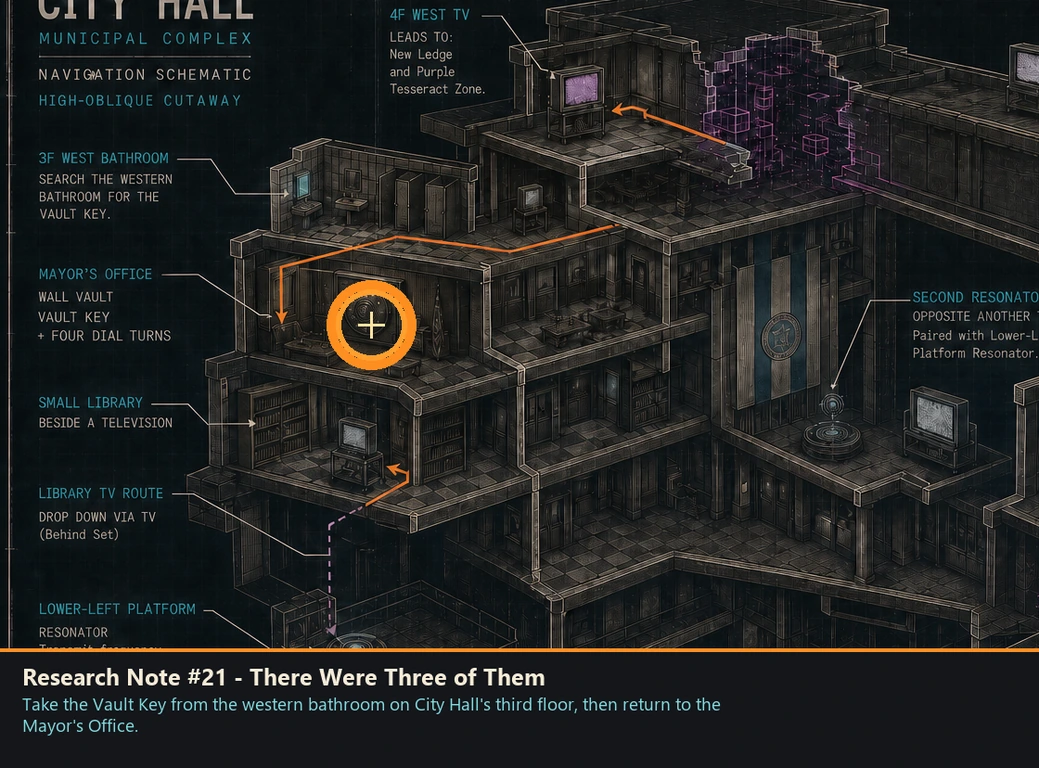
WhereTake the Vault Key from the western bathroom on City Hall's third floor, then return to the Mayor's Office.
Full detailOn the third floor, enter the western bathroom and collect the Vault Key. Use it on the Mayor's Office vault, then rotate clockwise to 9, counter-clockwise to 7, clockwise to 4, and counter-clockwise to 12. Open the vault and take the note.
Document #24 - Memo: Clock Tower
Document
HintA compact reading room holds the final paper.
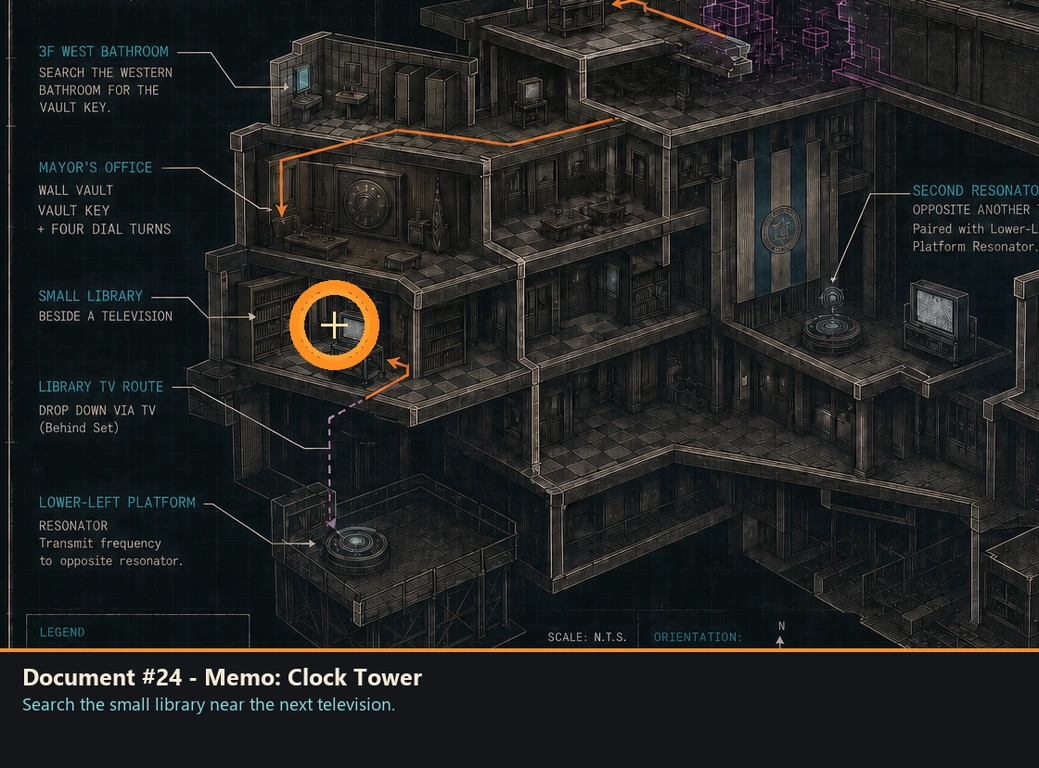
WhereSearch the small library near the next television.
Full detailEnter the small library beside the route's next television and inspect its interior surface for the document before using the television.
Booger Baby
Badge
HintA library television begins a two-step resonator route.
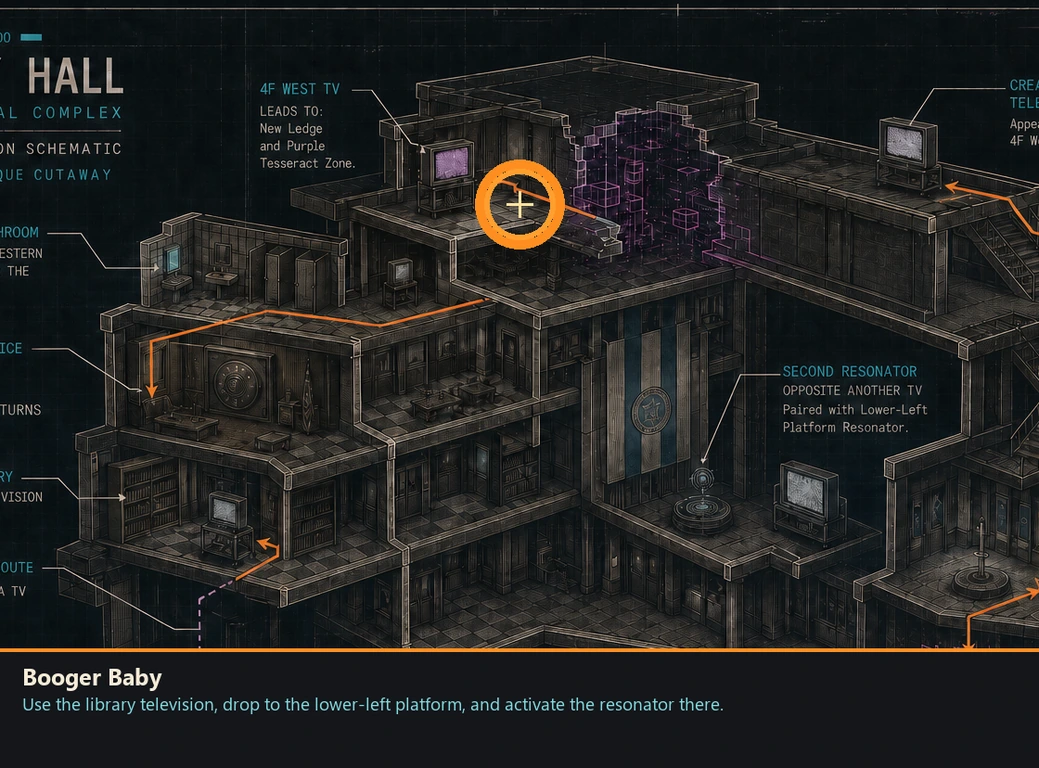
WhereUse the library television, drop to the lower-left platform, and activate the resonator there.
Full detailEnter the television in the small library, then drop left to the lower platform. Damage and activate the durable resonator. Return to the western television on City Hall's fourth floor, use it, drop to the new ledge, and make the final drop-and-jump to the purple tesseract.
Young Old Boy
Badge
HintAnother resonator changes a rooftop route.
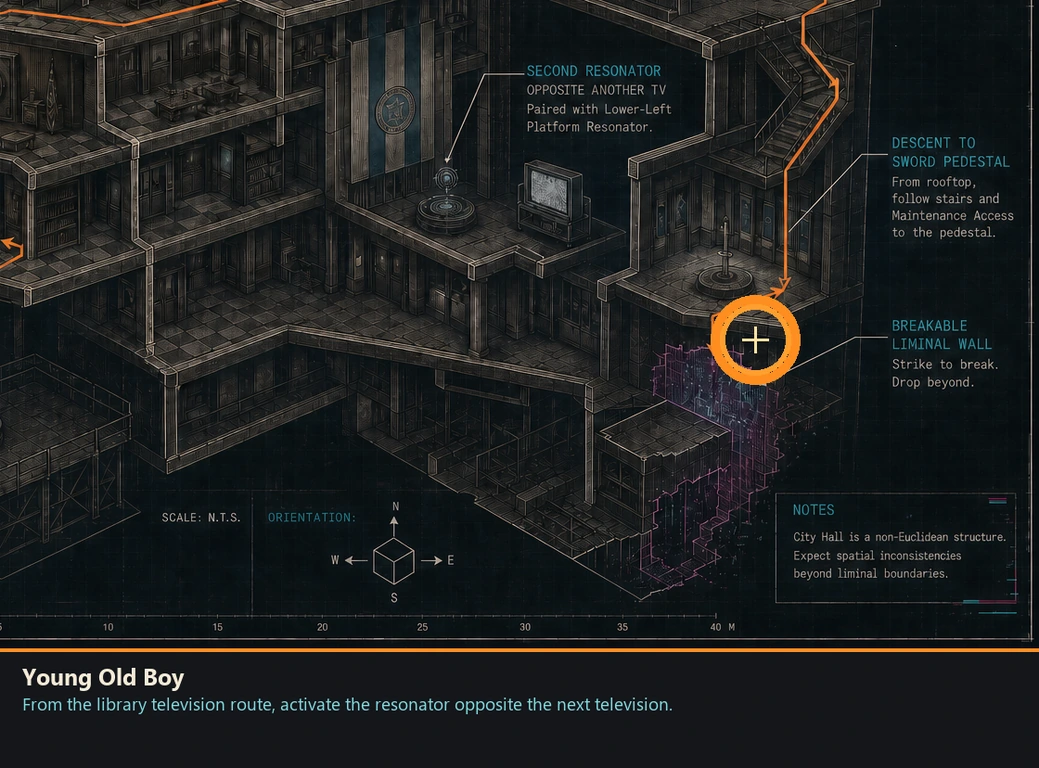
WhereFrom the library television route, activate the resonator opposite the next television.
Full detailUse the library television route and activate the resonator opposite the following television. Take the eastern stairs to the rooftop and pass through the newly created television. Descend to the sword, use it to break the liminal wall, then drop to the tesseract.
Subspace Hills
You are here when: The fragmented landscape of floating paths, ladders, resonator bridges, a Director Office, and a Hyper Klista Gate.
Scan below ledges after using resonators; several pickups sit off the forward route.
Neptune
Pin
HintThe area begins with this pin already handled.
WhereCheck the collection menu at the start of Subspace Hills.
Full detailNeptune is granted automatically as this location begins. If it is not visible immediately, advance until normal control is restored and check again.
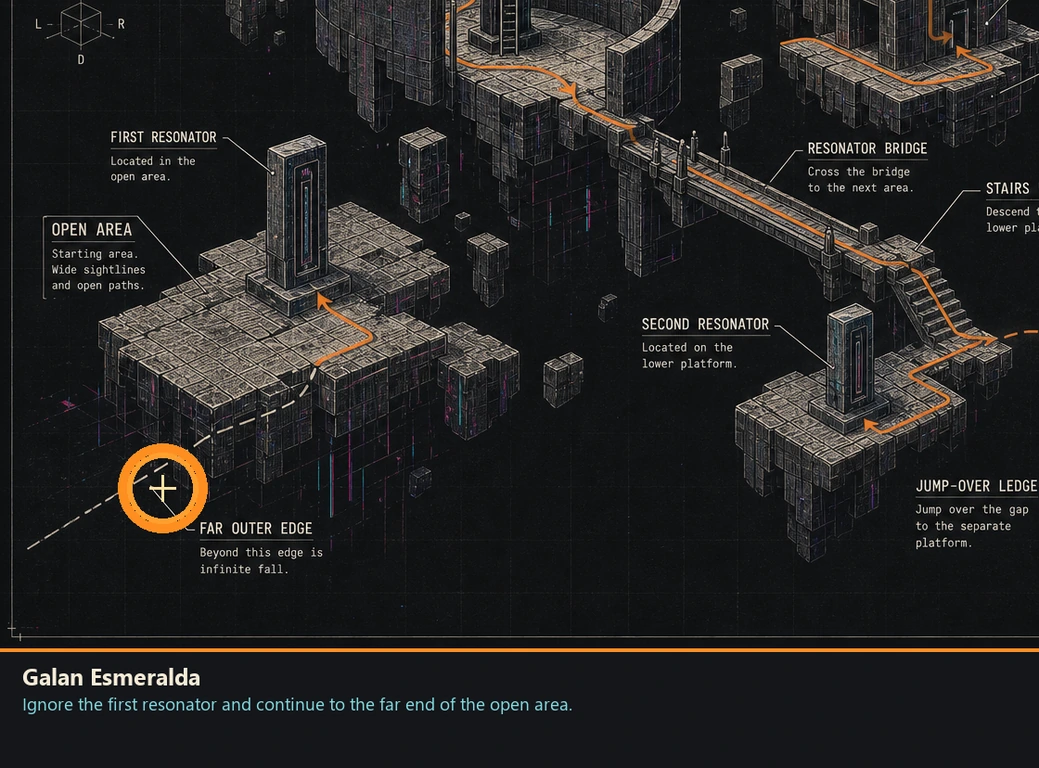
Galan Esmeralda
Badge
HintThe first resonator is a distraction.
WhereIgnore the first resonator and continue to the far end of the open area.
Full detailAt the first resonator, leave it untouched and cross the open area to its far boundary. The badge tesseract is reached from that outer edge, away from the obvious device.
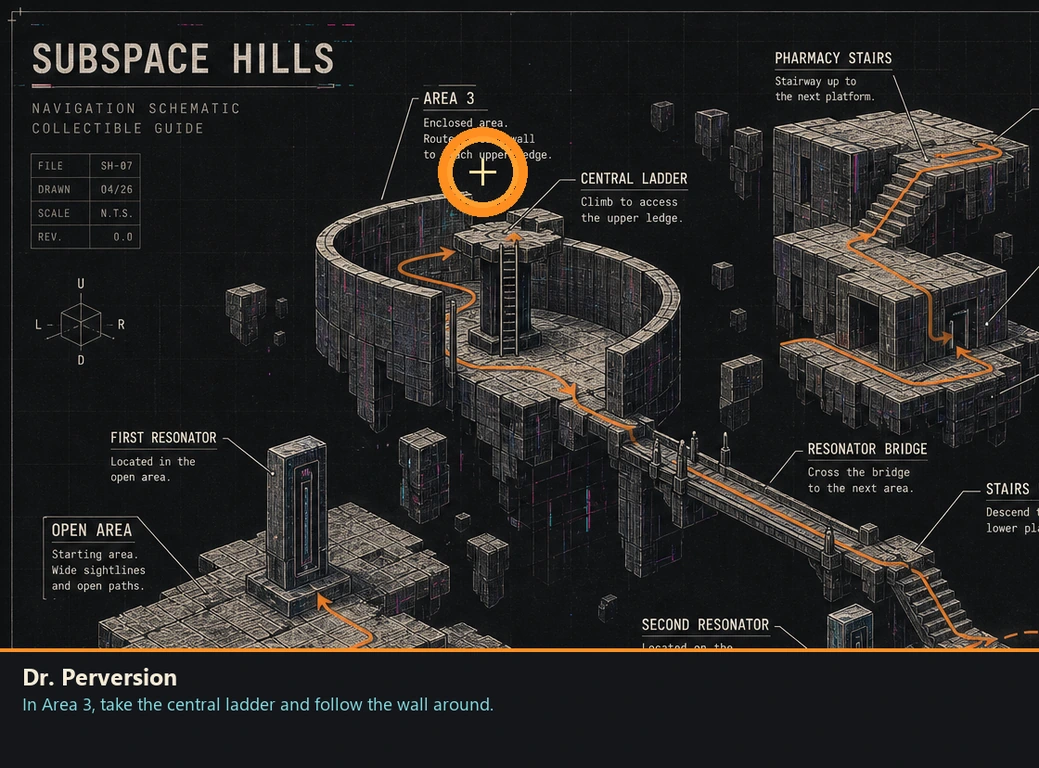
Dr. Perversion
Badge
HintA middle ladder begins a circular climb.
WhereIn Area 3, take the central ladder and follow the wall around.
Full detailFind the ladder near the middle of Area 3, climb it, and continue around the enclosing wall. Use the next climb point to reach the tesseract above.
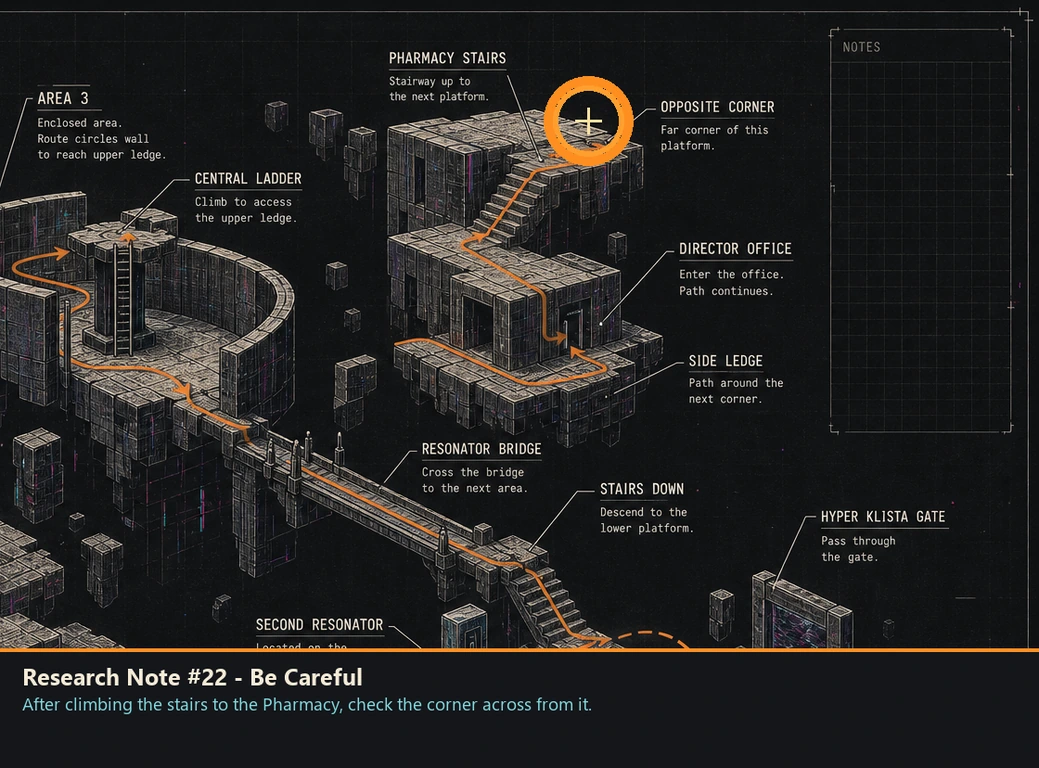
Research Note #22 - Be Careful
Research note
HintThe first stair climb has an opposite corner.
WhereAfter climbing the stairs to the Pharmacy, check the corner across from it.
Full detailClimb the stairs that lead to the Pharmacy, then cross to the opposite corner of the landing. The note lies there away from the forward doorway.
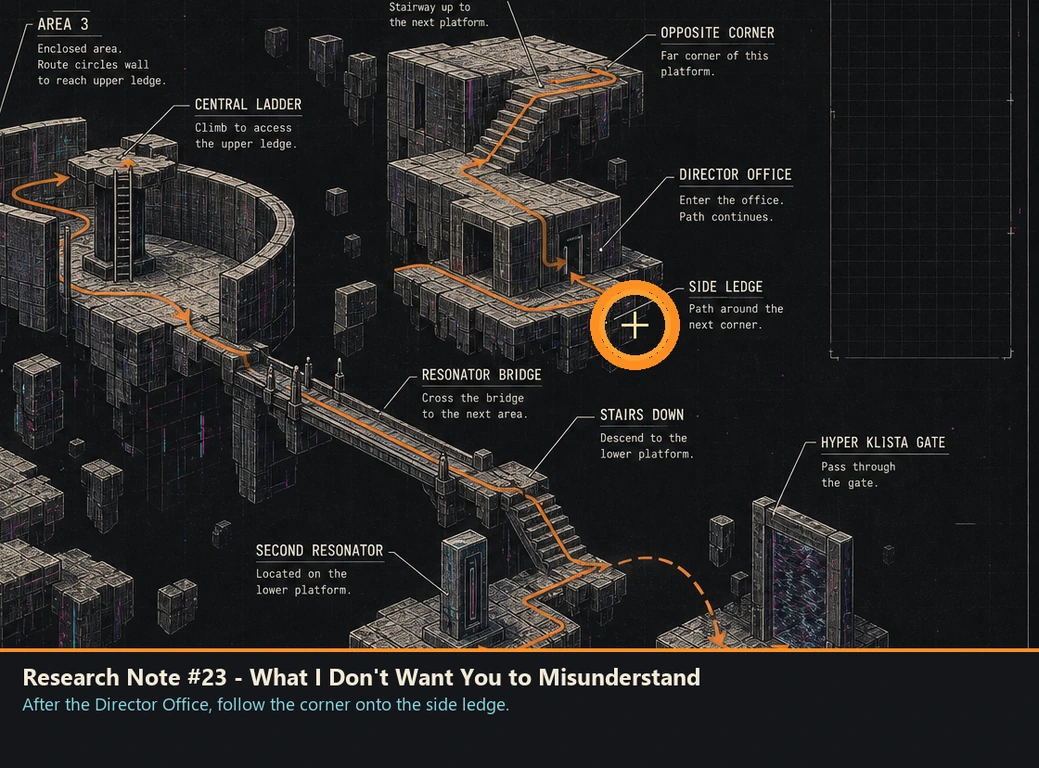
Research Note #23 - What I Don't Want You to Misunderstand
Research note
HintA named office hides a ledge route.
WhereAfter the Director Office, follow the corner onto the side ledge.
Full detailLeave the Director Office, round the next corner, and step onto the narrow side ledge. Follow it to the note instead of staying on the central path.
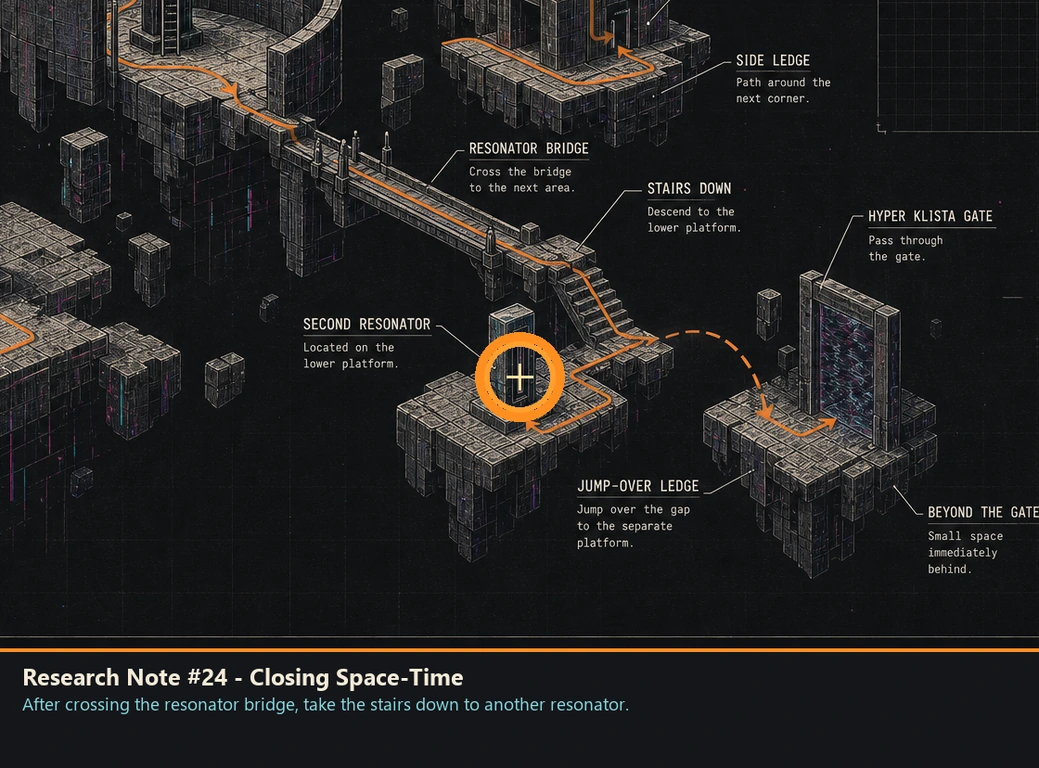
Research Note #24 - Closing Space-Time
Research note
HintA completed resonator bridge has a lower branch.
WhereAfter crossing the resonator bridge, take the stairs down to another resonator.
Full detailCross the bridge created by the resonator, descend the nearby stairs to the second resonator, then jump over the ledge beside it. Land on the separate platform holding the note.
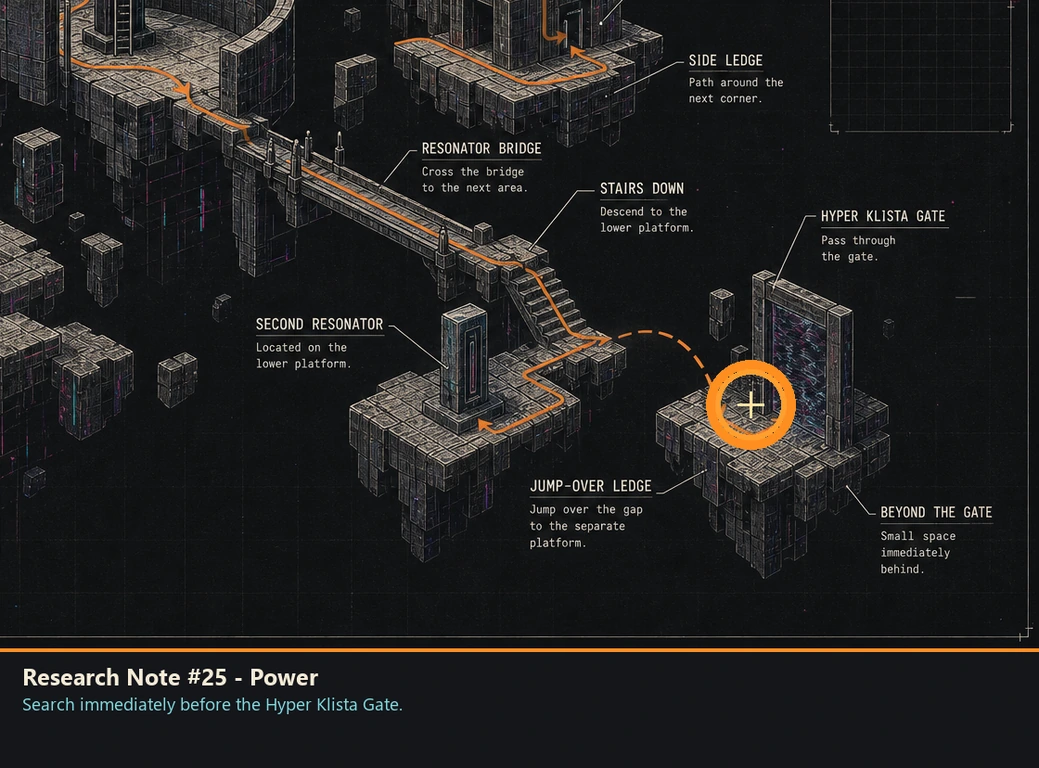
Research Note #25 - Power
Research note
HintThe large gate has a pickup before it.
WhereSearch immediately before the Hyper Klista Gate.
Full detailAs the Hyper Klista Gate comes into view, stop before crossing its threshold and collect the note from the approach.
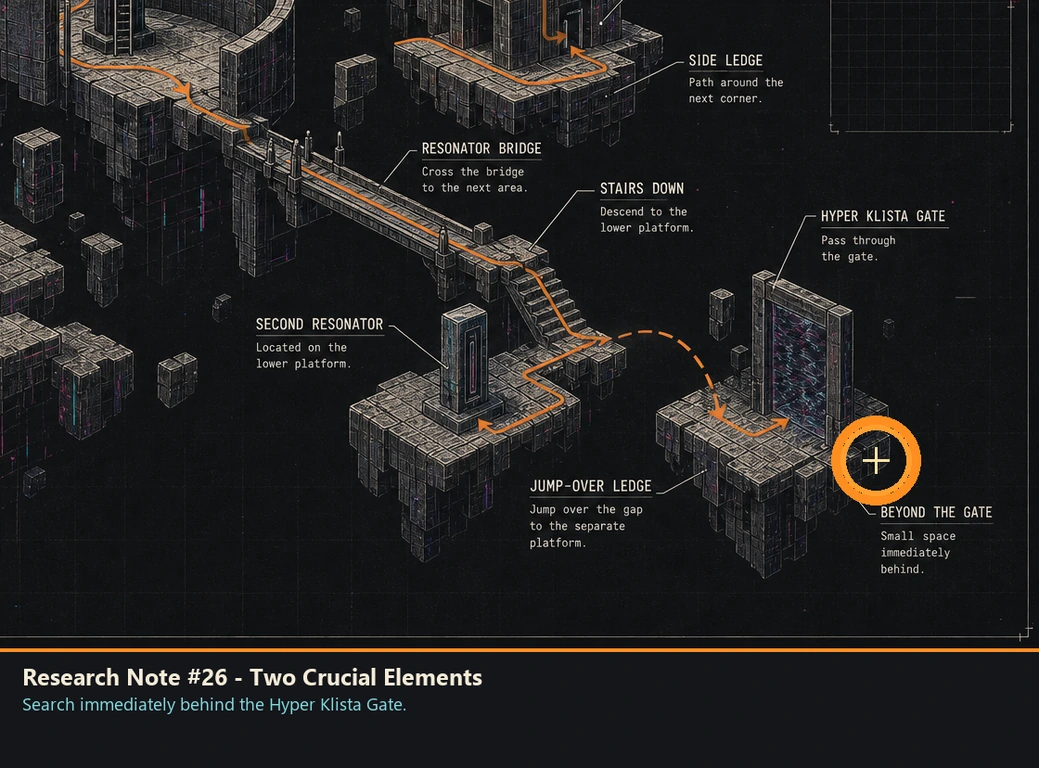
Research Note #26 - Two Crucial Elements
Research note
HintThe far side of the gate has two rewards.
WhereSearch immediately behind the Hyper Klista Gate.
Full detailPass through the Hyper Klista Gate and turn to inspect the space directly behind it. The note is beside the SilverEye badge tesseract.
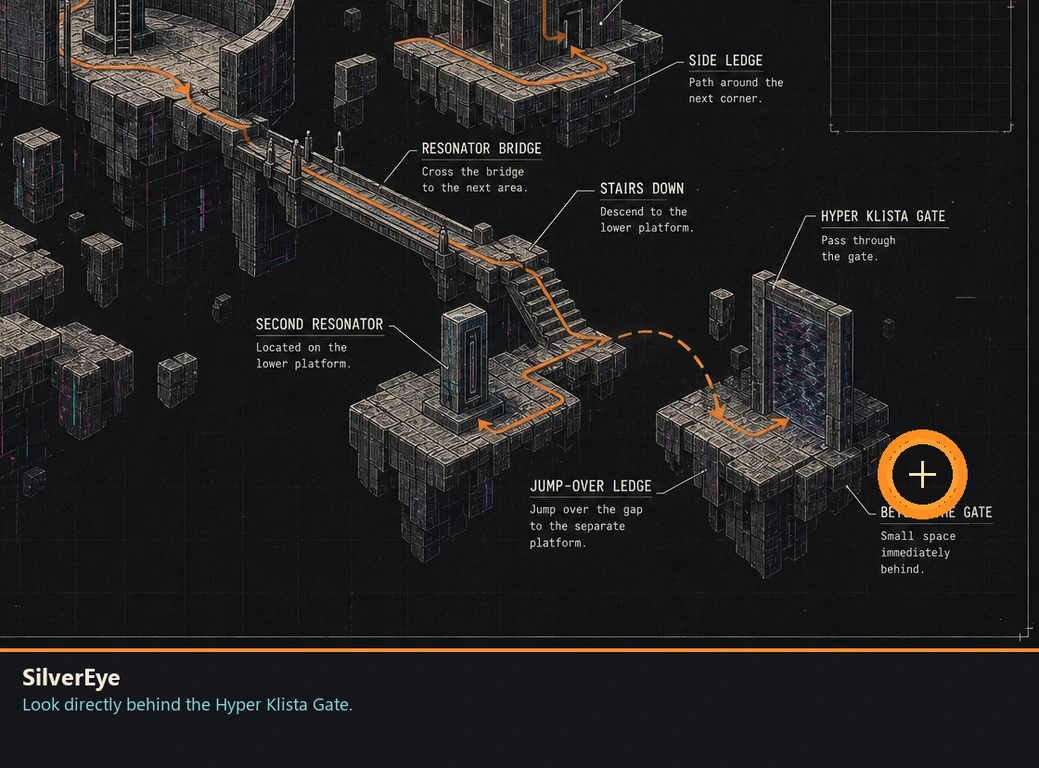
SilverEye
Badge
HintPair this search with the last research note.
WhereLook directly behind the Hyper Klista Gate.
Full detailAfter passing through the Hyper Klista Gate, turn around and activate the tesseract immediately behind it. Research Note #26 is in the same small space.
Shiroyabu Shop
You are here when: The recurring shop interface reached from the ship between deployments.
The stock expands with progress. Recheck it before and after campaign clear.
Katana Karen
Badge
HintSave some Emerald Flowsion for the shop's badge stock.
WhereBuy this badge from Shiroyabu once its midgame stock appears.
Full detailReturn to Shiroyabu after the badge section appears and purchase Katana Karen for 1,000 Emerald Flowsion. If it is absent, advance normal progress and check the shop again.
Magnum Mike
Badge
HintSave some Emerald Flowsion for the shop's badge stock.
WhereBuy this badge from Shiroyabu once its midgame stock appears.
Full detailReturn to Shiroyabu after the badge section appears and purchase Magnum Mike for 1,000 Emerald Flowsion. If it is absent, advance normal progress and check the shop again.
Bomb Betty
Badge
HintSave some Emerald Flowsion for the shop's badge stock.
WhereBuy this badge from Shiroyabu once its midgame stock appears.
Full detailReturn to Shiroyabu after the badge section appears and purchase Bomb Betty for 1,000 Emerald Flowsion. If it is absent, advance normal progress and check the shop again.
Shotgun Sharon
Badge
HintSave some Emerald Flowsion for the shop's badge stock.
WhereBuy this badge from Shiroyabu once its midgame stock appears.
Full detailReturn to Shiroyabu after the badge section appears and purchase Shotgun Sharon for 1,000 Emerald Flowsion. If it is absent, advance normal progress and check the shop again.
Fist Frankie
Badge
HintSave some Emerald Flowsion for the shop's badge stock.
WhereBuy this badge from Shiroyabu once its midgame stock appears.
Full detailReturn to Shiroyabu after the badge section appears and purchase Fist Frankie for 1,000 Emerald Flowsion. If it is absent, advance normal progress and check the shop again.
Rifle Rafael
Badge
HintSave some Emerald Flowsion for the shop's badge stock.
WhereBuy this badge from Shiroyabu once its midgame stock appears.
Full detailReturn to Shiroyabu after the badge section appears and purchase Rifle Rafael for 1,000 Emerald Flowsion. If it is absent, advance normal progress and check the shop again.
Spear Spencer
Badge
HintSave some Emerald Flowsion for the shop's badge stock.
WhereBuy this badge from Shiroyabu once its midgame stock appears.
Full detailReturn to Shiroyabu after the badge section appears and purchase Spear Spencer for 1,000 Emerald Flowsion. If it is absent, advance normal progress and check the shop again.
Bazooka Barbara
Badge
HintSave some Emerald Flowsion for the shop's badge stock.
WhereBuy this badge from Shiroyabu once its midgame stock appears.
Full detailReturn to Shiroyabu after the badge section appears and purchase Bazooka Barbara for 1,000 Emerald Flowsion. If it is absent, advance normal progress and check the shop again.
Malignant Dawn
Badge
HintThe shop keeps one unusually expensive badge.
WhereCheck Shiroyabu's later stock and prepare a large Emerald Flowsion reserve.
Full detailWhen Malignant Dawn appears in Shiroyabu's later inventory, purchase it for 100,000 Emerald Flowsion. Farm repeatable combat or cleanup routes if the balance is short.
Training Room Arsenal
You are here when: The ship room containing the DeadBall Unlocker, DeadBall Enhancer, and DeadGear Cannonball machines.
Unlock the full arsenal first, then use the adjacent machines to finish permanent upgrades.
Spazer
Weapon
HintThe Training Room machine expands both sides of the arsenal.
WherePurchase Spazer from the DeadBall Unlocker.
Full detailAt the Training Room's weapon-purchase console, spend 200 Emerald Flowsion on Spazer. It is one of the four melee weapons; confirm that its entry changes to owned.
Star Destroyer
Weapon
HintThe Training Room machine expands both sides of the arsenal.
WherePurchase Star Destroyer from the DeadBall Unlocker.
Full detailAt the Training Room's weapon-purchase console, spend 200 Emerald Flowsion on Star Destroyer. It is one of the four melee weapons; confirm that its entry changes to owned.
Juggernaut
Weapon
HintThe Training Room machine expands both sides of the arsenal.
WherePurchase Juggernaut from the DeadBall Unlocker.
Full detailAt the Training Room's weapon-purchase console, spend 200 Emerald Flowsion on Juggernaut. It is one of the four melee weapons; confirm that its entry changes to owned.
Arcadia
Weapon
HintThe Training Room machine expands both sides of the arsenal.
WherePurchase Arcadia from the DeadBall Unlocker.
Full detailAt the Training Room's weapon-purchase console, spend 200 Emerald Flowsion on Arcadia. It is one of the four melee weapons; confirm that its entry changes to owned.
Discovery
Weapon
HintThe Training Room machine expands both sides of the arsenal.
WherePurchase Discovery from the DeadBall Unlocker.
Full detailAt the Training Room's weapon-purchase console, spend 200 Emerald Flowsion on Discovery. It is one of the four ranged weapons; confirm that its entry changes to owned.
Diaspora
Weapon
HintThe Training Room machine expands both sides of the arsenal.
WherePurchase Diaspora from the DeadBall Unlocker.
Full detailAt the Training Room's weapon-purchase console, spend 200 Emerald Flowsion on Diaspora. It is one of the four ranged weapons; confirm that its entry changes to owned.
Nebuchadnezzar
Weapon
HintThe Training Room machine expands both sides of the arsenal.
WherePurchase Nebuchadnezzar from the DeadBall Unlocker.
Full detailAt the Training Room's weapon-purchase console, spend 200 Emerald Flowsion on Nebuchadnezzar. It is one of the four ranged weapons; confirm that its entry changes to owned.
Yggdrasil
Weapon
HintThe Training Room machine expands both sides of the arsenal.
WherePurchase Yggdrasil from the DeadBall Unlocker.
Full detailAt the Training Room's weapon-purchase console, spend 200 Emerald Flowsion on Yggdrasil. It is one of the four ranged weapons; confirm that its entry changes to owned.
All Weapons: Attack Power
Upgrade track
HintThe Enhancer tracks this stat separately on each weapon.
WhereRaise Attack Power through all five levels for every weapon at the DeadBall Enhancer.
Full detailAt the DeadBall Enhancer beside the Unlocker, select each of the eight weapons in turn and buy Attack Power levels one through five with Sentrey. Recheck every weapon tab; progress on one does not fill the others.
All Weapons: Break Ability
Upgrade track
HintThe Enhancer tracks this stat separately on each weapon.
WhereRaise Break Ability through all five levels for every weapon at the DeadBall Enhancer.
Full detailAt the DeadBall Enhancer beside the Unlocker, select each of the eight weapons in turn and buy Break Ability levels one through five with Sentrey. Recheck every weapon tab; progress on one does not fill the others.
All Weapons: Bloody Summer
Upgrade track
HintThe Enhancer tracks this stat separately on each weapon.
WhereRaise Bloody Summer through all five levels for every weapon at the DeadBall Enhancer.
Full detailAt the DeadBall Enhancer beside the Unlocker, select each of the eight weapons in turn and buy Bloody Summer levels one through five with Sentrey. Recheck every weapon tab; progress on one does not fill the others.
All Weapons: Blood Amount
Upgrade track
HintThe Enhancer tracks this stat separately on each weapon.
WhereRaise Blood Amount through all five levels for every weapon at the DeadBall Enhancer.
Full detailAt the DeadBall Enhancer beside the Unlocker, select each of the eight weapons in turn and buy Blood Amount levels one through five with Sentrey. Recheck every weapon tab; progress on one does not fill the others.
All Romeo Parameters
Upgrade set
HintOne Training Room machine improves the character rather than a weapon.
WhereUse the DeadGear Cannonball and fill every available parameter track.
Full detailSpend Emerald Flowsion at the DeadGear Cannonball until every character parameter offered by the machine is at its cap. Reopen the screen and verify that no purchasable level remains.
Bastard Cultivation
You are here when: The ship's cultivation and fusion interface where seeds become equippable abilities.
Keep one copy of every new seed until the full fusion chain is complete.
SuicideAttack
Ability
HintKeep cultivating and combine duplicates instead of discarding them.
WhereUse the cultivation interface to register SuicideAttack.
Full detailFuse CreepingVenom with any Common Support-type Bastard. Finish the cultivation cycle, collect the result, and confirm SuicideAttack appears in the owned roster. A drop-based seed may require repeat combat farming.
SentryCannon
Ability
HintKeep cultivating and combine duplicates instead of discarding them.
WhereUse the cultivation interface to register SentryCannon.
Full detailObtain its seed from an enemy drop, then cultivate it. Finish the cultivation cycle, collect the result, and confirm SentryCannon appears in the owned roster. A drop-based seed may require repeat combat farming.
Screamadelica
Ability
HintKeep cultivating and combine duplicates instead of discarding them.
WhereUse the cultivation interface to register Screamadelica.
Full detailObtain its seed from an enemy drop, then cultivate it. Finish the cultivation cycle, collect the result, and confirm Screamadelica appears in the owned roster. A drop-based seed may require repeat combat farming.
HealingSpire
Ability
HintKeep cultivating and combine duplicates instead of discarding them.
WhereUse the cultivation interface to register HealingSpire.
Full detailFuse SuicideAttack with any Common Technical-type Bastard. Finish the cultivation cycle, collect the result, and confirm HealingSpire appears in the owned roster. A drop-based seed may require repeat combat farming.
CreepingVenom
Ability
HintKeep cultivating and combine duplicates instead of discarding them.
WhereUse the cultivation interface to register CreepingVenom.
Full detailFuse Screamadelica with any Common Attack-type Bastard. Finish the cultivation cycle, collect the result, and confirm CreepingVenom appears in the owned roster. A drop-based seed may require repeat combat farming.
PulseMirror
Ability
HintKeep cultivating and combine duplicates instead of discarding them.
WhereUse the cultivation interface to register PulseMirror.
Full detailObtain its seed from an enemy drop, then cultivate it. Finish the cultivation cycle, collect the result, and confirm PulseMirror appears in the owned roster. A drop-based seed may require repeat combat farming.
ThunderChain
Ability
HintKeep cultivating and combine duplicates instead of discarding them.
WhereUse the cultivation interface to register ThunderChain.
Full detailFuse PulseMirror with Screamadelica. Finish the cultivation cycle, collect the result, and confirm ThunderChain appears in the owned roster. A drop-based seed may require repeat combat farming.
GreenTornado
Ability
HintKeep cultivating and combine duplicates instead of discarding them.
WhereUse the cultivation interface to register GreenTornado.
Full detailObtain its seed from an enemy drop, then cultivate it. Finish the cultivation cycle, collect the result, and confirm GreenTornado appears in the owned roster. A drop-based seed may require repeat combat farming.
ManaBloom
Ability
HintKeep cultivating and combine duplicates instead of discarding them.
WhereUse the cultivation interface to register ManaBloom.
Full detailFuse ThunderChain with PulseMirror. Finish the cultivation cycle, collect the result, and confirm ManaBloom appears in the owned roster. A drop-based seed may require repeat combat farming.
SlowBallad
Ability
HintKeep cultivating and combine duplicates instead of discarding them.
WhereUse the cultivation interface to register SlowBallad.
Full detailObtain its seed from an enemy drop, then cultivate it. Finish the cultivation cycle, collect the result, and confirm SlowBallad appears in the owned roster. A drop-based seed may require repeat combat farming.
Nosferatu
Ability
HintKeep cultivating and combine duplicates instead of discarding them.
WhereUse the cultivation interface to register Nosferatu.
Full detailFuse ManaBloom with SuicideAttack. Finish the cultivation cycle, collect the result, and confirm Nosferatu appears in the owned roster. A drop-based seed may require repeat combat farming.
StealJobs
Ability
HintKeep cultivating and combine duplicates instead of discarding them.
WhereUse the cultivation interface to register StealJobs.
Full detailObtain its seed from an enemy drop, then cultivate it. Finish the cultivation cycle, collect the result, and confirm StealJobs appears in the owned roster. A drop-based seed may require repeat combat farming.
MultiLazer
Ability
HintKeep cultivating and combine duplicates instead of discarding them.
WhereUse the cultivation interface to register MultiLazer.
Full detailFuse Nosferatu with FrostBolt. Finish the cultivation cycle, collect the result, and confirm MultiLazer appears in the owned roster. A drop-based seed may require repeat combat farming.
DeadlyBowler
Ability
HintKeep cultivating and combine duplicates instead of discarding them.
WhereUse the cultivation interface to register DeadlyBowler.
Full detailFuse WeakenFlower with PurifyingZone. Finish the cultivation cycle, collect the result, and confirm DeadlyBowler appears in the owned roster. A drop-based seed may require repeat combat farming.
FrostBolt
Ability
HintKeep cultivating and combine duplicates instead of discarding them.
WhereUse the cultivation interface to register FrostBolt.
Full detailFuse GreenTornado with StealJobs. Finish the cultivation cycle, collect the result, and confirm FrostBolt appears in the owned roster. A drop-based seed may require repeat combat farming.
PurifyingZone
Ability
HintKeep cultivating and combine duplicates instead of discarding them.
WhereUse the cultivation interface to register PurifyingZone.
Full detailFuse DeadlyBowler with SweeperBeam. Finish the cultivation cycle, collect the result, and confirm PurifyingZone appears in the owned roster. A drop-based seed may require repeat combat farming.
SweeperBeam
Ability
HintKeep cultivating and combine duplicates instead of discarding them.
WhereUse the cultivation interface to register SweeperBeam.
Full detailFuse FrostBolt with MultiLazer. Finish the cultivation cycle, collect the result, and confirm SweeperBeam appears in the owned roster. A drop-based seed may require repeat combat farming.
WeakenFlower
Ability
HintKeep cultivating and combine duplicates instead of discarding them.
WhereUse the cultivation interface to register WeakenFlower.
Full detailFuse PurifyingZone with DeadlyBowler. Finish the cultivation cycle, collect the result, and confirm WeakenFlower appears in the owned roster. A drop-based seed may require repeat combat farming.
Graha Malla
Ability
HintKeep cultivating and combine duplicates instead of discarding them.
WhereUse the cultivation interface to register Graha Malla.
Full detailFuse MultiLazer with DeadlyBowler. Finish the cultivation cycle, collect the result, and confirm Graha Malla appears in the owned roster. A drop-based seed may require repeat combat farming.
Gozu
Ability
HintKeep cultivating and combine duplicates instead of discarding them.
WhereUse the cultivation interface to register Gozu.
Full detailFuse FrostBolt with PurifyingZone. Finish the cultivation cycle, collect the result, and confirm Gozu appears in the owned roster. A drop-based seed may require repeat combat farming.
Mictlantecuhtli
Ability
HintKeep cultivating and combine duplicates instead of discarding them.
WhereUse the cultivation interface to register Mictlantecuhtli.
Full detailFuse SweeperBeam with WeakenFlower. Finish the cultivation cycle, collect the result, and confirm Mictlantecuhtli appears in the owned roster. A drop-based seed may require repeat combat farming.
Post-Clear Cleanup
You are here when: The ship hub after a clear-data save has been created, with replay terminals and New Game Plus available.
Finish free cleanup on clear data before converting a copy into New Game Plus.
Campaign Clear
Completion
HintContinue the main route until clear data is offered.
WhereComplete the required campaign route and save the resulting clear data in a fresh slot.
Full detailFinish the campaign on your chosen standard difficulty, then create clear data when prompted. Keep this slot intact: it supports post-clear cleanup, replay challenges, costume access, and New Game Plus preparation.
Couverture Chocolate Clear
Run condition
HintThe hardest setting appears only after a completed run.
WhereStart New Game Plus from copied clear data and choose Couverture Chocolate.
Full detailDuplicate the clear-data save, begin New Game Plus from the copy, select Couverture Chocolate, and complete the campaign without lowering it. Character parameters, equipment progress, and owned combat tools carry into the new cycle.
All Standard Trials
Challenge set
HintThe Z challenges depend on their ordinary counterparts.
WhereClear every ordinary Room of Trials entry at least once.
Full detailOpen the Room of Trials and work through every non-Z encounter, including Boss Rush after it unlocks. A standard clear opens its Z counterpart; confirm each ordinary entry shows a completion record.
All Palace Athene Danger Clears
Challenge set
HintThe arena remembers each danger setting separately.
WhereComplete Easy, Normal, Hard, and Very Hard at Palace Athene.
Full detailRun Palace Athene four times, selecting Easy, Normal, Hard, and Very Hard. Finish the full sequence on each setting and verify all four clear records rather than assuming the highest substitutes for the lower ones.
Clear-Data Customization
You are here when: Romeo's room on a clear-data save, where the costume menu becomes available.
These options belong to the free June 2026 PC update and are tracked as current content.
Costume Change
Feature
HintA clear-data room gains a new wardrobe interaction.
WhereLoad clear data and use the costume option in Romeo's room.
Full detailInstall the current PC update, load a completed clear-data save, enter Romeo's room, and open the newly available costume-change interface. Cycle through its categories once to register that the feature is working.
Jacket's Outfit
Costume
HintThe clear-data wardrobe includes newly added options.
WhereOpen the costume menu in Romeo's room and locate Jacket's Outfit.
Full detailOn updated PC clear data, enter Romeo's room and open Costume Change. Select the outfit category, highlight Jacket's Outfit, and equip it once to confirm it is present.
Biker's Outfit
Costume
HintThe clear-data wardrobe includes newly added options.
WhereOpen the costume menu in Romeo's room and locate Biker's Outfit.
Full detailOn updated PC clear data, enter Romeo's room and open Costume Change. Select the outfit category, highlight Biker's Outfit, and equip it once to confirm it is present.
Three Masks
Costume
HintThe clear-data wardrobe includes newly added options.
WhereOpen the costume menu in Romeo's room and locate Three Masks.
Full detailOn updated PC clear data, enter Romeo's room and open Costume Change. Select the mask set category, highlight Three Masks, and equip it once to confirm it is present.
FBI Space-Time Task Force Battle Suit
Costume
HintThe clear-data wardrobe includes newly added options.
WhereOpen the costume menu in Romeo's room and locate FBI Space-Time Task Force Battle Suit.
Full detailOn updated PC clear data, enter Romeo's room and open Costume Change. Select the jacket category, highlight FBI Space-Time Task Force Battle Suit, and equip it once to confirm it is present.
FBI Space-Time Task Force Battle Suit, No Jacket
Costume
HintThe clear-data wardrobe includes newly added options.
WhereOpen the costume menu in Romeo's room and locate FBI Space-Time Task Force Battle Suit, No Jacket.
Full detailOn updated PC clear data, enter Romeo's room and open Costume Change. Select the jacket category, highlight FBI Space-Time Task Force Battle Suit, No Jacket, and equip it once to confirm it is present.
Caliban County Sheriff Summer Uniform
Costume
HintThe clear-data wardrobe includes newly added options.
WhereOpen the costume menu in Romeo's room and locate Caliban County Sheriff Summer Uniform.
Full detailOn updated PC clear data, enter Romeo's room and open Costume Change. Select the jacket category, highlight Caliban County Sheriff Summer Uniform, and equip it once to confirm it is present.
Tiger Jacket I
Costume
HintThe clear-data wardrobe includes newly added options.
WhereOpen the costume menu in Romeo's room and locate Tiger Jacket I.
Full detailOn updated PC clear data, enter Romeo's room and open Costume Change. Select the jacket category, highlight Tiger Jacket I, and equip it once to confirm it is present.
Tiger Jacket II
Costume
HintThe clear-data wardrobe includes newly added options.
WhereOpen the costume menu in Romeo's room and locate Tiger Jacket II.
Full detailOn updated PC clear data, enter Romeo's room and open Costume Change. Select the jacket category, highlight Tiger Jacket II, and equip it once to confirm it is present.
Tiger Jacket III
Costume
HintThe clear-data wardrobe includes newly added options.
WhereOpen the costume menu in Romeo's room and locate Tiger Jacket III.
Full detailOn updated PC clear data, enter Romeo's room and open Costume Change. Select the jacket category, highlight Tiger Jacket III, and equip it once to confirm it is present.
Tiger Death Ball Jacket
Costume
HintThe clear-data wardrobe includes newly added options.
WhereOpen the costume menu in Romeo's room and locate Tiger Death Ball Jacket.
Full detailOn updated PC clear data, enter Romeo's room and open Costume Change. Select the jacket category, highlight Tiger Death Ball Jacket, and equip it once to confirm it is present.
Demon Jacket
Costume
HintThe clear-data wardrobe includes newly added options.
WhereOpen the costume menu in Romeo's room and locate Demon Jacket.
Full detailOn updated PC clear data, enter Romeo's room and open Costume Change. Select the jacket category, highlight Demon Jacket, and equip it once to confirm it is present.
Photo Mode
Feature
HintThe current update adds a separate camera tool.
WhereOpen Photo Mode from updated PC gameplay.
Full detailWith the current PC update installed, load playable clear data and invoke Photo Mode from its assigned menu or control. Confirm the camera and composition controls open normally; no image needs to be saved for guide completion.
Completion Records
You are here when: The statistics, character, and archive menus available from the ship or pause screen.
Use this as a final audit after all locations and clear-data activities are open.
All Space-Time Police Conversations
Completion record
HintTalk around the ship between deployments.
WhereSpeak with every Space-Time Police member available in the hub.
Full detailMake a full circuit of the ship and speak to all ten Space-Time Police members. Revisit the hub after progress changes if any conversation does not register, then confirm the record reaches its cap.
WorstPink Quiz
Completion record
HintA long quiz expects complete participation.
WhereFinish all questions in the WorstPink quiz activity.
Full detailOpen WorstPink and answer its full set of ninety-nine questions. Use retries for missed answers and continue until the activity records the entire set as completed.
Space Debris Collection Record
Completion record
HintKeep collecting debris during every deployment.
WhereRaise the space-debris statistic to 1,000.
Full detailCollect space debris from exploration and repeatable routes until the Records menu shows 1,000. Check the counter periodically so you can stop farming at the exact requirement.
Status-Ailment Records
Completion record
HintLet the combat archive observe every condition.
WhereFill every status-effect entry in the records menu.
Full detailReview the status section, identify every blank entry, and deliberately encounter or apply each missing condition in replayable combat. Verify every row has registered before leaving cleanup.
Weak-Spot Records
Completion record
HintTargeted damage feeds its own completion record.
WhereRegister every enemy weak-spot entry.
Full detailInspect the enemy archive for blank weak-spot records, replay suitable encounters, expose the relevant target, and hit it at least once. Repeat until every enemy entry with a weak spot is filled.
Enemy Archive
Completion record
HintRepeatable combat can fill any remaining gaps.
WhereComplete every enemy entry in the records menu.
Full detailOpen the enemy archive after campaign clear and locate any blank silhouettes or incomplete observations. Replay the associated deployment or trial and defeat that enemy until its record is complete.
Weapon Combat Records
Completion record
HintUse every weapon rather than merely owning it.
WhereFill each weapon's usage and finishing records.
Full detailEquip every melee and ranged weapon in turn, perform its ordinary strings and Bloody Summer action, and use it for combat finishes. Recheck the Records menu and repeat any weapon whose rows remain blank.
Bastard Combat Records
Completion record
HintOwned abilities still need field use.
WhereDeploy every Bastard at least once in combat.
Full detailEquip each owned Bastard, enter a replayable encounter, activate it successfully, and finish the encounter or reach a checkpoint. Cycle through the roster until every ability has a usage record.
Open the spoiler-free interactive guide
Part of the 100% guide collection at
samimirash.com/guides.